For instance, MyCompany could have the subscription named "mycompany.trustelem.com".
The list of admins provided will be automatically provisioned when the subscription is created. They will receive an email with : - A link to initialize the account - The subscription admin url (admin-your\_name.trustelem.com) for WALLIX ONE IDaaS - The subscription user url (your\_name.trustelem.com) for WALLIX ONE IDaaS - The link to the documentation So, your first action as an administrator is to create your account using the link provided in the email, and then to go on the WALLIX ONE IDaaS administration page. #### 2/ Setup WALLIX ONE IDaaS When you log on to the admin page, the subscription is empty, except for the first administrators. So you'll need to configure it. There are 3 main things to do on WALLIX ONE IDaaS: - Add Enterprise Vault applications - Add users - Give users access to Enterprise Vault ##### 2.1/ Add Enterprise Vault applications There are two applications to add: - One for administrators, which includes auditing, logs and security policies. [Link to Enterprise Vault admin app documentation](https://vault-doc.wallix.com/books/enterprise-vault-administration/page/administration-application) - The other for users, in which secrets are managed, as well as a few administrative tasks such as recovery. Go to **Apps**, then **Add an application**, then select **WALLIX Enterprise Vault** and **WALLIX Enterprise Vault administration**. [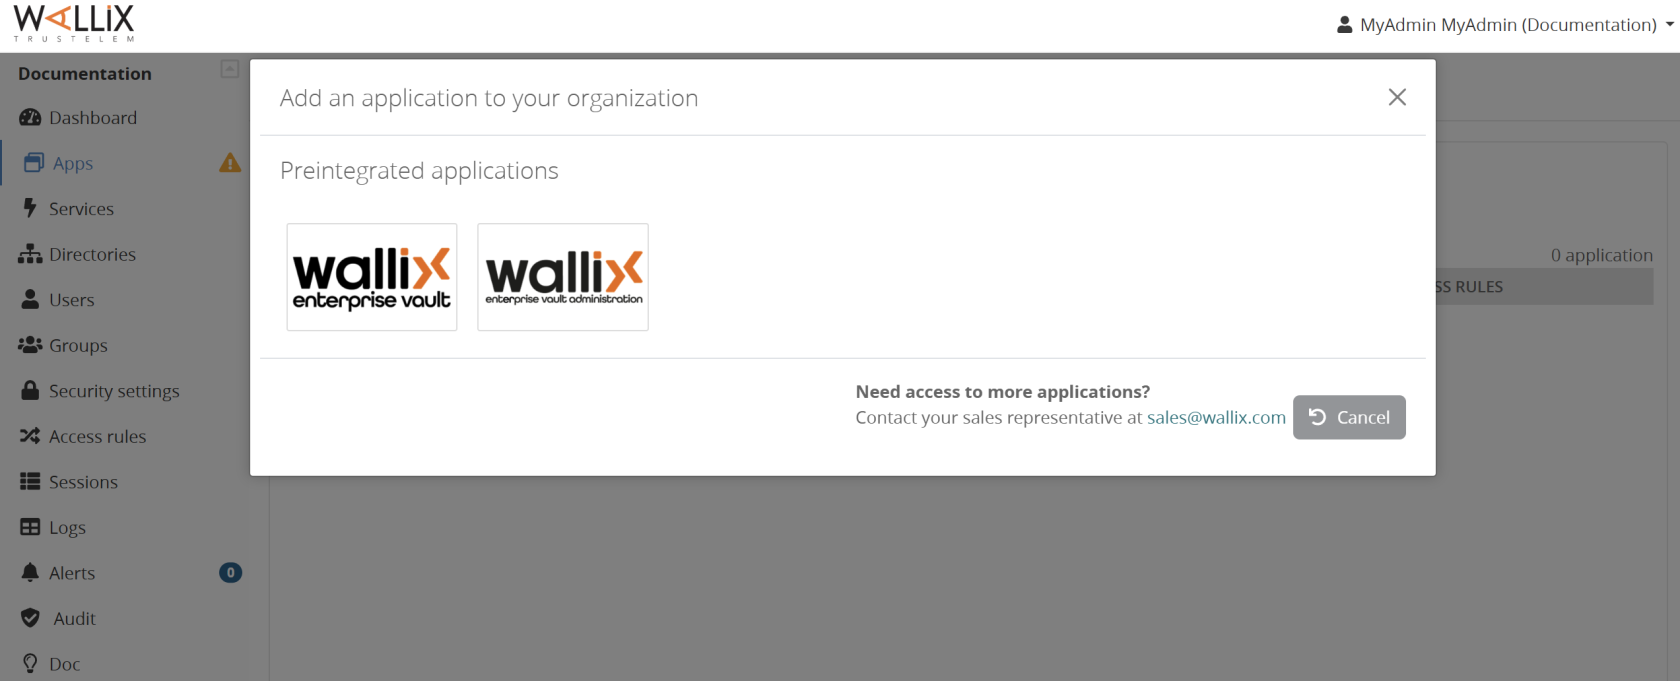](https://vault-doc.wallix.com/uploads/images/gallery/2025-01/2025-vault-2.png) ##### 2.2/ Add users If you want to use directory or IDP users, you can do the following setup. - [Link to Active Directory documentation](https://trustelem-doc.wallix.com/books/trustelem-administration/page/active-directory-users-trustelem-adconnect) - [Link to Azure AD documentation](https://trustelem-doc.wallix.com/books/trustelem-administration/page/azure-ad-users) - [Link to External IDP (Azure, Okta...) documentation](https://trustelem-doc.wallix.com/books/trustelem-administration/page/authentication-with-an-external-idp) But if you want to use local users, you don't want to create them right away: they'll receive enrollment emails, while the rest of the setup isn't ready yet. That said, you can still create user groups, as they will be used for the next steps. For instance, you can create a "Users" group, and an "Admins" group. Go to **Groups**, then **Create**. [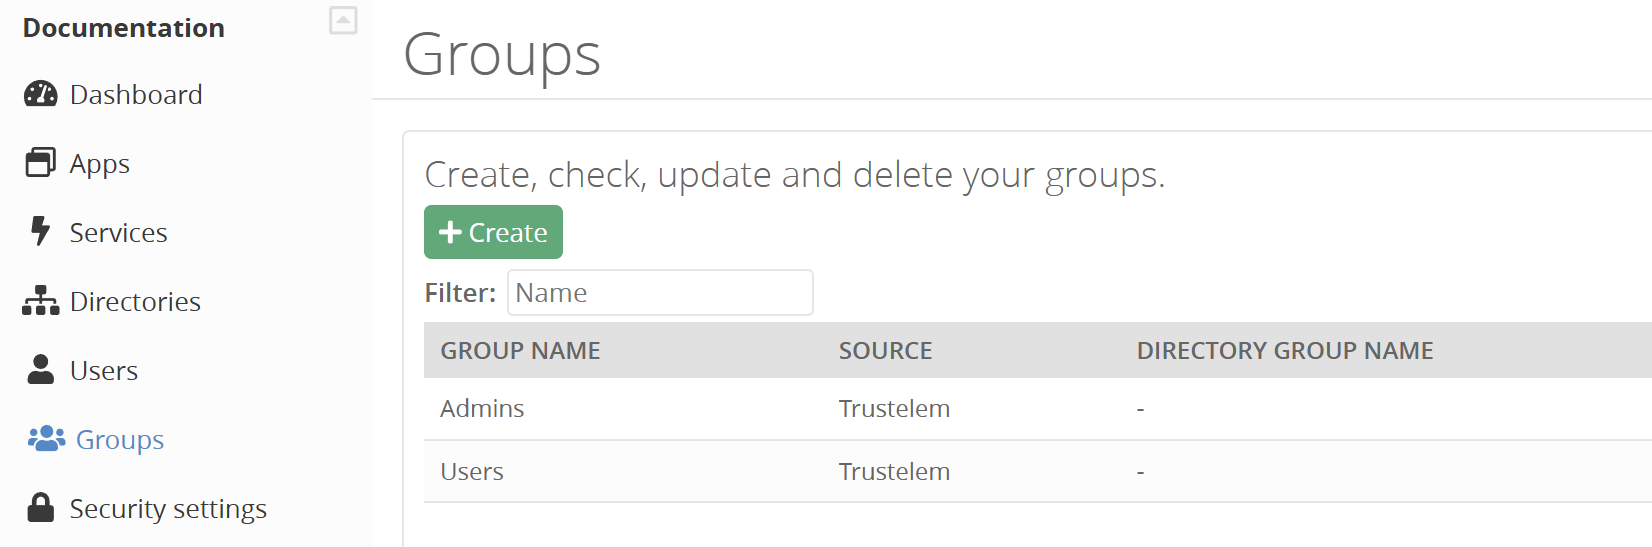](https://vault-doc.wallix.com/uploads/images/gallery/2025-01/2025-vault-3.png) ##### 2.3/ Give users access to Enterprise Vault You need to define who can access Enterprise Vault and how. To do this, you'll add permissions. Permissions can be 1-factor, usually login and password, or two-factor with an additional secret. Full documentation is available here: - [Link to access rules documentation](https://trustelem-doc.wallix.com/books/trustelem-administration/page/access-rules) - [Link to multi factors documentation](https://trustelem-doc.wallix.com/books/trustelem-administration/page/multi-factors-authentication) Here's a summary of the main steps: 1. Create permissions for users and administrators, usually in 2-factor mode. Go to **Access rules**, select **Create**, then choose your apps et your groups [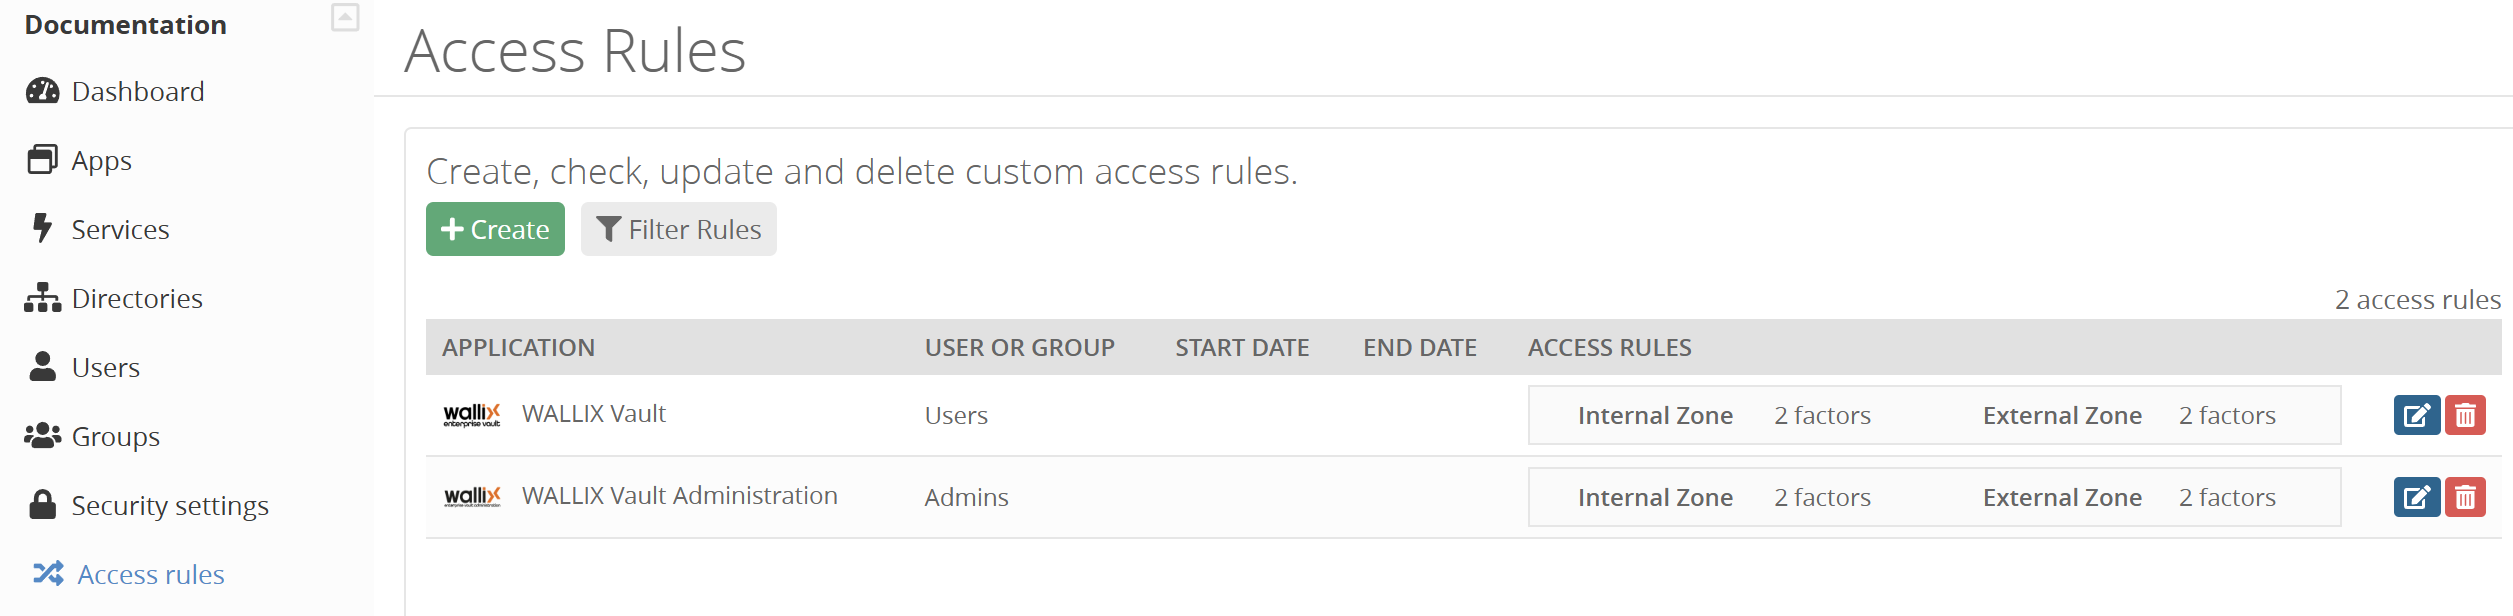](https://vault-doc.wallix.com/uploads/images/gallery/2025-01/2025-vault-4.png) *Internal & External zone depend of the users public IP which is compared to what is provided in Security > General > Internal network.* 2. Enable the desired multi-factors in **Security**, **Authentication factors**, **Login** column [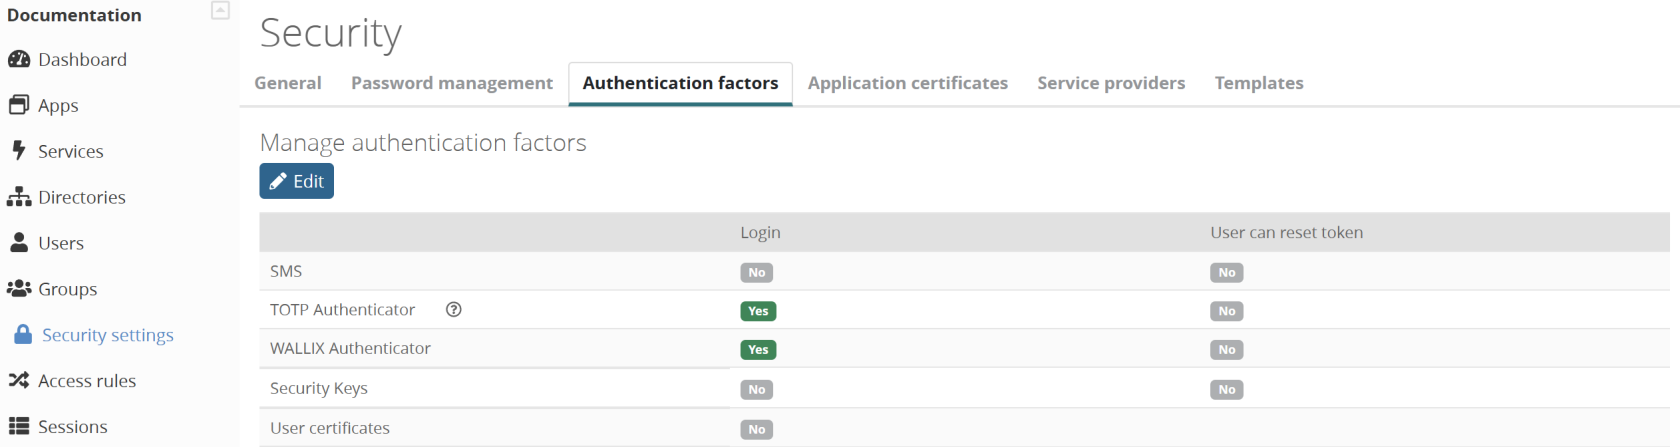](https://vault-doc.wallix.com/uploads/images/gallery/2025-01/LWwimage.png) 3. In the same page, create an **enrollment campaign** to automate the 2nd factor enrollment [](https://vault-doc.wallix.com/uploads/images/gallery/2025-01/M7bimage.png) *You'll probably want to use "enrollment during login", which allows the form to be displayed directly after authentication if the user doesn't yet have a 2nd factor.* #### 3/ Setup Enterprise Vault admin application The next step is to define Enterprise Vault administration policies. [Link to Enterprise Vault admin app documentation](https://vault-doc.wallix.com/books/enterprise-vault-administration/page/administration-application) Today there are 3 policies: - **Log**: which information do you want to log? - **Recovery**: do you allow master password reset ? Do you allow data recovery? - **Security**: do you allow to list existing users in the forms that offer it in the user application? If you want to use Recovery features, it is very important to enable it right now. Indeed, if a user hasn't logged in AFTER you've activated the option, it won't be possible to help him if he loses his master password. 1. Go to your **user dashboard** (your\_name.trustelem.com) with an account that has access to the admin app 2. Click the **Admin app** 3. Go to **Settings** 4. Enable the desired settings, then **Save** each categories [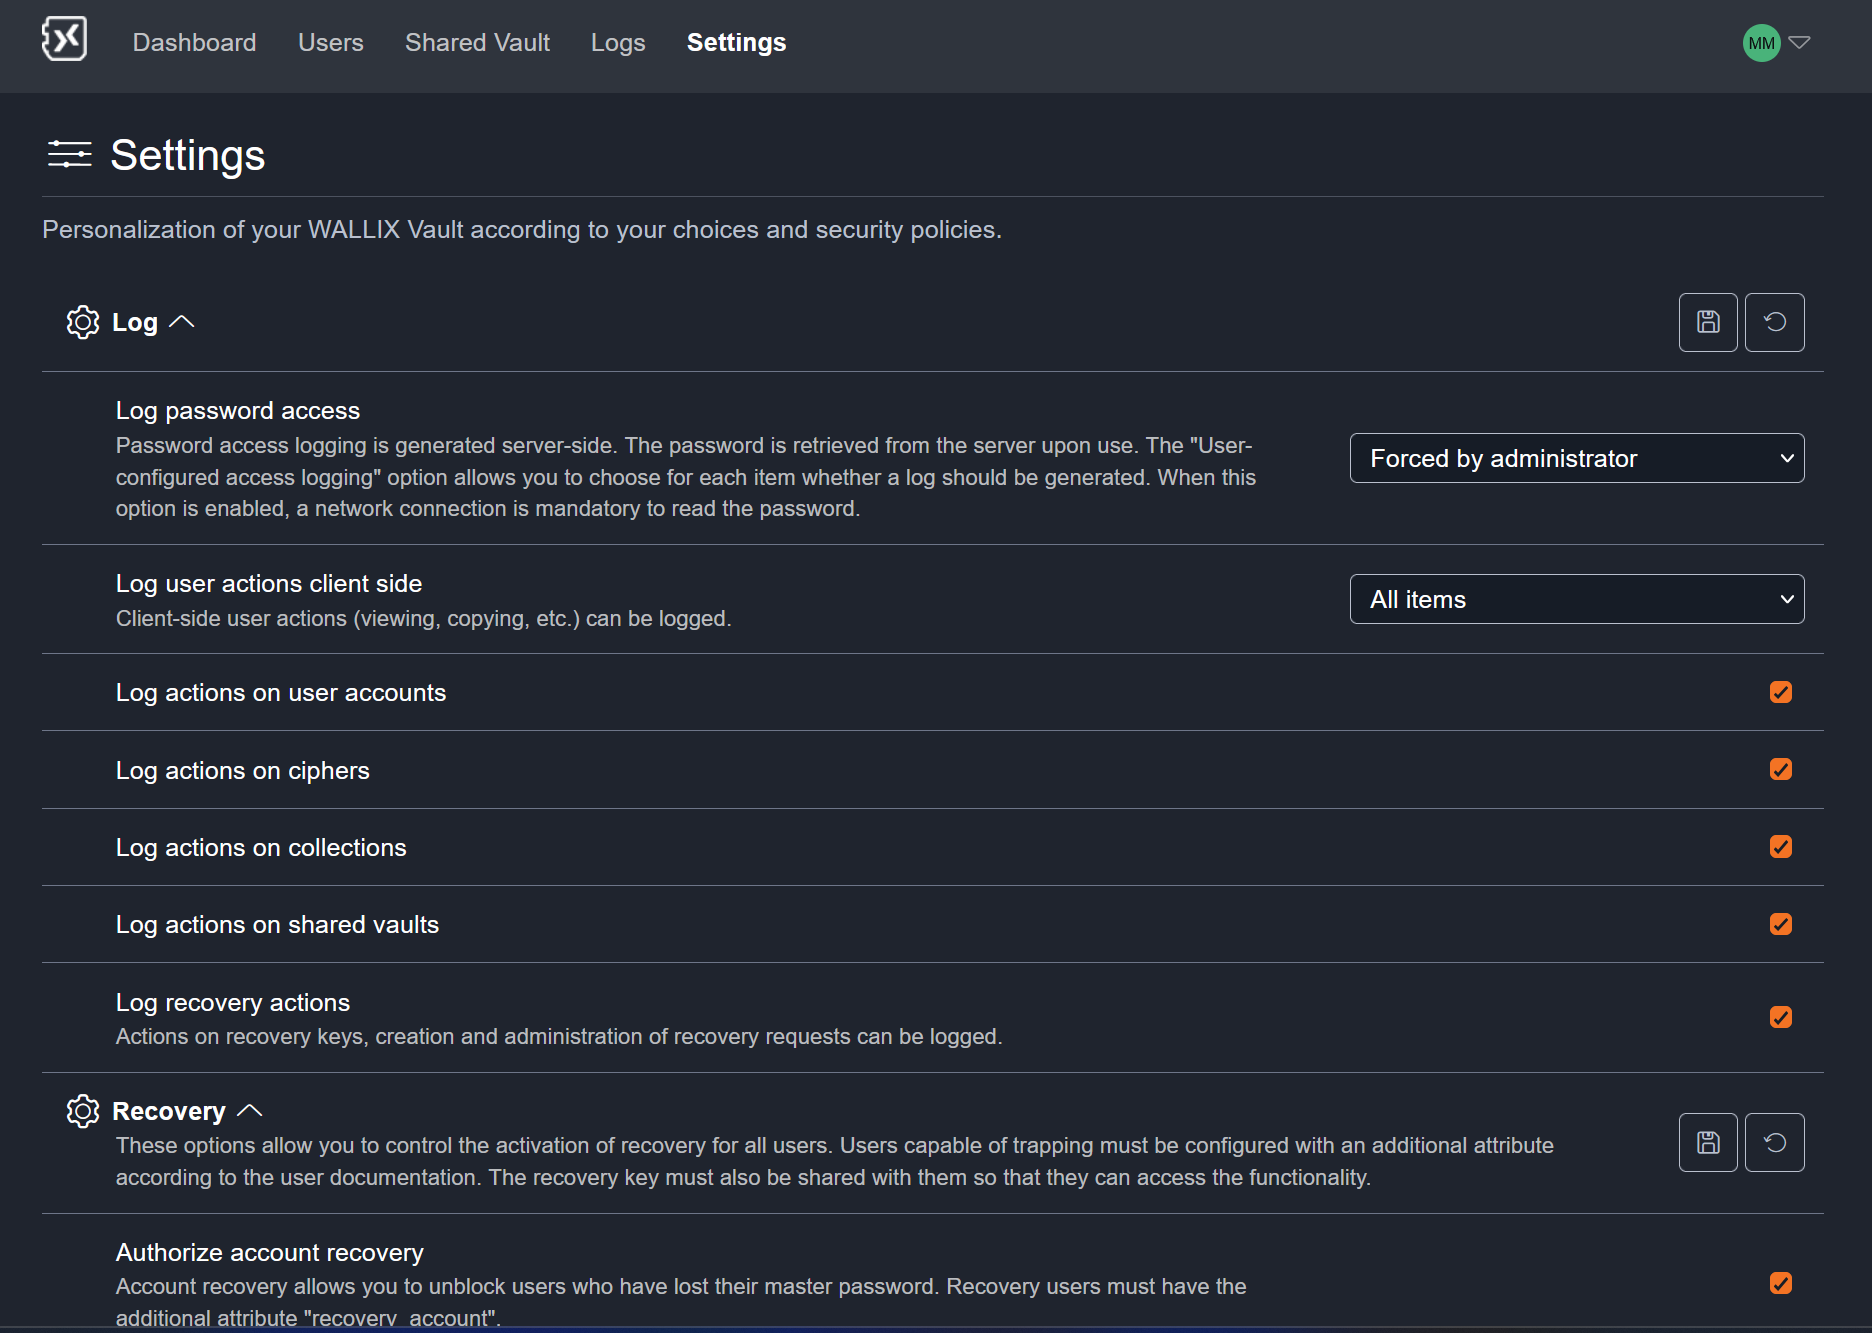](https://vault-doc.wallix.com/uploads/images/gallery/2025-01/tQNimage.png) #### 4/ Add the Enterprise Vault specific recovery rights for userThis step is only necessary if you want to use recovery.
There are 2 types of recovery: - Account recovery, to manage master password reset requests [Link for account recovery documentation](https://vault-doc.wallix.com/books/enterprise-vault-administration/page/recovery-account) - Data recovery, to access a user's personal secrets. [Link for data recovery documentation](https://vault-doc.wallix.com/books/enterprise-vault-administration/page/recovery-data) Each requires specific rights, which are controlled by WALLIX ONE IDaaS. To carry out a data recovery action, a validation is required, with a quorum to be reached. Defining quorum members also requires a specific right. 1. Go to WALLIX ONE IDaaS admin dashboard, then click **Users** 2. Select a User, click **Edit** and **Add attribute** 3. For recovery account: **name**: recovery\_account **kind**: bool **value**: true 4. For recovery data: **name**: recovery\_data **kind**: bool **value**: true 5. For recovery data quorum: **name**: recovery\_data\_workflow **kind**: bool **value**: true [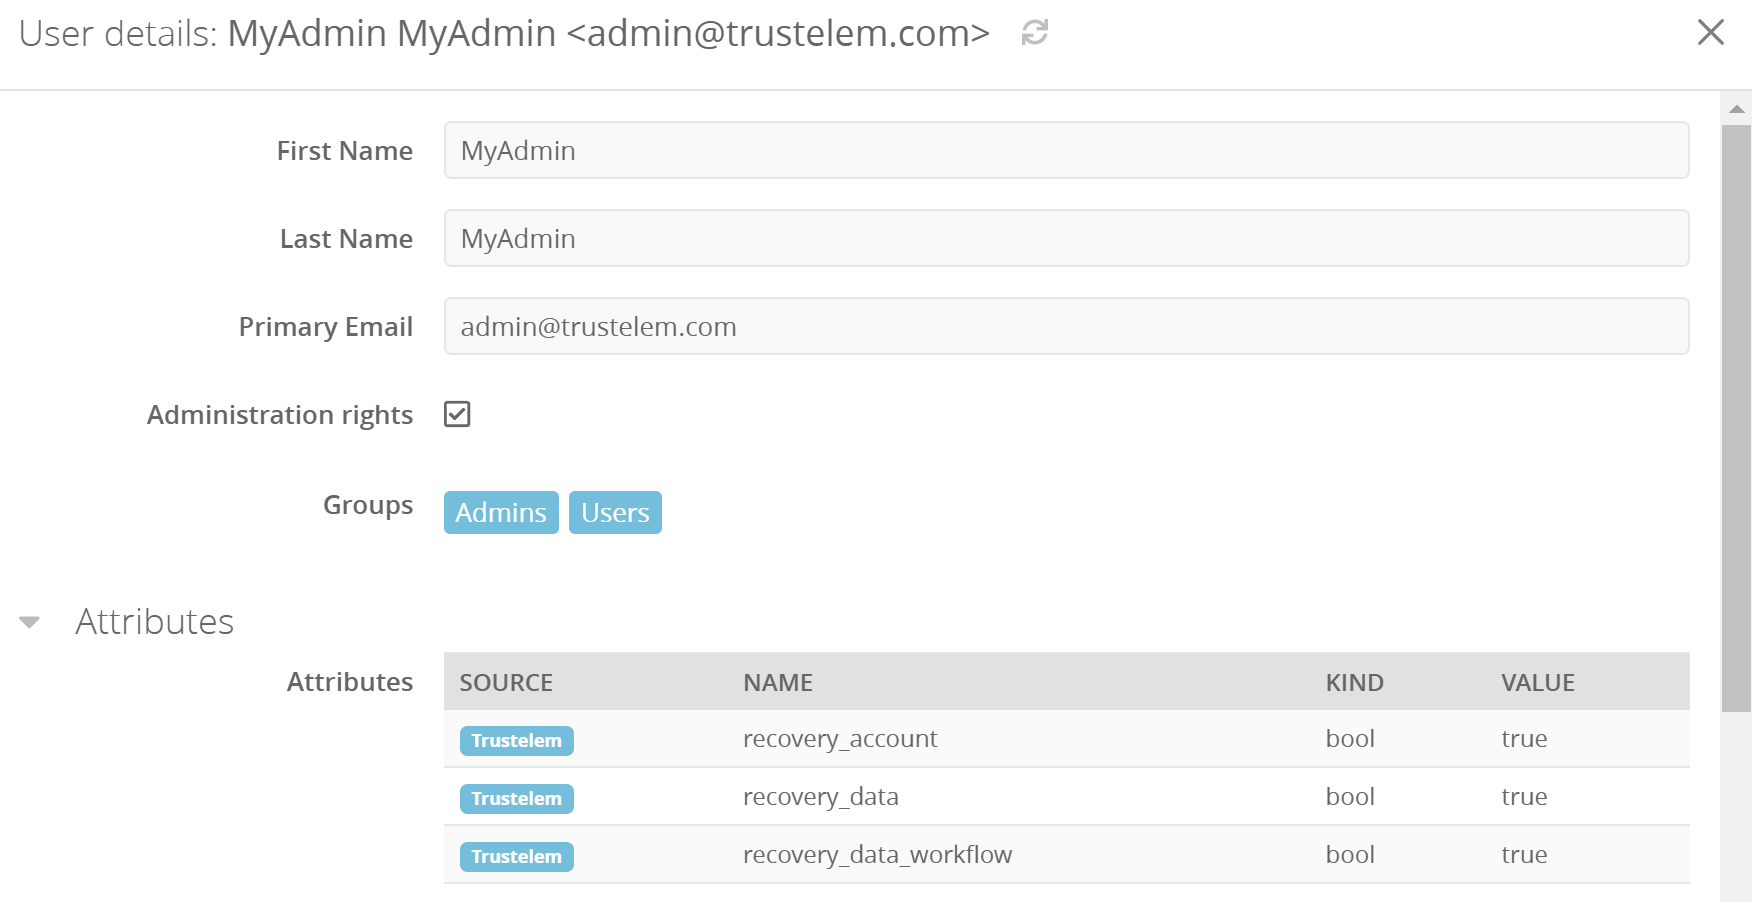](https://vault-doc.wallix.com/uploads/images/gallery/2025-01/uq9image.png) *Of course, recovery\_data and recovery\_data\_workflow should never be assigned to the same person.*The first user with data/account recovery rights will automatically have the encryption keys needed for these operations. However, this will not be the case for subsequent administrators. The first admin will have to share these keys via the recovery key sharing page on the user application. (Settings > Recovery keys > Activate access)
#### Notes - WALLIX ONE IDaaS administration page should always be secured using multi-factor authentication. To do so you need to enroll a 2nd factor for the admin accounts, then enable multi-factor using the option **Authentication level for Trustelem admin console** on **Security settings** > **General**. - More information about WALLIX ONE IDaaS is available here: [https://trustelem-doc.wallix.com/books/trustelem-administration](https://trustelem-doc.wallix.com/books/trustelem-administration)Now you're all set, you can create local users if you need to, and communicate about the availability of this new application.
### RUN Once Enterprise Vault is up and running, here's a list of the most important things administrators can do. #### WALLIX ONE IDaaS - **Add / edit / delete users** \- Change a user email on WALLIX ONE IDaaS will also change the email on Enterprise Vault. \- Deleting a user from WALLIX ONE IDaaS does not delete him from Enterprise Vault, but he will no longer be able to authenticate there. \- Re-creating a user identical to the one deleted will not allow data recovery from Enterprise Vault either: the 2 users will have different IDs. If you need to restore a user, you should use the **Display recently deleted users** option in the User list. - **Unblocking a user** A user may have lost his first or second factor. In both cases, you can unblock the user by clicking on his profile in the User list. - **Add or remove Enterprise Vault rights to users** As explained above, on WALLIX ONE IDaaS you define the Enterprise Vault user rights: recovery\_account, recovery\_data or recovery\_data\_workflow. - **View logs** On WALLIX ONE IDaaS, you can view all authentication-related information: when, who, what, how, from which IP, with which browser… #### WALLIX Enterprise Vault admin app [Link to Enterprise Vault admin app documentation](https://vault-doc.wallix.com/books/enterprise-vault-administration/page/administration-application) - **Audit Enterprise Vault usage** You can see how your users use the product via the Dashboard, Users and Shared Vault tabs. - **Delete a user** In the Users tab, you can delete a user with his or her personal vault. - **Force a change of master password or user encryption key** In the Users tab, you can force specific users to change their master password, with or without renewing their encryption keys. - **Delete a shared vault** In the Shared Vault tab, you can delete a shared vault with all its objects. - **View logs** In the Logs tab, you can audit all Enterprise Vault logged actions. What is logged is defined in the log policy. - **Change policies** In the Settings tab, you can modify your policies, particularly for recovery and logs. #### WALLIX Enterprise Vault user app - **Validate a master password reset request** If a user has lost his master password and wishes to reset it, you must validate the request. [Link for account recovery documentation](https://vault-doc.wallix.com/books/enterprise-vault-administration/page/recovery-account) - **Request access to a user's personal vault** If you wish to retrieve a secret that is no longer accessible due to the unavailability of its owner, you must make the request. Secrets will be accessible after approval by a quorum. [Link for data recovery documentation](https://vault-doc.wallix.com/books/enterprise-vault-administration/page/recovery-data) - **Share recovery keys with a new admin** When a new admin has the recovery rights on WALLIX ONE IDaaS (recovery\_data or recovery\_account) it is not sufficient to perform recovery tasks. Indeed, another admin with access to the recovery keys must share them with the new admin first (Enterprise Vault user app > Settings > Recovery keys > Activate access). [Link for data recovery documentation](https://vault-doc.wallix.com/books/enterprise-vault-administration/page/recovery-data) or [Link for account recovery documentation](https://vault-doc.wallix.com/books/enterprise-vault-administration/page/recovery-account) # Administration application The Enterprise Vault admin application is dedicated to 5 usages : - See Enterprise Vault usage - Watch Enterprise Vault logs - Define Enterprise Vault policies - Manage Enterprise Vault existing users - Manage Enterprise Vault existing shared vault Do do so, you'll find 4 menus: - **Dashboard**: a general overview of the existing vaults, with the clients used to access the secrets - **Users**: information about the existing users (dates, vaults…) - **Shared** Vault: information about the existing shared vault - **Logs**: information about what happens on Enterprise Vault - **Settings**: the global settings for Enterprise Vault [](https://vault-doc.wallix.com/uploads/images/gallery/2025-01/O5Simage.png) ### Dashboard The dashboard tab displays a summary of the contents as well as the client interfaces used to access it. [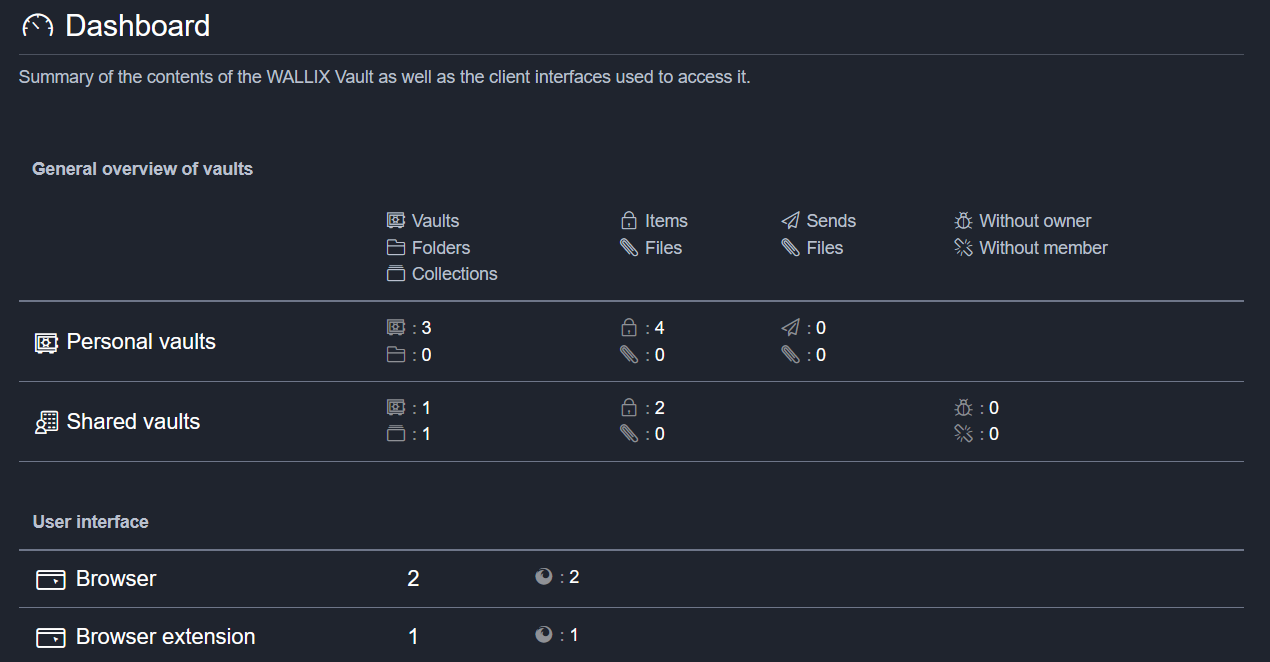](https://vault-doc.wallix.com/uploads/images/gallery/2025-01/dutimage.png) This page gives a quick overview of Enterprise Vault adoption in your company. Among other things, you can see: - Number of users (Personnal vaults > Vaults) - Number of personal secrets (Personnal vaults > Items) - Number of shared vaults (Shared vaults > Vaults) - Number of shared secrets (Shared Vaults > Items) - Type of client used (User interface)There is one clickable information: the icon at the end of the user interface lines. It gives details of the software used per user.
### Users The Users tab displays a list of WALLIX Enterprise Vault users. Users with anomalies are displayed in red. [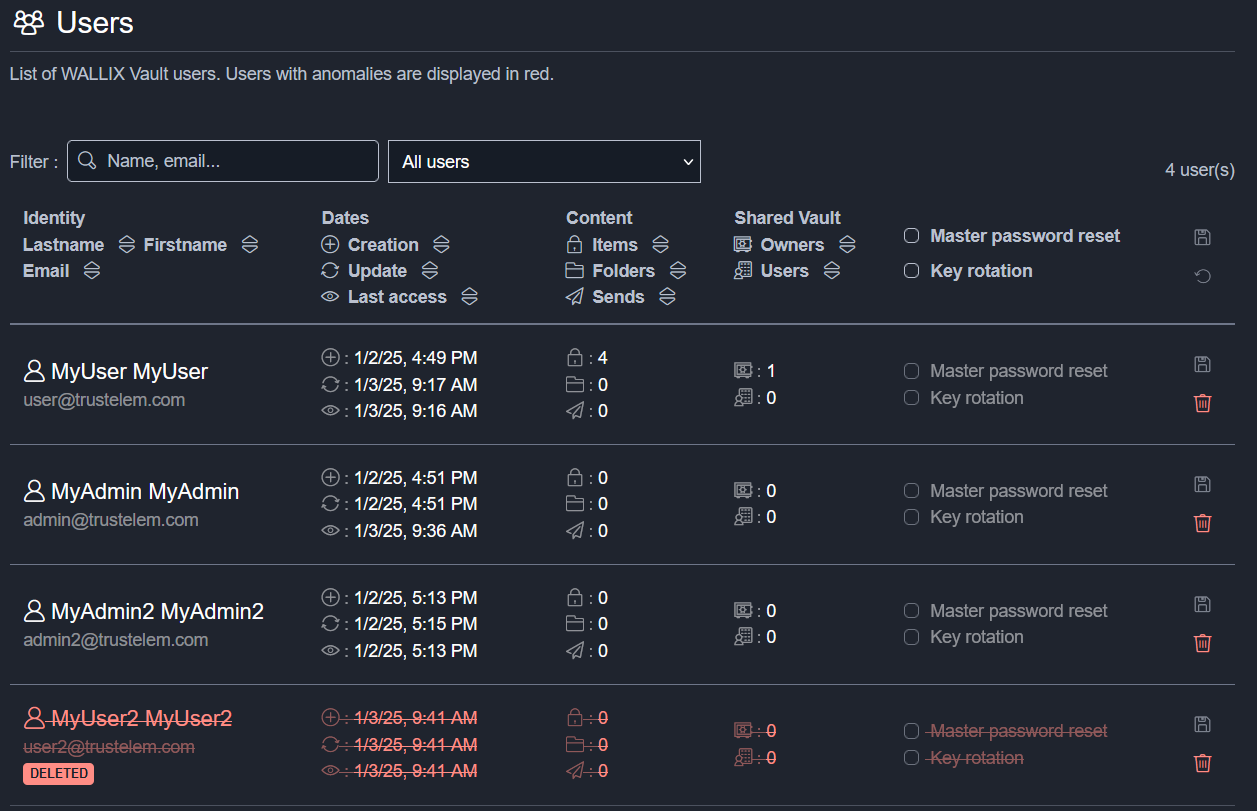](https://vault-doc.wallix.com/uploads/images/gallery/2025-01/TUAimage.png) This page shows, user by user: - Creation, update and last access dates - The number of personal secrets, as well as the number of personal folders and the number of existing sends - The number of shared vaults where the user is owner or user In addition, for each user it is possible to: - Force a master password reset. In this case, the user must enter his old master password, then a new one. - Force rotation of the user main encryption key, in addition to the master password reset. - Delete the users and its secrets.A user deleted on Enterprise Vault still exists on WALLIX ONE IDaaS.
Certain scenarios prevent the user from being deleted: for example, if the user is the only owner of the recovery key, or the only owner of a shared vault with members.
A user displayed in red has been deleted on the WALLIX ONE IDaaS side. But the user still exists on Enterprise Vault. It is not possible to automate the user deletion on Enterprise Vault from WALLIX ONE IDaaS. ### Shared Vault The Shared Vault tab displays a list of vaults shared by WALLIX Enterprise Vault users. [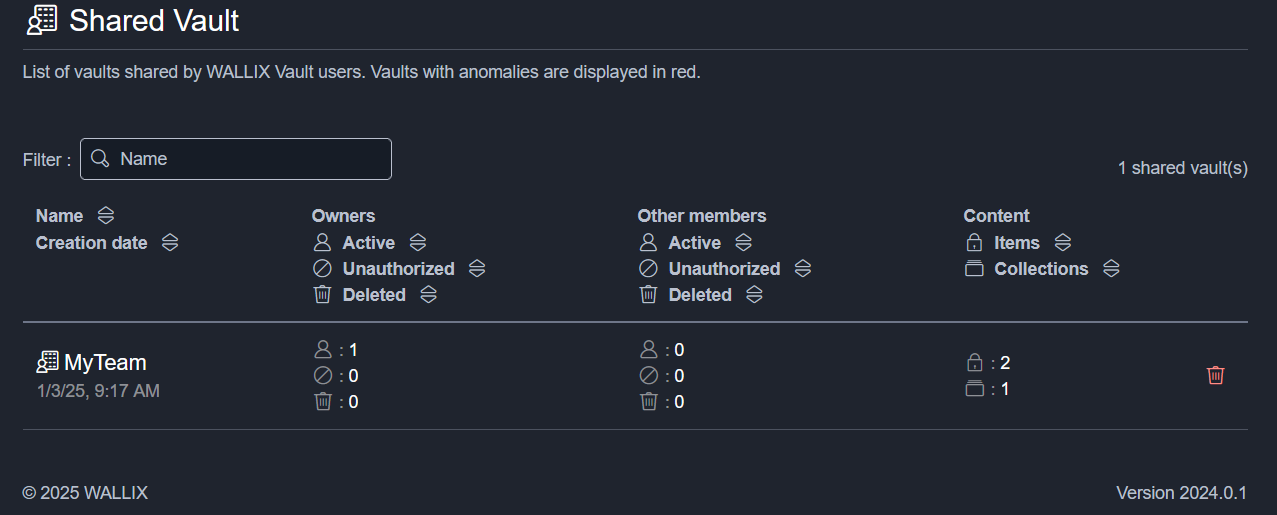](https://vault-doc.wallix.com/uploads/images/gallery/2025-01/BbKimage.png) This page shows, vault by vault: - The creation date - The active, unauthorized, deleted owners of the vault - The active, unauthorized, deleted users of the vault - The item and collection number In addition, for each vault it is possible to delete the vault.All owner/other member fields (active/unauthorized/deleted) are clickable, giving details of the users concerned.
### Logs The Logs tab displays the logs of actions performed and items viewed [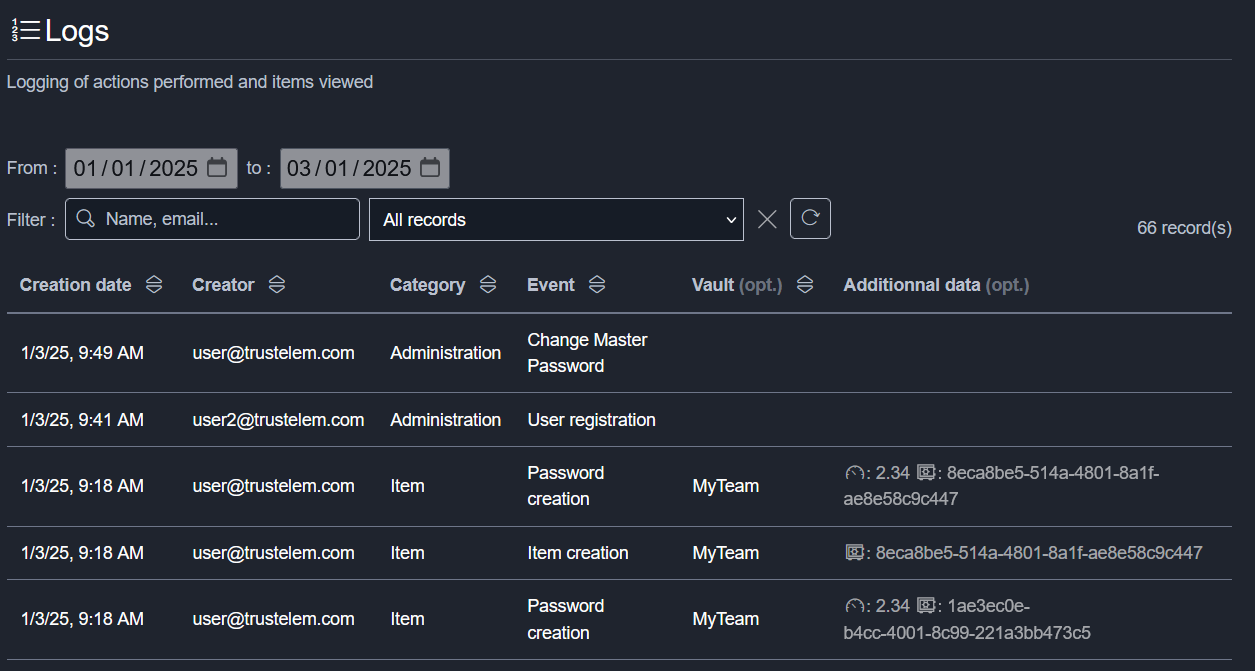](https://vault-doc.wallix.com/uploads/images/gallery/2025-01/YXaimage.png) This page shows: - The creation date - The user who performed the action - Action category (administration, item, collection, shared vault, domain, recovery) - Event corresponding to the action (User registration, Item creation, Item access...) - The name of the shared vault associated with the item, if the action is relevant - Additional data, such as the strength of the password created, or the IDs of objects affected by the action There are 3 types of filters for searching logs, which can be combined: - A **text** field, allowing you to enter any information you wish to search for on the page - A **records** field, for filtering by category or event - A **date** field, allowing you to select the range over which you wish to examine the logs.At present, it is not possible to extract logs (export or link with SIEM).
### Settings The Settings tab allows the personnalisation of WALLIX Enterprise Vault according to your choices and security policies. [](https://vault-doc.wallix.com/uploads/images/gallery/2025-01/tQNimage.png) Today there are 3 policies: - **Log**: which information do you want to log? - **Recovery**: do you allow master password reset ? Do you allow data recovery? - **Security**: do you allow to list existing users in the forms that offer it in the user application? #### Log - **Log password acces**s: define if password access are logged or notIf password access are logged, it is not possible anymore to have an offline access
- **Log user actions client side**: define if actions done on user client (browser/plugin...) are logged - **Log actions on user accounts**: define if actions related to accounts (creation, deletion...) are logged - **Log actions on ciphers**: define if actions related to encryption keys (creation, rotation...) are logged - **Log actions on collections**: define if actions related to shared vault collections (creation, deletion...) are logged - **Log actions on shared vaults**: define if actions related to share vaults (creation, changes, deletion...) are logged - **Log recovery actions**: define if recovery actions (requests, validation, quorum...) are logged #### Recovery - **Authorize account recovery**: define if users can ask for a master password reset or not - **Account recovery request timeout**: define the maximum validity period of a master password reset request - **Authorize data recovery**: define if an admin can ask access to a user personal vault or not - **Data recovery request timeout**: define the maximum validity period of an access to a user personal vault from an adminWhen recovery is enabled, each item will be encrypted with an additional key dedicated to recovery. This encryption is added the first time the user decrypts his items with his own key. Consequently, even if the recovery is enabled, these operations can only be performed AFTER the user has made a new access. So if you want to use them, it's important to activate recovery features from the beginning!
#### Security - **Allow all users of a shared vault to be displayed**: when you add new shared vault members, you have to provide a valid email address of an existing vault user. But if this option is enabled, you'll have the list of existing users instead. # Recovery account Account recovery allows users to request a reset of their master password if they have lost it. There are 3 prerequisites: - Account recovery must be enabled in the administration page - At least one user must have account recovery rights. - The user must have a valid email address The workflow will be as follows: 1. User requests master password reset 2. Admin accepts reset 3. User sets new master password ### Enable account recovery 1. Go to the **Enterprise Vault admin app** 2. Go to **Settings** 3. Enable the line **Authorize account recovery** 4. Click **Save** button [](https://vault-doc.wallix.com/uploads/images/gallery/2025-01/HfLimage.png)The length of time for which the request is valid can also be set here. The default setting is 2 hours.
### Add account recovery rights to a user 1. Go to your **WALLIX ONE IDaaS admin page** 2. Go to **Users** and select an existing user 3. Click **Edit** then **Add an attribute** 4. Provide the following attribute: **name**: recovery\_account **kind**: bool **value**: true [](https://vault-doc.wallix.com/uploads/images/gallery/2025-01/iM5image.png) When this user will log in the Enterprise Vault user app, and if he is the first one with recovery rights(data or account), he will have the following message: [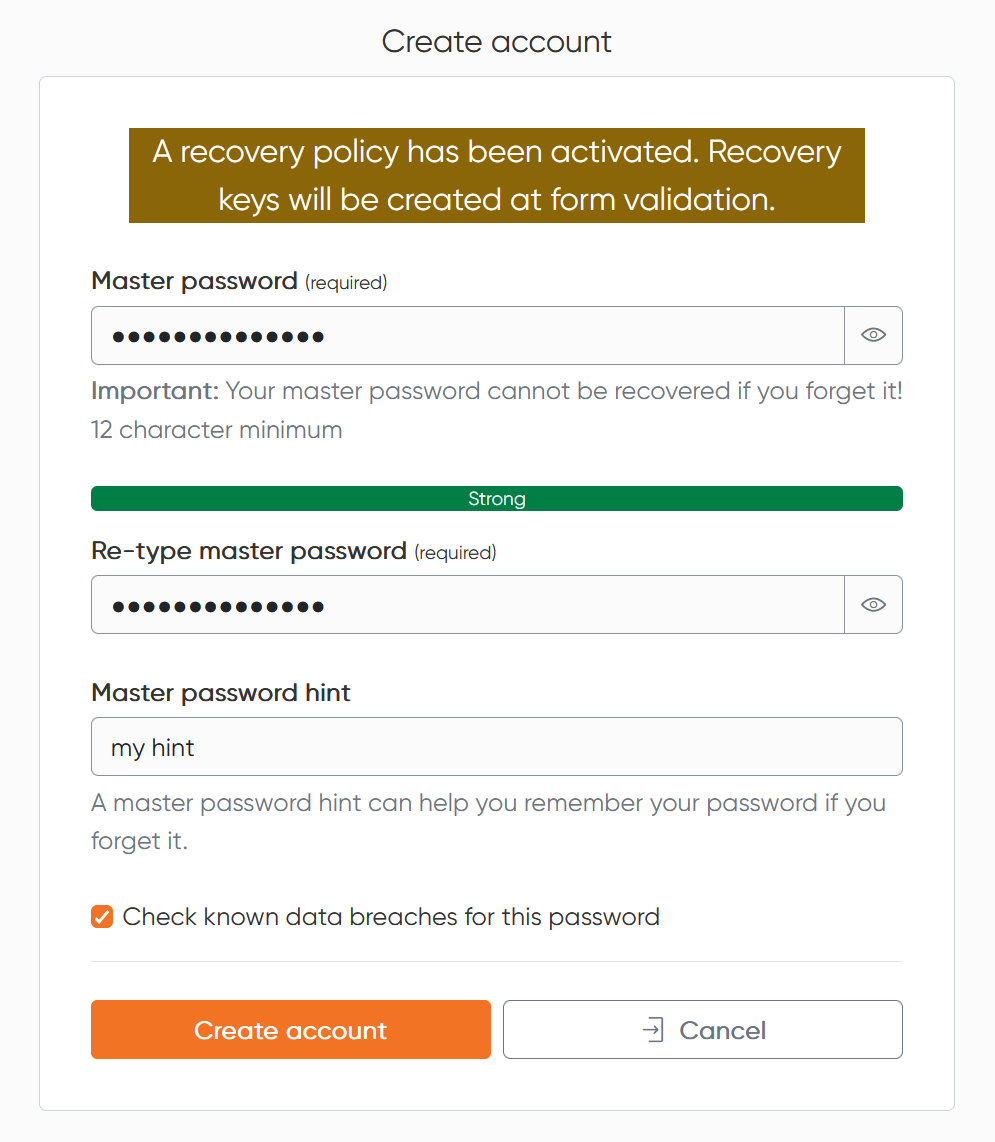](https://vault-doc.wallix.com/uploads/images/gallery/2025-01/BxLimage.png) In fact, specific encryption keys are required to carry out recovery operations. These are created when the first admin is authenticated. Consequently, for subsequent admins, an admin who has the keys must share them. 1. Go to your **Enterprise Vault user app** with an admin who has the recovery key 2. Go to **Settings**, then **Recovery keys** 3. Click **Activate access** for the new admins [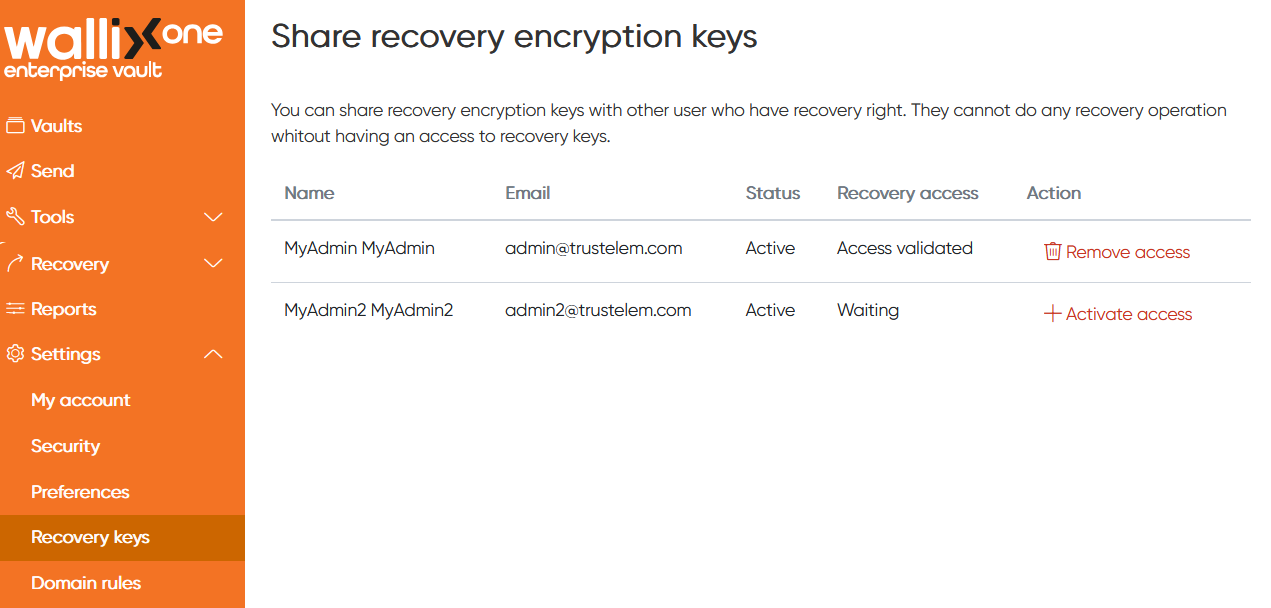](https://vault-doc.wallix.com/uploads/images/gallery/2025-01/5uEimage.png) ### Workflow #### User requests master password reset - The user clicks **Start a password reset procedure** [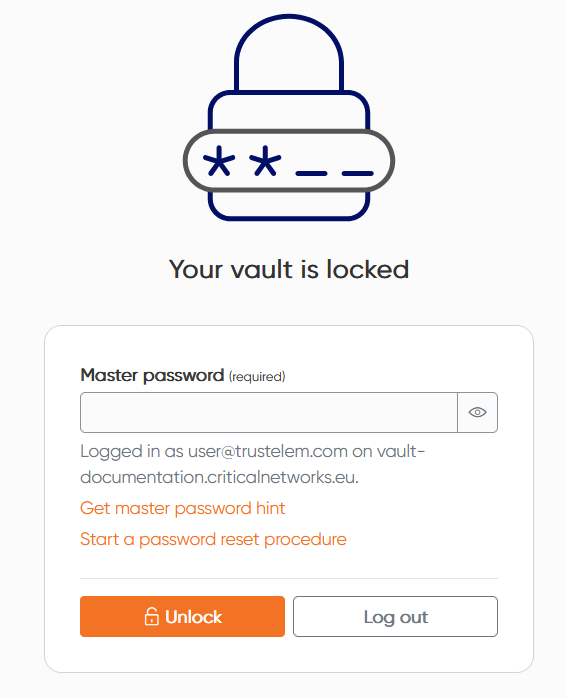](https://vault-doc.wallix.com/uploads/images/gallery/2025-01/686image.png)If the button "Start a password reset procedure" is not displayed, causes can be: - The "recovery account" option is not enabled in the admin page - No admin has the right "recovery account" - The user has not been logged in since the recovery account option was activated.
- Then he defines a reset code, which will be used later to complete the procedure [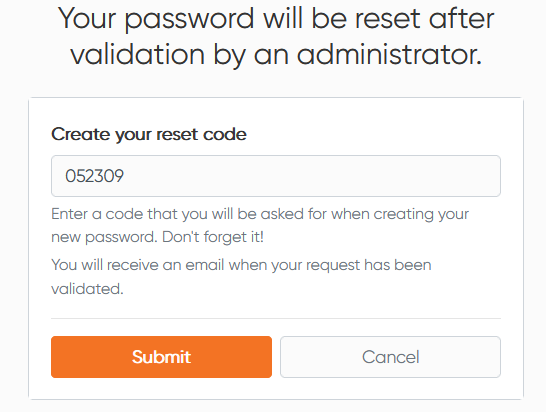](https://vault-doc.wallix.com/uploads/images/gallery/2025-01/IkCimage.png) - Finally, he receives a confirmation email about his request #### Admin accepts reset - The admin is alerted by email - He goes to his **Enterprise Vault user app** - Then he clicks **Recovery**, an **Approbation requests** - He can click **Approve** or **Dismiss** [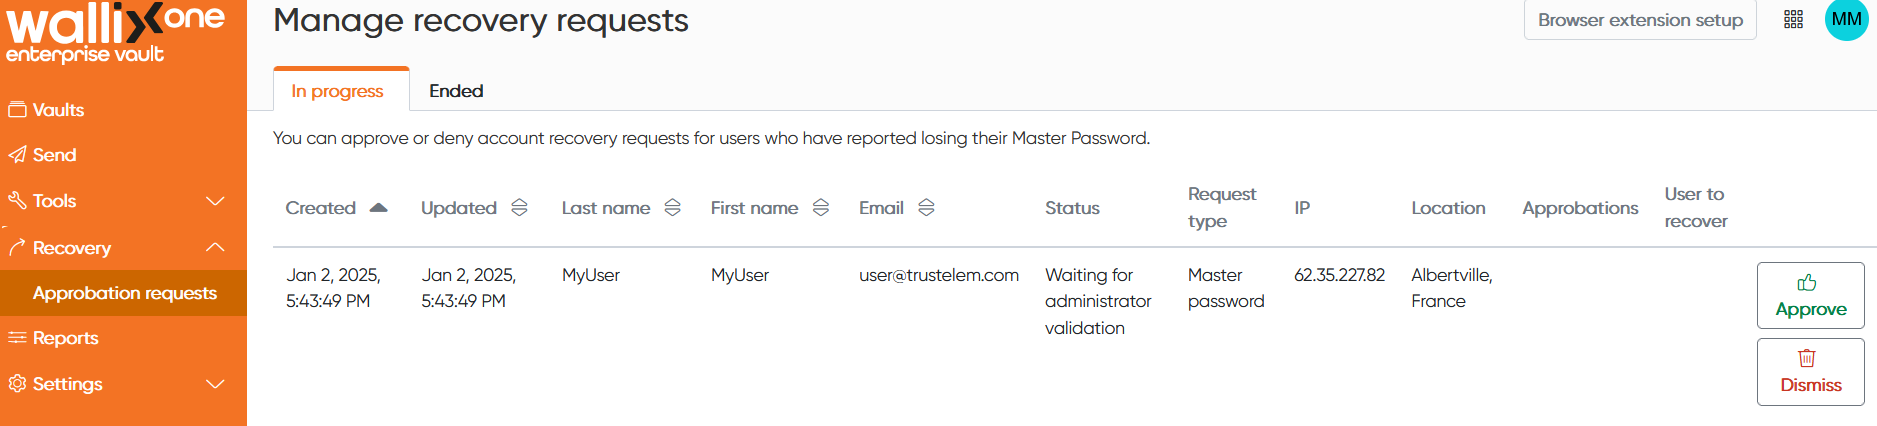](https://vault-doc.wallix.com/uploads/images/gallery/2025-01/Nedimage.png) #### User sets new master password - When the master password reset request is validated, the user receive an email with a reset link - He clicks the link, and arrives on the reset page - He provides the initial reset code - He can define the new master password [](https://vault-doc.wallix.com/uploads/images/gallery/2025-01/ownimage.png) # Recovery data Data recovery allows admin to access personal items for selected users.The point is to recover a secret which is no longer accessible due to the owner's unavailability. Consequently, in this mode it is only possible to copy a personal secret's identifier, a personal secret's password, or to export the personal vault. No other action is possible.
There are 4 prerequisites: - Data recovery must be enabled in the administration page - At least one user must have data recovery rights. - At least one user must have the rights to manage data recovery quorum. - The quorum must be defined. The workflow will be as follows: 1. An admin requests the access to a specific user account 2. The quorum members are notified and accept the request 3. The admin is notified and reload his user app: he has access to the user personal itemsShared Vaults are not accessible through data recovery.
### Enable Data recovery 1. Go to the **Enterprise Vault admin app** 2. Go to **Settings** 3. Enable the line **Authorize data recovery** 4. Click **Save** button [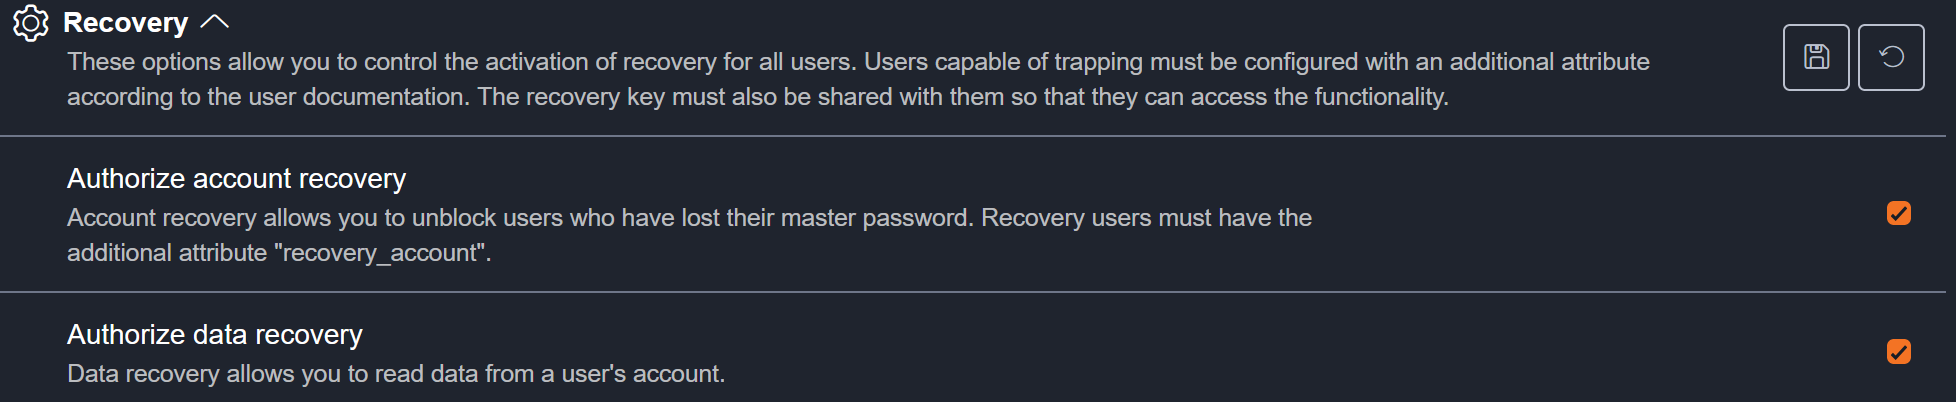](https://vault-doc.wallix.com/uploads/images/gallery/2025-01/3HSimage.png)The length of time for which the request is valid when accepted can also be set here. The default setting is 12 hours.
### Add data recovery rights to a user 1. Go to your **WALLIX ONE IDaaS admin page** 2. Go to **Users** and select an existing user 3. Click **Edit** then **Add an attribute** 4. Provide the following attribute: **name**: recovery\_data **kind**: bool **value**: true [](https://vault-doc.wallix.com/uploads/images/gallery/2025-01/uNDimage.png) When this user will log in the Enterprise Vault user app, and if he is the first one with recovery rights (data or account), he will have the following message: [](https://vault-doc.wallix.com/uploads/images/gallery/2025-01/BxLimage.png) In fact, specific encryption keys are required to carry out recovery operations. These are created when the first admin is authenticated. Consequently, for subsequent admins, an admin who has the keys must share them. 1. Go to your **Enterprise Vault user app** with an admin who has the recovery key 2. Go to **Settings**, then **Recovery keys** 3. Click **Activate access** for the new admins [](https://vault-doc.wallix.com/uploads/images/gallery/2025-01/5uEimage.png) ### Add quorum rights to a user 1. Go to your **WALLIX ONE IDaaS admin page** 2. Go to **Users** and select an existing user 3. Click **Edit** then **Add an attribute** 4. Provide the following attribute: **name**: recovery\_data\_workflow **kind**: bool **value**: true [](https://vault-doc.wallix.com/uploads/images/gallery/2025-01/RF0image.png) ### Define the quorum 1. Go to your **Enterprise Vault user app** with an admin who has the quorum rights 2. Go to **Settings**, then **Approvers groups** 3. Click **Add group** 4. Choose a name and a quorum number (number of validation needed to accept the request), then click **Save** [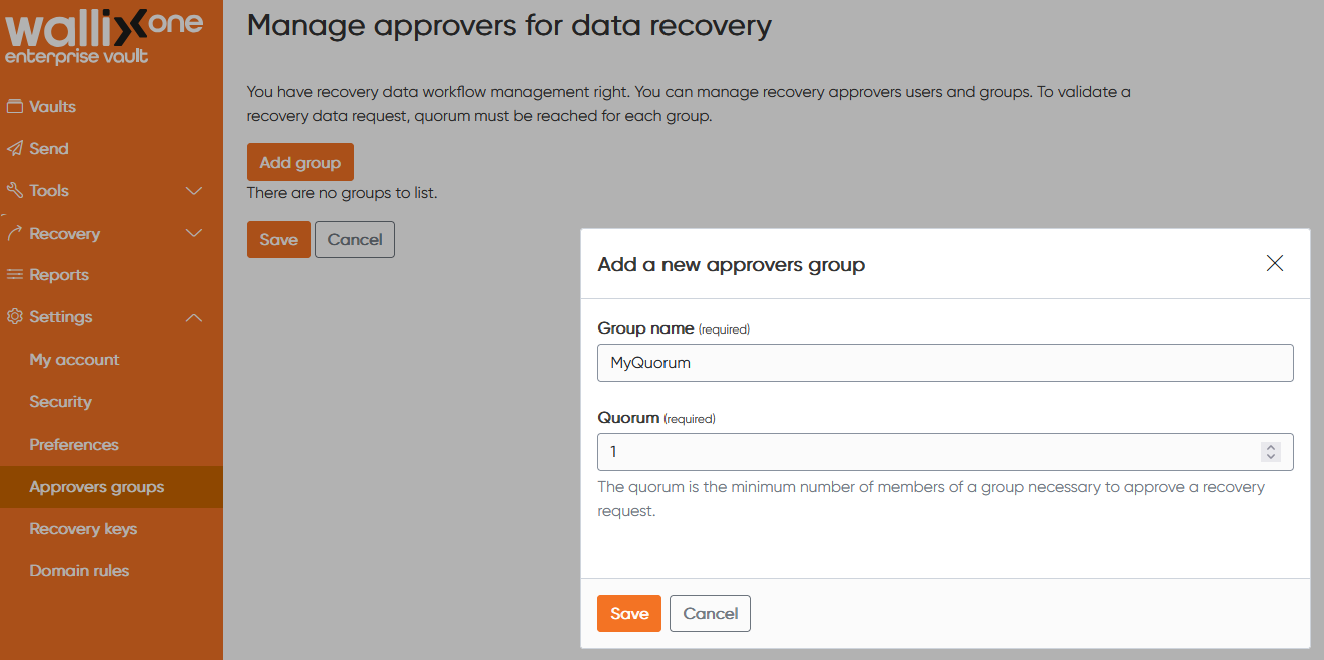](https://vault-doc.wallix.com/uploads/images/gallery/2025-01/K5gimage.png) 5. Click **+** on the Users column, then provide the approvers email address then click **Validate** Press "Enter" if you want to add multiple approvers [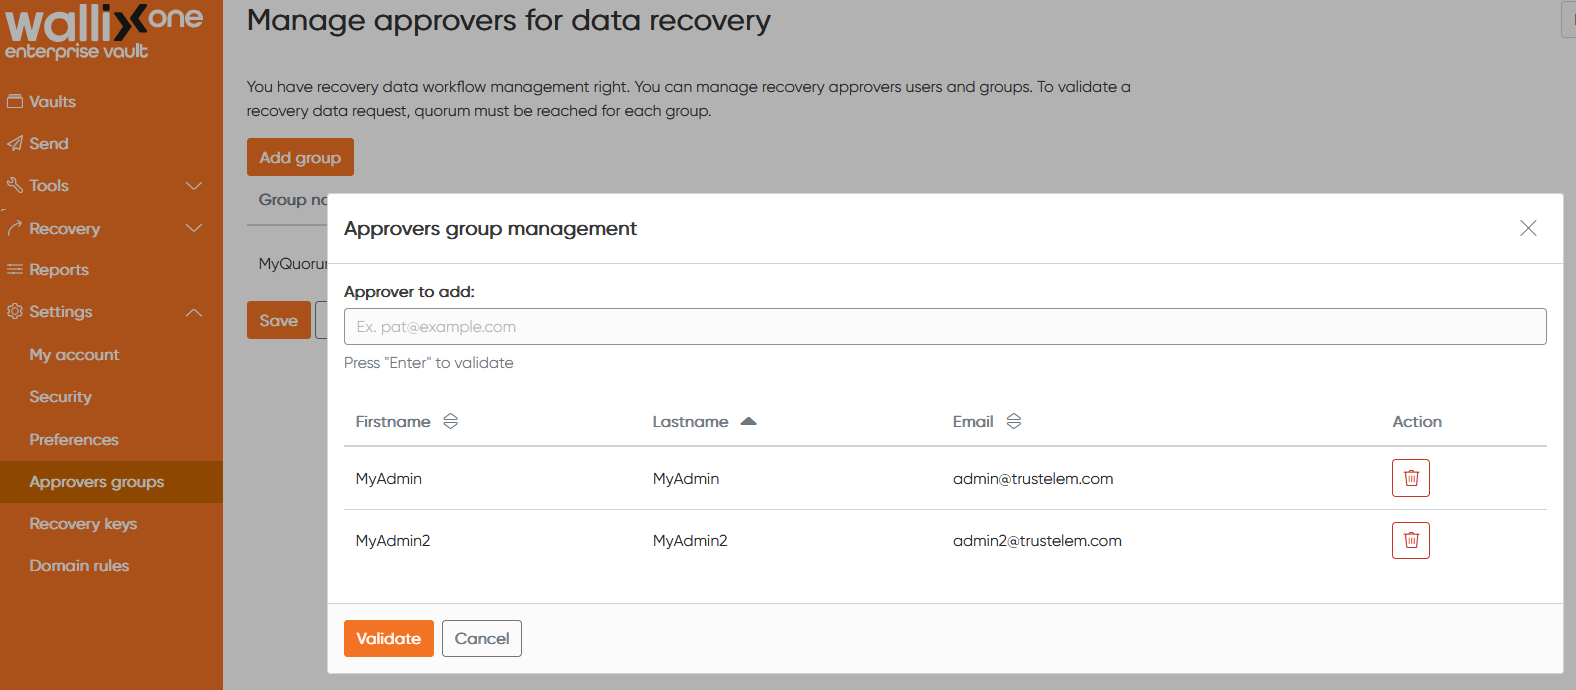](https://vault-doc.wallix.com/uploads/images/gallery/2025-01/dxaimage.png) 6. Click the **Group name** the **Quorum** or the **Users** if you need to change an information [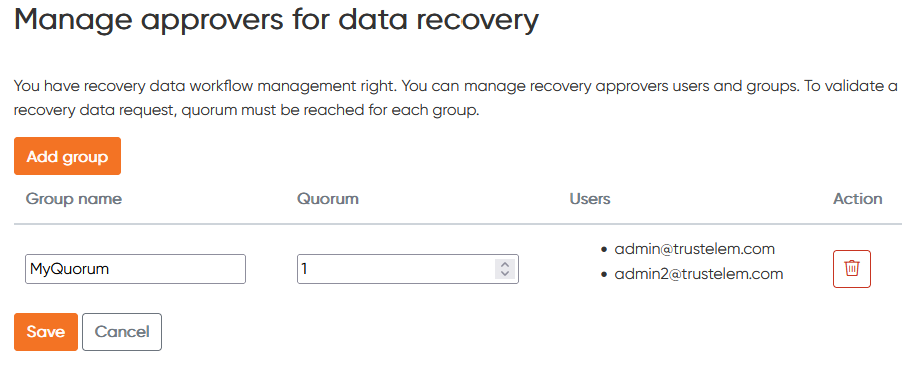](https://vault-doc.wallix.com/uploads/images/gallery/2025-01/bRCimage.png) 7. Click **Save** ### Workflow #### The admin requests the access to a specific user account - The admin goes to his **Enterprise Vault user app** - He clicks on **Recovery** then **Data recovery** - He selects a user, then click **Send** - The request appears in the history [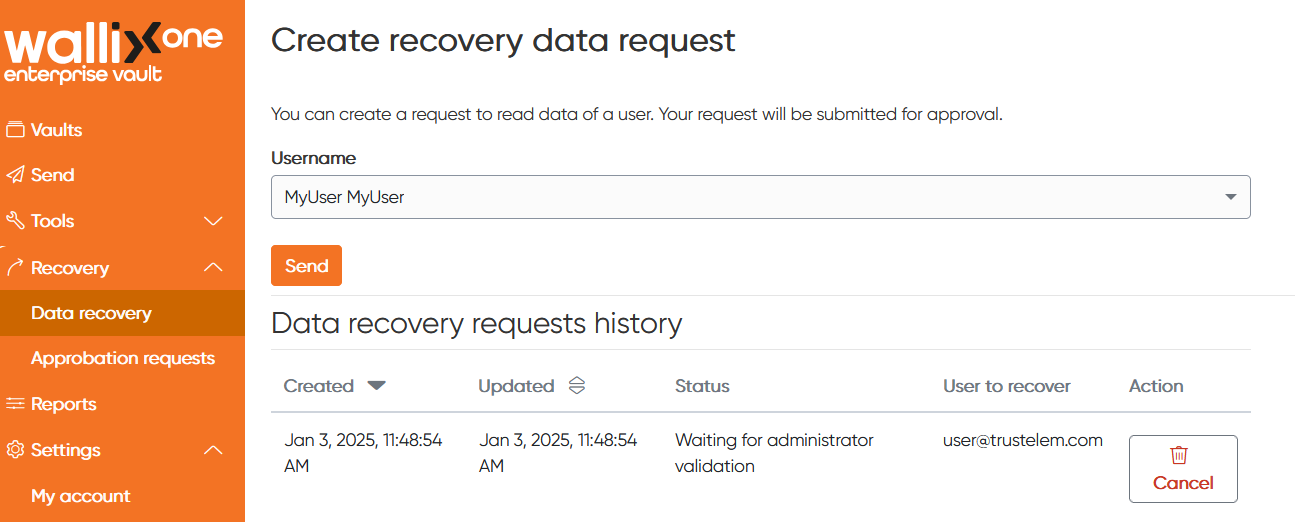](https://vault-doc.wallix.com/uploads/images/gallery/2025-01/HpKimage.png) #### The quorum members are notified and accept the request - A quorum user goes to his **Enterprise Vault user app** - He clicks **Recovery** then **Approbation requests** - He clicks **Approve** or **Dismiss** [](https://vault-doc.wallix.com/uploads/images/gallery/2025-01/xtpimage.png) #### The admin has access to the user personal items - The admin **logout** from his web client then perform a new authentication - He clicks his profile - He selects the user account [](https://vault-doc.wallix.com/uploads/images/gallery/2025-01/7Hcimage.png) - He has access to the user's personal items [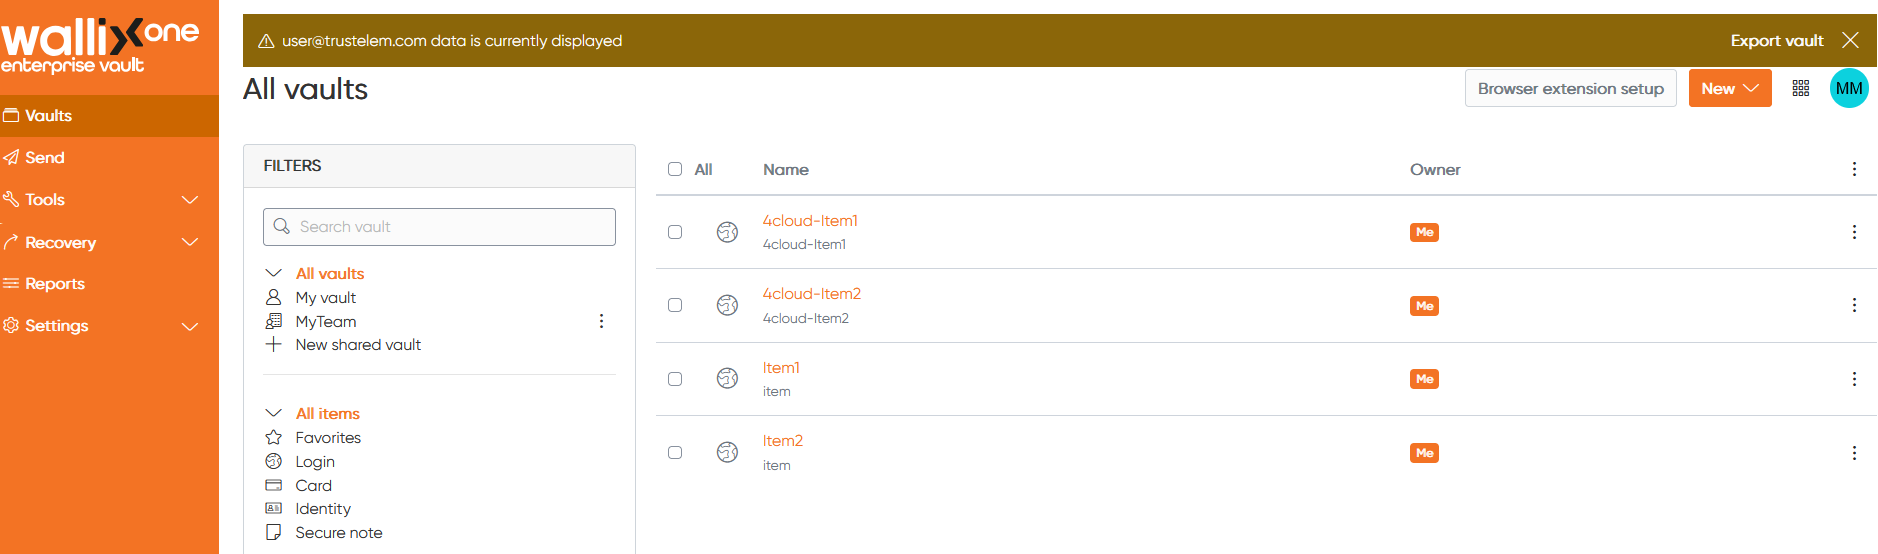](https://vault-doc.wallix.com/uploads/images/gallery/2025-01/bK0image.png) As mentioned in the introduction, it is only possible to retrieve secrets from the personal vault. Any other action will display an error, which indicates that it is prohibited. # Synchronizing Trustelem Groups with the Enterprise Vault CLI ### 🎯 Goal Automatically define access rights to **shared vaults** and **collections** in Enterprise Vault based on membership in **Trustelem groups**, using a custom JSON attribute called `vaultSync`. --- ### 🧩 Overall Workflow The script reads all Trustelem groups that include the `vaultSync` attribute. 1. For each Trustelem group with the attribute: - A **shared vault** is created or updated. - **Collections** can be created or removed according to the configuration. - **User permissions** are applied. 2. If a user also has a `vaultSync` attribute, it **overrides** the group configuration. --- ### 🧷 Trustelem Configuration #### Step 1 – Add custom attributes ##### 🔹 `vaultSync` JSON attribute on a **Trustelem Group** (mandatory) Example to adapt: ```json [ { "sharedVault": "SharedVault1", "mode": "exact", "collections": ["Collec1", "Collec2"], "createCollections": true, "deleteCollections": false, "role": "User", "permission": "view" }, { "sharedVault": "SharedVault2", "mode": "exact", "collections": ["Colletion1", "Collection2"], "createCollections": true, "deleteCollections": false, "role": "User", "permission": "edit" } ] ```| Field | Type | Description |
|---|---|---|
| `sharedVault` | `string` | Name of the shared vault to sync |
| `mode` | `string` | "exact" or "pattern". Not mandatory, default to "exact" If "exact" is used, "collections" list must be exact names of synchronized collections if "pattern" is used, "collections" list is patterns for collections names. |
| `collections` | `string[]` | List of collections name or patterns |
| `createCollections` | `boolean` | Auto-create missing collections (can only be used with exact mode) |
| `deleteCollections` | `boolean` | Auto-remove collections not listed (can only be used with exact mode) |
| `role` | `string` | User role in the vault: `"Owner"`, `"Admin"`, or `"User"` |
| `permission` | `string` | Permission in the collection: `"view"`, `"viewExceptPass"`, `"edit"`, `"editExceptPass"`, `"manage"` |
**How to use patterns ?**
Patterns uses **glob matching** syntax to consider collections names as filesystem path. It allow you to use wildcard and more complex syntax. **Glob matching** - Using wildcards (`*` to match at one level of directories and `?` to replace one character), globstars (`**`) to include nested directories. You can use POSIX character classes \[:alpha:\] or \[:digit:\], regex classes \[1-5\], regex logical (abc|xyz) and brace expansion. If you wont to have an exhausted documentation, you can refer to the library [micromatch](https://www.npmjs.com/package/micromatch "micromatch"). **examples :** With collections tree as follow ``` collection1/ collection11 collection12/ collection121 collection122 collection2/ collection21 ```| **Pattern** | **Matching results** |
| `collection1/**` | `collection1`, `collection11`, `collection12`, `collection121`, `collection122` collection1 and all childs of collection1 with wildcard "\*\*", parent is included |
| `*` | `collection1`, `collection2` all collection of first level |
| `collection?/*` | `collection11`, `collection12`, `collection21` all collection of second level with parent 'collection' and an other character. with wildcard "\*", parent is not included |
| `*/collection[0-9]{1,2}` | all second level collections with a name 'collection' followed by one or two digits. |
| Variable | Description |
|---|---|
| `vault_id` | API service account ID (web client > Account parameters > Security > API Keys) |
| `vault_secret` | API service account secret (web client > Account parameters > Security > API Keys) |
| `vault_password` | Master password for the service account |
| `vault_url` | Vault instance URL (e.g., `https://vault-yourdomain.trustelem.com`) |
| `trustelem_key_id` | KEY ID from Step 2 |
| `trustelem_bearer` | Bearer Token from Step 2 |
| `trustelem_url` | Trustelem admin URL (e.g., `https://admin-yourdomain.trustelem.com`) |
| Scenario | Behavior |
|---|---|
| 🔁 Trustelem group renamed in AD | Synchronization continues (attribute remains present) |
| 🗑 Trustelem group deleted | Synchronization stops, but the vault remains unchanged |
| ♻️ Group deleted and recreated | Vault is no longer linked; re-adding the attribute resumes sync |
| Action | Required Right (Service Account) |
|---|---|
| Create shared vault | None (becomes `Owner`) |
| Modify existing vault | Must be `Owner` |
| Create/delete collection | `manage` |
| Add/remove users from collections | `manage` |
| Update user permissions | `manage` |