Avanced options
Learn how to go further with Entreprise Vault.
- Options Overview
- Preferences
- Change Language
- Domain Equivalencies
- Sync Vault
- Shortcuts
- Custom Fields
- Username or Password Generator
- Reports
- Purge Vault
- Change Avatar
Options Overview
When you login to WALLIX Vault, the Vault Home Screen is displayed.
A number of options are possible within your Vault:
- You can Search and Filter to find Items in the Vault.
- In the Preferences Screen, you can set your Timeout Preferences, Change Language, Change Theme, etc.
- You can set Domain Equivalencies for Domains that use the same Login.
- Sync Vault to synchronise the Vault Items in the Web Browser Extension.
- User and Configure Shortcuts.
- Make the most of Custom Fields to add additional fields to Items and to enable Auto-filling on some fields.
- TOTP Authentication is available in the Web Vault, the Browser Extension and the WALLIX Authenticator App, to generate a TOTP code based on an Account Authentication Key.
- The Username and Password Generator can generate usernames, passwords or passphrases for Login Items.
- WALLIX Vault provides a number of Reports to ensure the security of passwords, logins and websites that are stored in the Vault.
- It is possible to Deauthorize Sessions on all logged-in devices. This is especially useful if you accessed WALLIX Vault from a public computer.
- The Vault can be purged of its data or deleted entirely.
Preferences
Click on the User Icon, on the top right-hand side of the screen, to display the User Menu.
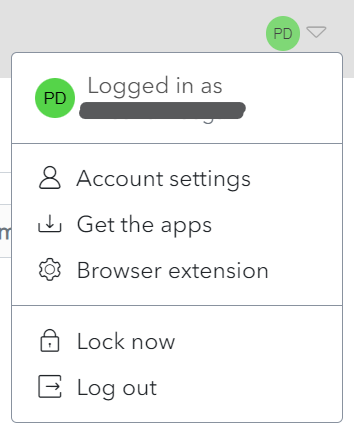
Click on Account Settings and then Preferences. The Preferences Screen is displayed.
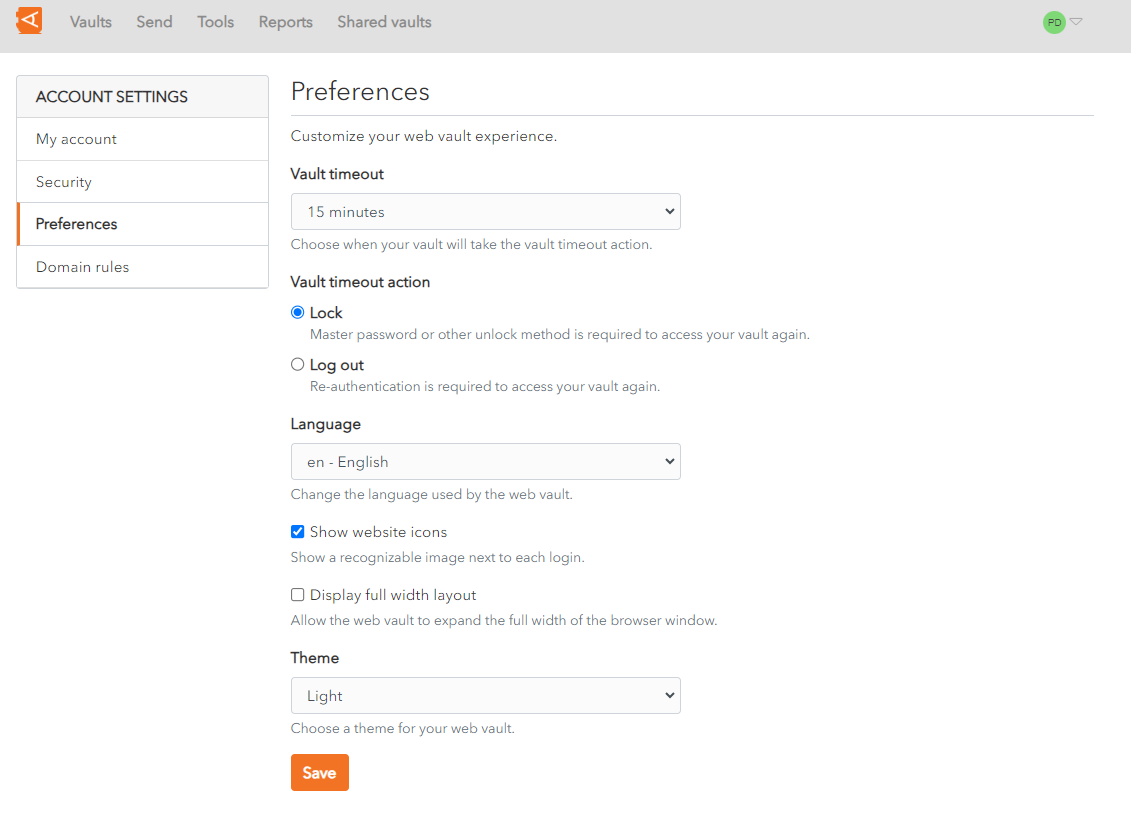
The following options are possible:
- Vault timeout: Set the Vault timeout from the dropdown. The default is 15 minutes.
- Vault Timeout action: Choose Lock or Log-out as the action to take on timeout. The default is Lock.
- Language: Choose the language of the user interface.
- Show website icons: Check to show a recognizable image beside each Login. This is checked by default.
- Display full width layout: Check to allow the Web Vault to take up the full width of the browser window. This is unchecked by default.
- Theme: Choose from the dropdown. Options include Light, Dark and System Theme.
Click Save to save changes.
Change Language
By default, WALLIX Enterprise Vault uses the language of the Web Browser.
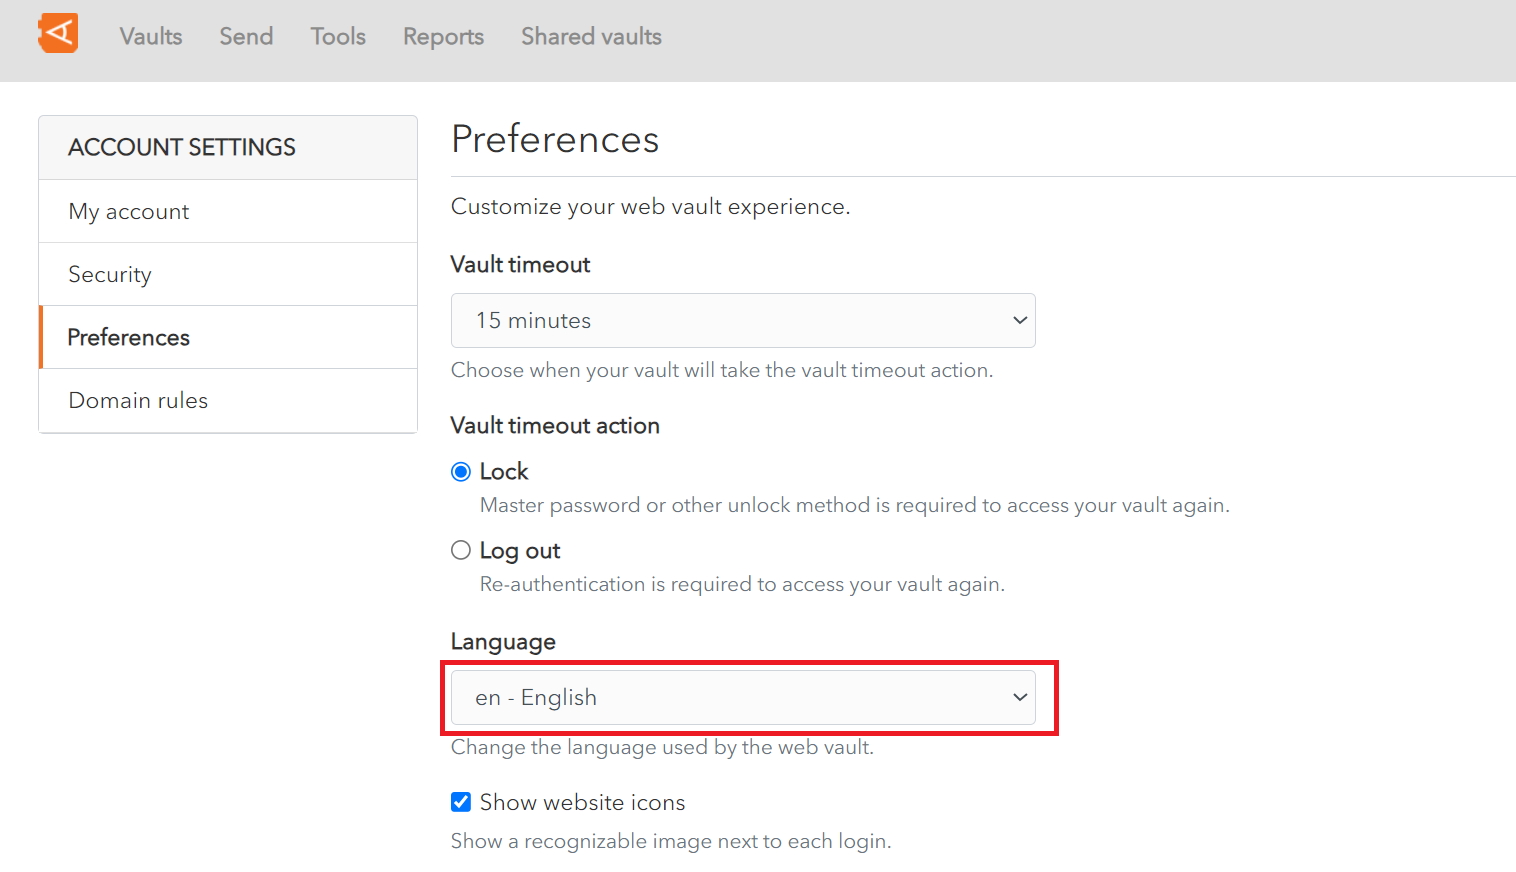
To change the language of the screens in WALLIX Enterprise Vault, click on the Account Settings button in the User Menu.

This opens the Preferences Screen.
Choose the language from the Language dropdown menu.
Click the Save button to save the user interface language.

Supported Languages
The following list of languages are currently supported.
Note: Not all languages are supported on all client applications.
|
Symbol |
Language |
|---|---|
|
af |
Afrikaans |
|
az |
Azərbaycanca |
|
be |
Беларуская |
|
bg |
български |
|
ca |
català |
|
cs |
čeština |
|
da |
dansk |
|
de |
Deutsch |
|
el |
Ελληνικά |
|
en |
English |
|
en-GB |
English (British) |
|
eo |
Esperanto |
|
es |
español |
|
et |
eesti |
|
fa |
فارسی |
|
fi |
suomi |
|
fr |
français |
|
he |
עברית |
|
hi |
हिन्दी |
|
hr |
hrvatski |
|
hu |
magyar |
|
id |
Bahasa Indonesia |
|
it |
italiano |
|
ja |
日本語 |
|
ko |
한국어 |
|
lv |
Latvietis |
|
ml |
മലയാളം |
|
nb |
norsk (bokmål) |
|
nl |
Nederlands |
|
pl |
polski |
|
pt-BR |
português do Brasil |
|
pt-PT |
português |
|
ro |
română |
|
ru |
русский |
|
sk |
slovenčina |
|
sr |
Српски |
|
sv |
svenska |
|
th |
ไทย |
|
tr |
Türkçe |
|
uk |
українська |
|
vi |
Tiếng Việt |
|
zh-CN |
中文(中国大陆) |
|
zh-TW |
中文(台灣) |
Domain Equivalencies
It is possible to link equivalent domains, for example, google.com, youtube.com and gmail.com.
This is useful where mulitple domains use the same login credentials.
Click on the User Icon, on the top right-hand side of the screen, to display the User Menu.
Click on Account Settings and then Domain Rules. The Domain Rules Screen is displayed.
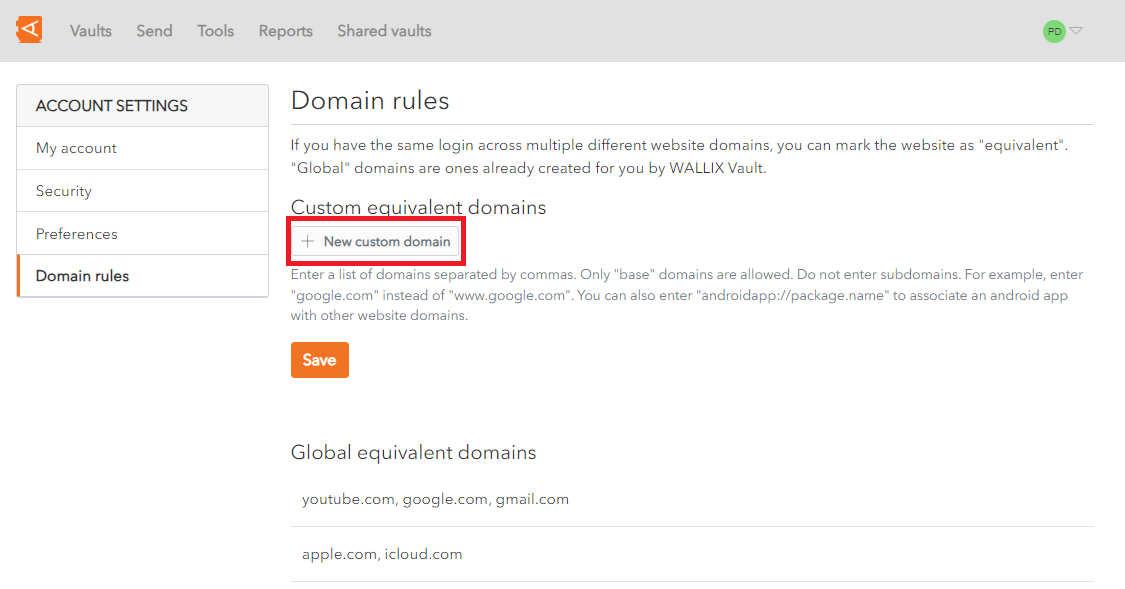
Click the new custom domain button.
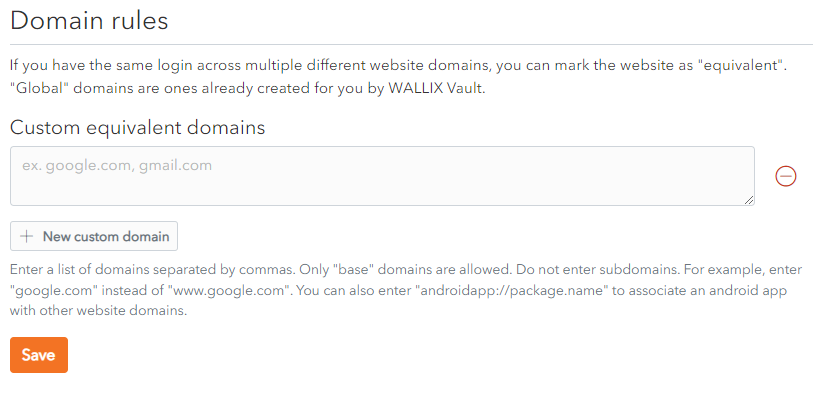
Enter the equivalent domains, delimited by a , comma.
Click Save to save changes.
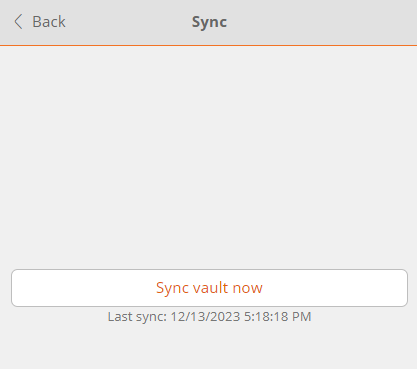
Sync Vault
This is available the for WALLIX Web Extension.
From Settings > Sync, the Sync Screen is displayed.
Tap the Sync vault now button to Sync the Vault Data in the Web Extension.
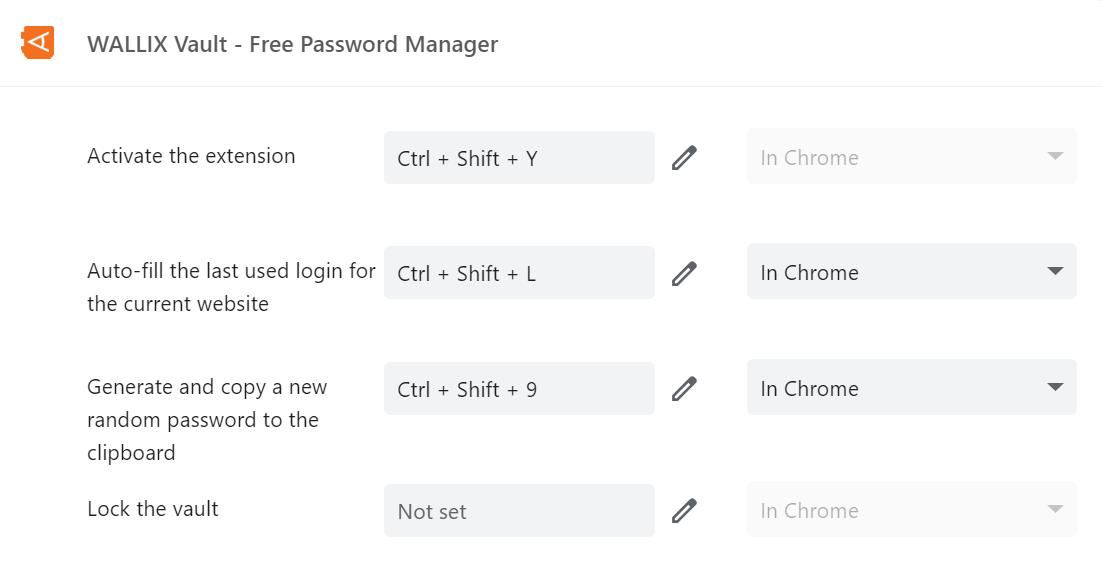
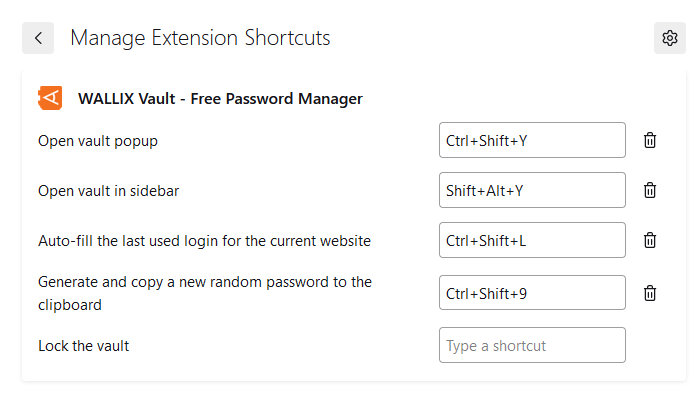
Shortcuts
WALLIX can use shortcuts for certain functions:
- Activate the extension
- Auto-fill the last used login for the current website
- Generate and copy a new random password to the clipboard
- Lock the vault
Shortcuts can be configured in the web browser.
Chrome
The shortcuts are displayed and can be modified.
Firefox
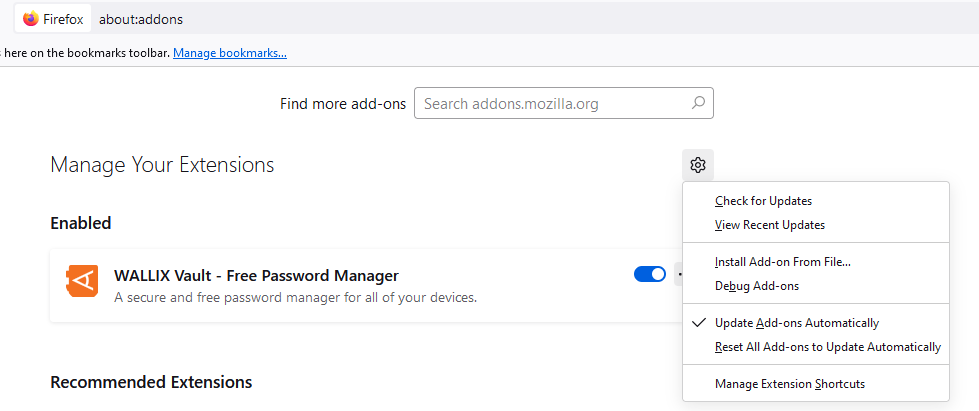
The shortcuts are displayed and can be modified.
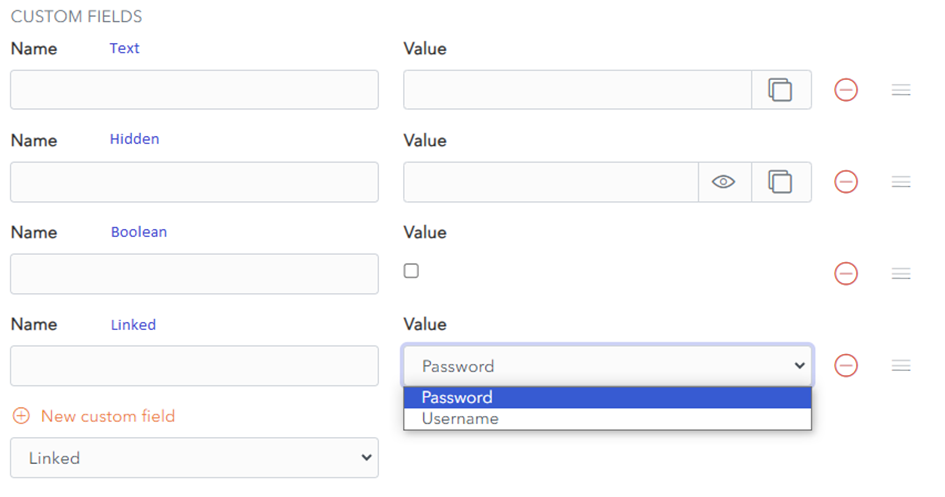
Custom Fields
Create Custom Fields
From the Item Screen, you can also add one or more Custom fields by choosing the field type from the dropdown menu and clicking on the New Custom Field button.
A Custom field has Name and Value properties. The Value field can be of type Text, Boolean, Hidden or Linked.
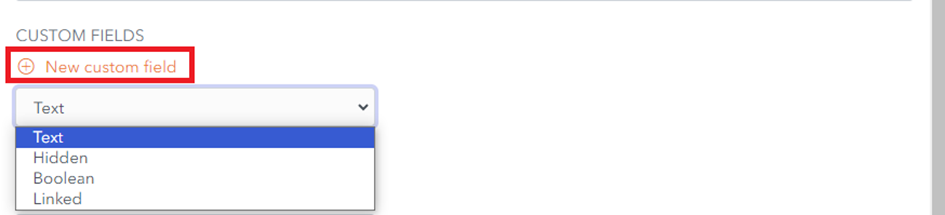
- A Text custom field can hold a text value.
- A Hidden custom field can hold a hidden value and is typically used for passwords. This field can be displayed or hidden using the Display/Hide toggle button.
- A Boolean custom field can hold a true/false value and is typically used for yes/no choices.
- A Linked custom field can link to a Username or Password. Linked Fields are used for certain auto-fill options.
Custom Field Names
The Naming of Custom Fields, that are linked to Login Fields for auto-fill purposes, should take into account the following rules.
Order of Preference
The 4 attributes of the HTML Form Element of the Linked Field take the following order of preference:
- id
- name
- aria-label
- placeholder
Matching
Custom Fields are matched based on exact and case-insensitive comparison, e.g. for the field mylogin
- Matched Names: MyLogin, myLogin
- Unmatched Names: mylogin2, login
Prefixing
Prefixes can be used to influence matching.
csv Prefix
To add multiple possible logins, use the prefix csv=.
For example, if a custom field is named csv=mylogin,MyLogin, myLogin, field name matching will work on mylogin or MyLogin or myLogin.
regex Prefix
To allow matching based on regular expressions, use the prefix regex=.
For example, regex=^myLogin will match on myLogin, or MyLogin.
Username or Password Generator
WALLIX Vault provides a Generator Feature to automatically generate a Username or Password based on certain criteria.
Username Generator
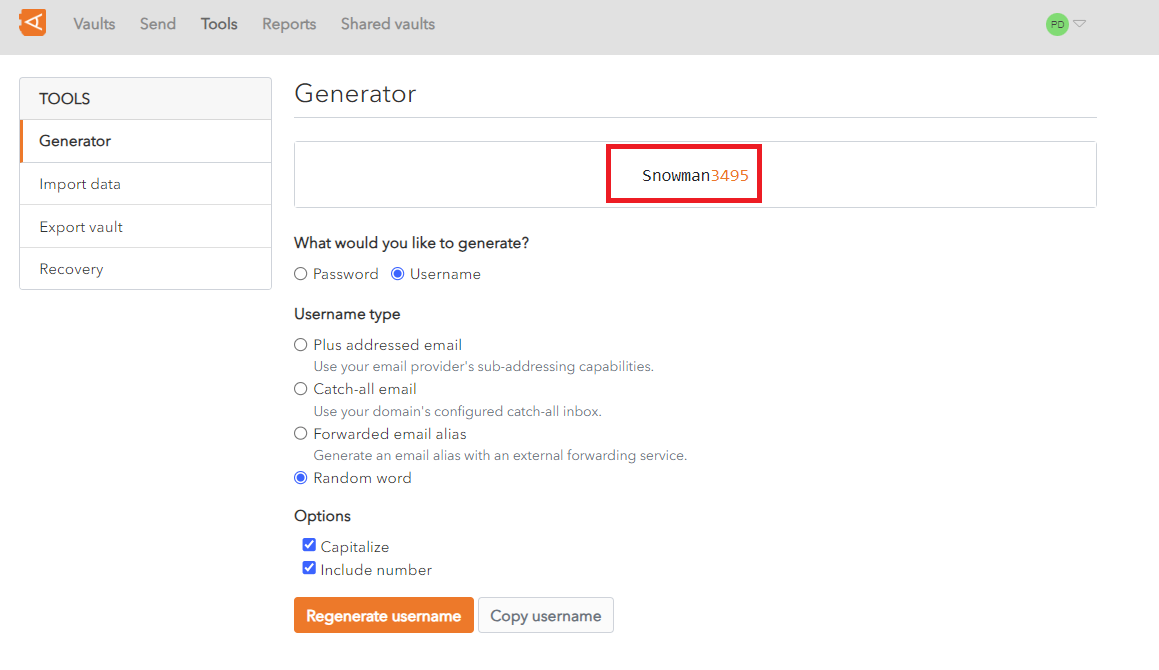
In the What could you like to generate? Field, click Username.
In the Username type field, choose from the following options:
- Plus addressed email: uses your email provider's sub-addressing capabilities for the generated username
- Catch-all email: uses your domain's configured catch-all inbox for the generated username
- Forwarded email alias: generates an email alias with an external forwarding service for the generated username
- Random word: choose a random word for the generated username
In the Options section:
- Check Capitalize to capitalize the letters in the generated username
- Check Include number to include a number in the generated username
Click Regenerate username button to regenerate a username. The generated username displays at the top of the screen. In this example it is Snowman3495.
Click Copy Username to copy the generated username to the clipboard.
Password Generator
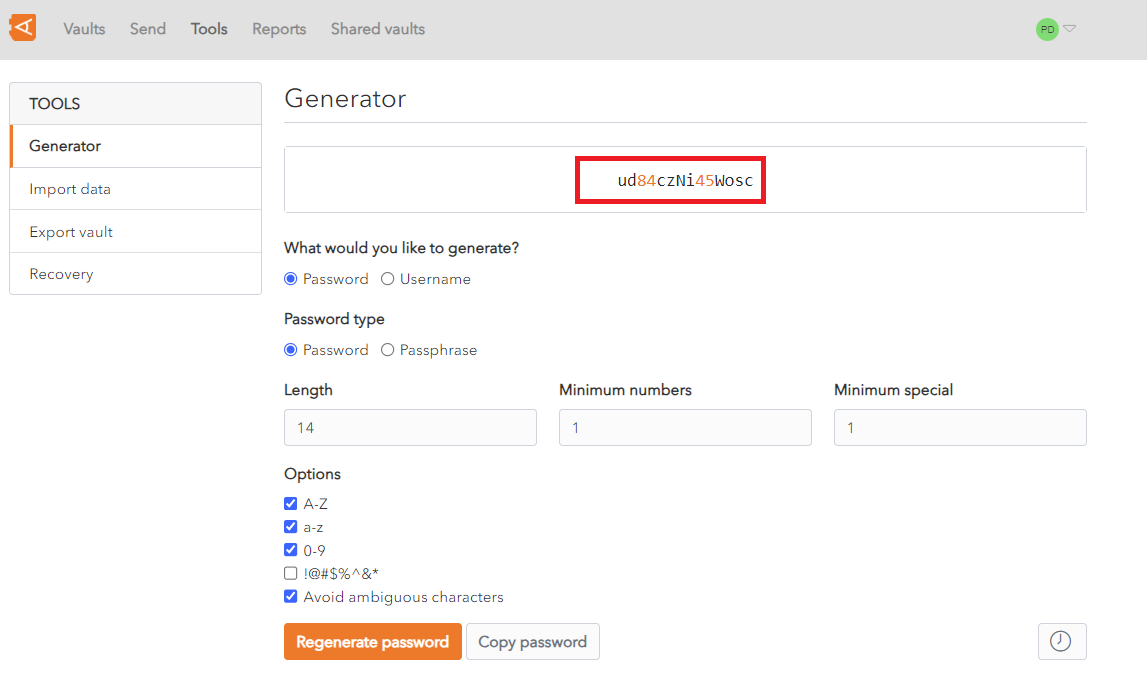
In the What could you like to generate? Field, click Password
In the Password type field, choose either a Password or a Passphrase. A passphrase is a group of randomly generated concatenated words, e.g. hopeful-best-crazy-uses-glasses
If Password is chosen as the Password Type, the following options are available:
- In the Length field enter the required password length
- In the Minimum numbers field enter the minimim number of numbers required in the password
- In the Minimum special field enter the minimim number of special characters required in the password
- In the Options section:
- Check A-Z if the generated password should contain upper case letters. This is checked by default
- Check a-z if the generated password should contain lower case letters. This is checked by default
- Check 0-9 if the generated password should contain numbers. This is checked by default
- Check !@#$%^&* if the generated password should contain special characters. This is unchecked by default
- Check Avoid ambiguous characters to exclude ambiguous characters from the generated username, i.e. 1 and I or 0 and o. This is checked by default
If Passphrase is chosen as the Password Type, the following options are available:
- In the Number of words field enter the number of words required in the passphrase. The Default is 3 words
- In the Word separator field enter the separator to use to concatenate the words in the passphrase. The Default is -
- In the Options section:
- Check Capitalize to capitalize the letters in the generated passphrase
- Check Include number to include a number in the generated passphrase
Click Regenerate username button to regenerate a username. The generated username displays at the top of the screen. In this example it is Snowman3495
Click Copy Username to copy the generated username to the clipboard
Mobile App
This feature is also available on the WALLIX Mobile App, either from the Generator option or the Add/Edit Screen. The exact location depends on the Mobile Device used.
Reports
A number of reports are available in WALLIX Vault.
Click Reports from the Top Menu to access the Reports Screen.
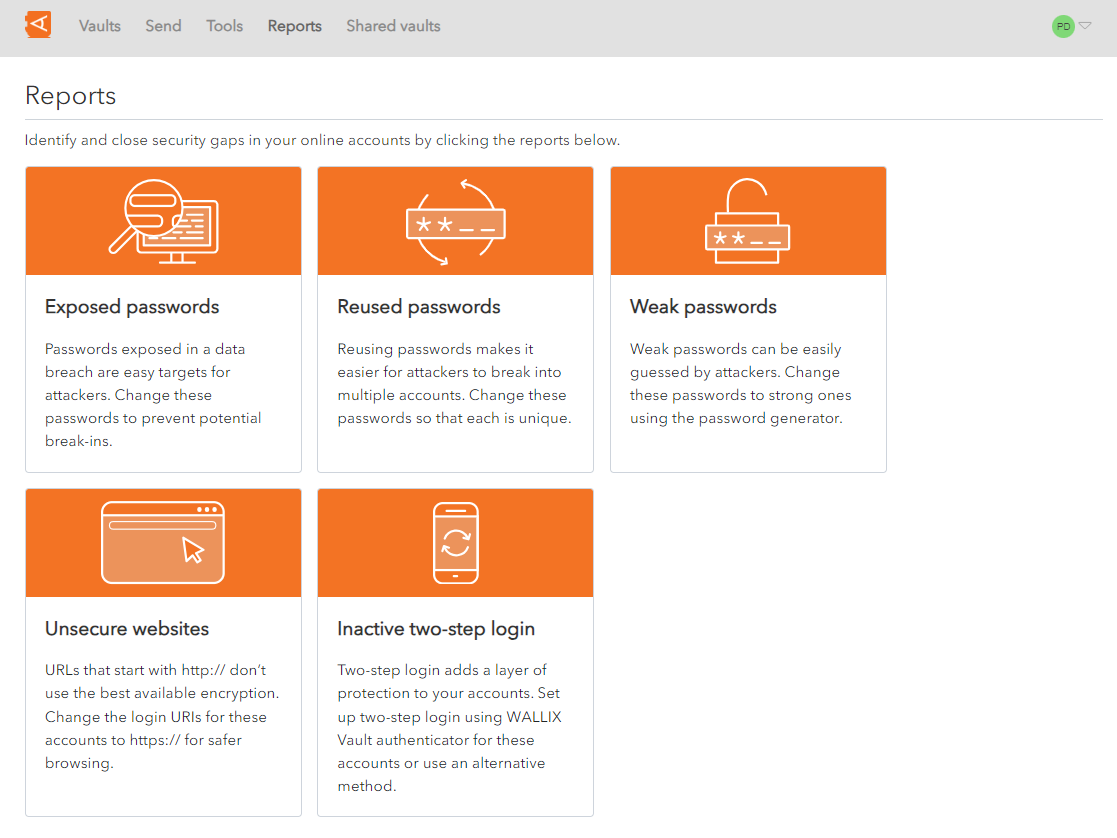
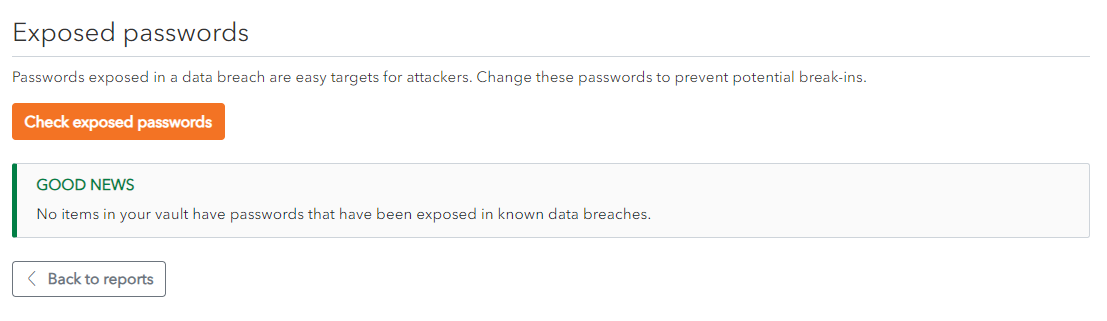
Exposed passwords
Click on the Exposed Passwords Icon to view this report.
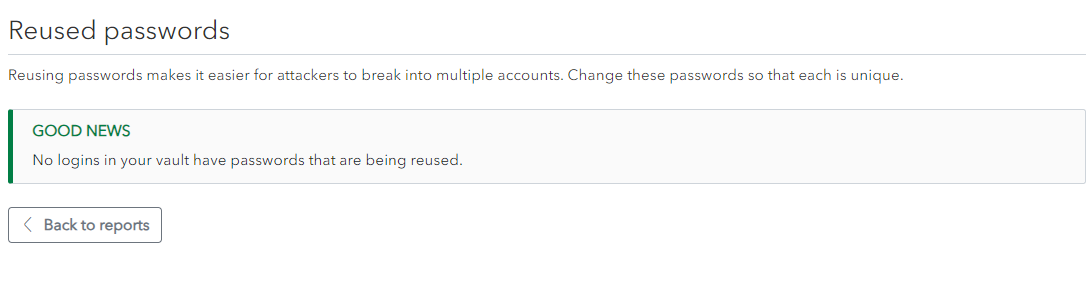
Reused passwords
Click on the Reused Passwords Icon to view this report.
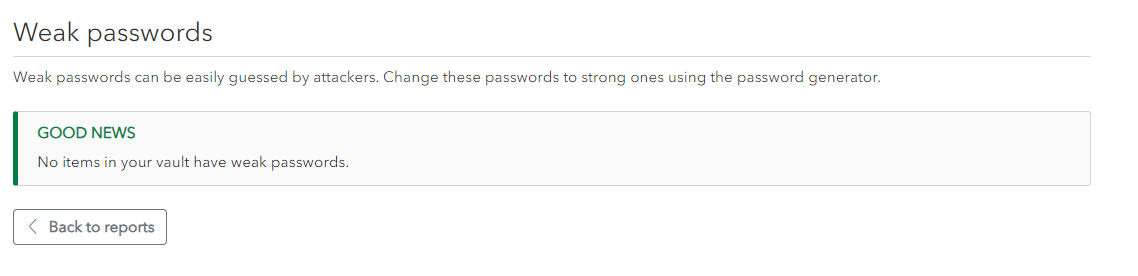
Weak passwords
Click on the Weak Passwords Icon to view this report.
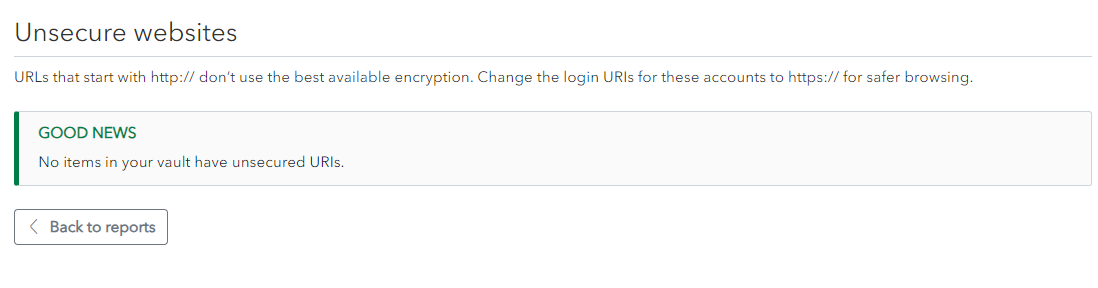
Unsecure websites
Click on the Unsecure websites Icon to view this report.
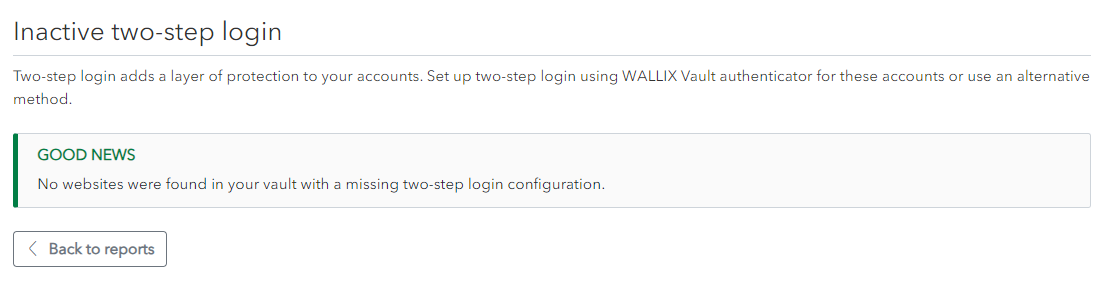
Inactive two-step login
Click on the Inactive 2 two-step login Icon to view this report.
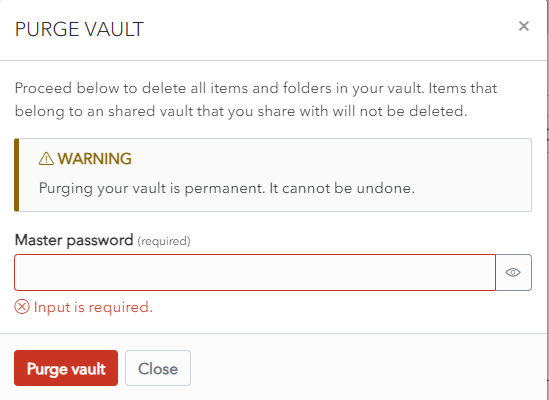
Purge Vault
Click on the User Icon, on the top right-hand side of the screen, to display the User Menu.
Click on Account Settings and then My Account. The My Account Screen is displayed.
Click Purge Vault.
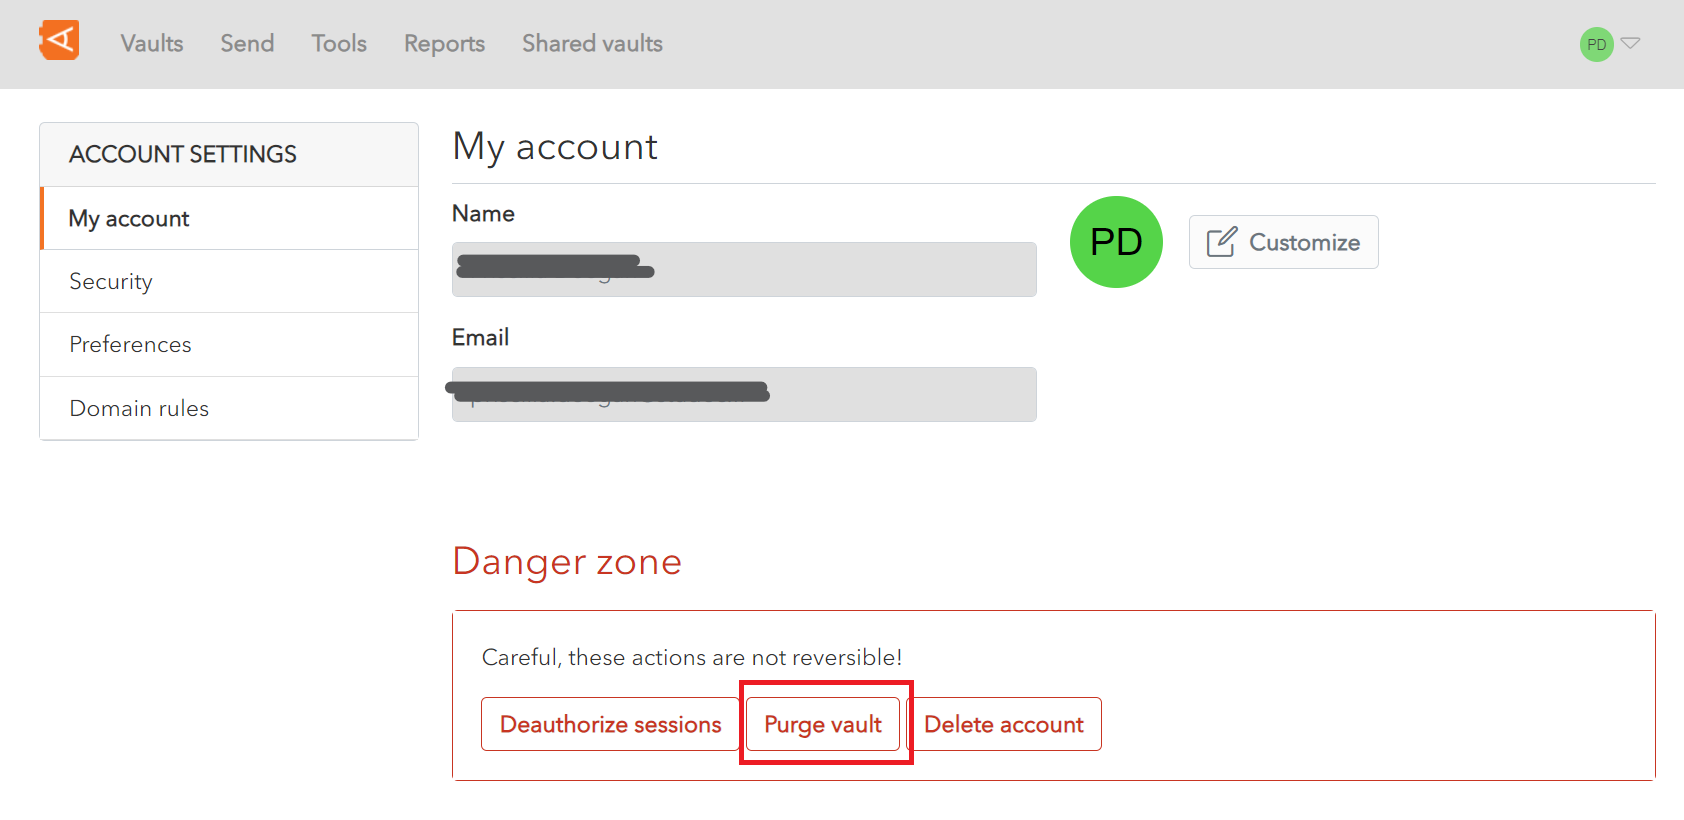
A Confirmation Screen is displayed.
Enter your Master Password and click Purge vault to purge the vault. All data (items and folders) are deleted.
Alternatively, click Close to cancel the operation.
Change Avatar
Click on the User Icon, on the top right-hand side of the screen, to display the User Menu.
Click on Account Settings and then My Account. The My Account Screen is displayed.
Click Customize.
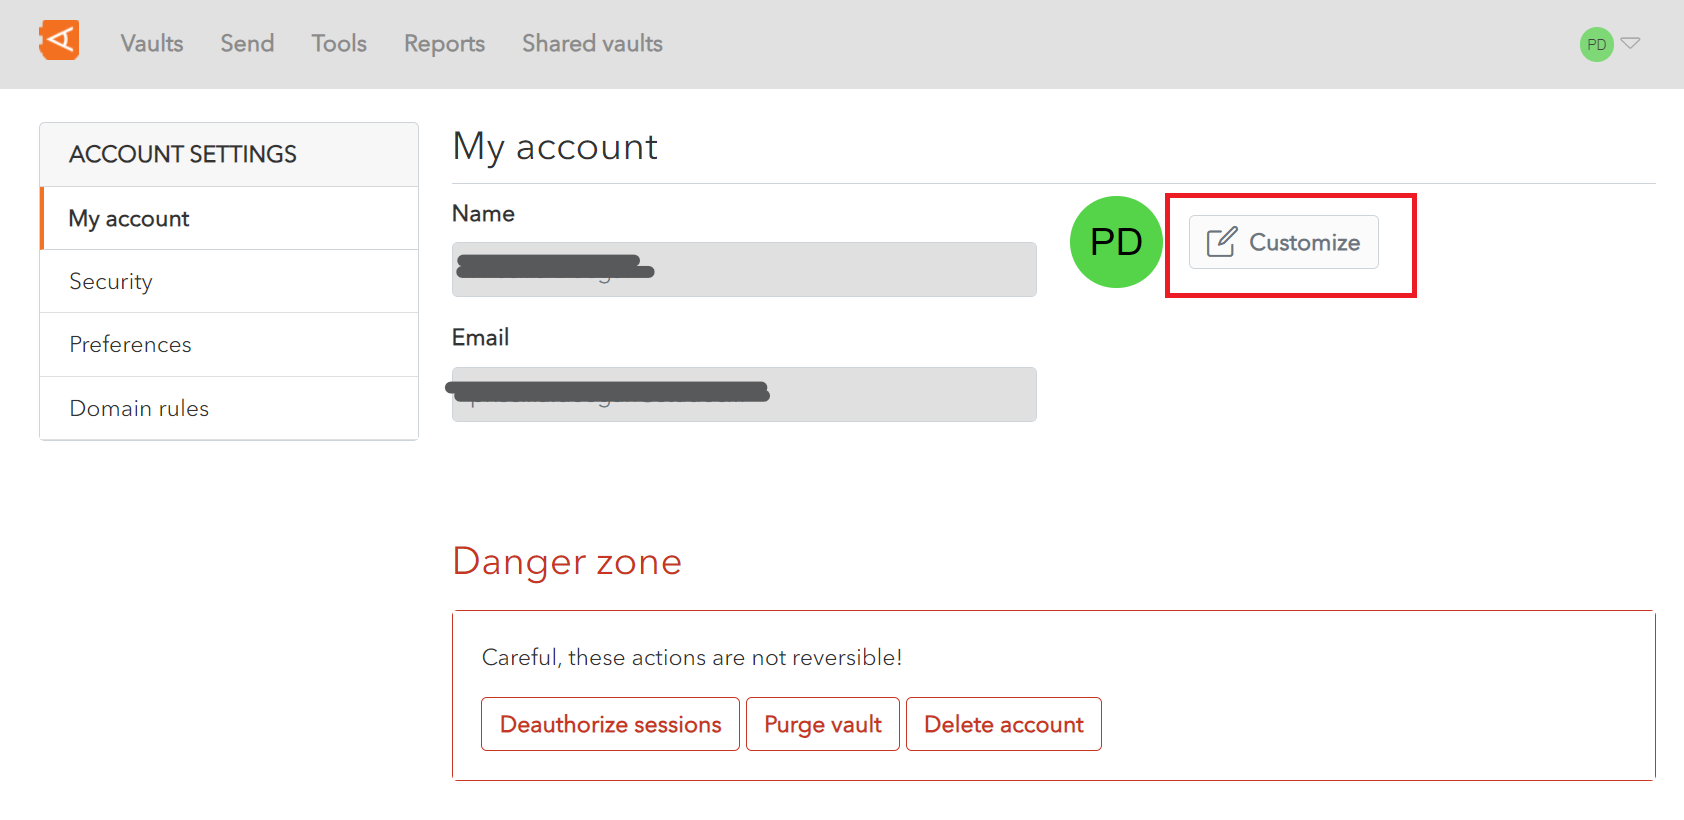
A Customize Avatar Screen is displayed.
Change the color of your avatar and click Save.
Alternatively, click Close to cancel the operation.
![]()