Auto-fill data
Auto-fill your Entreprise Vault data into web pages and mobile apps.
- Auto-fill Overview
- Disable Browser Password Manager & Export Saved Passwords
- Browser Extension Options
- Auto-fill Logins
- Auto-fill for Cards and Identities
- Auto-fill for Custom Fields
- Using URIs in Auto-fills
- Auto-fill for iOS
- Auto-fill for Android
Auto-fill Overview
Once Installed, the WALLIX Browser extension facilitates Auto-fill to webpage pages and mobile apps. The Browser Extension is currently available for Chrome and Firefox.
Browser Password Managers are generally considered less secure than dedicated solutions like WALLIX Enterprise Vault. Before using the Browser Extension it is advisable to Disable Browser Password Manager & Export Saved Passwords.
Items can be added to the Vault from a webpage using the Browser Extension on Desktop or mobile devices.
Logins, Card and Identities, and Custom Fields can be auto-filled to a Webpage using the Browser Extension from a Desktop computer. There are various options for Using URIs in Auto-fills.
A number of options are available for auto-filling webpages and mobile apps on Android Devices and iOS Devices.
Other options are available in the Browser Extension such as Badge Counter, TOTP Copy after Auto-fill or Auto-fill for iframes.
Disable Browser Password Manager & Export Saved Passwords
Chrome Browser
Type chrome://password-manager/passwords into the address bar.
![]()
Click Enter. The Passwords Screen opens.
Click the Settings Link in the Password Manager menu. The Settings Screen opens.
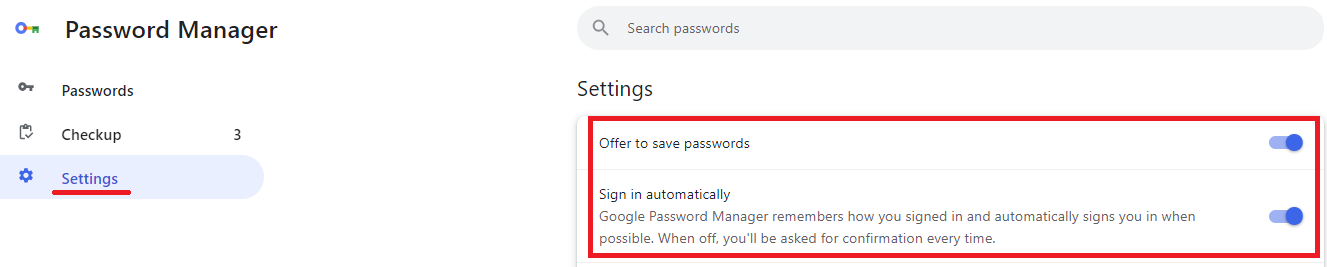
Disable Password Manager
Toggle off the following options:
- Offer to save passwords
- Sign in automatically
The Browser no longer offers to save password or sign in automatically to websites.
Export Saved Passwords
Click Download file beside the Export passwords option.

The Passwords are exported in CSV format.
Firefox Browser
Type about:preferences#privacy into the address bar.

Click Enter. The Passwords Screen opens.
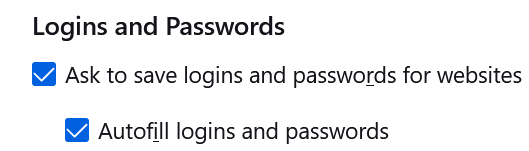
Disable Password Manager
Toggle off the following options:
- Ask to save logins and passwords for websites
- Autofill logins and passwords
The Browser no longer offers to save password or sign in automatically to websites.
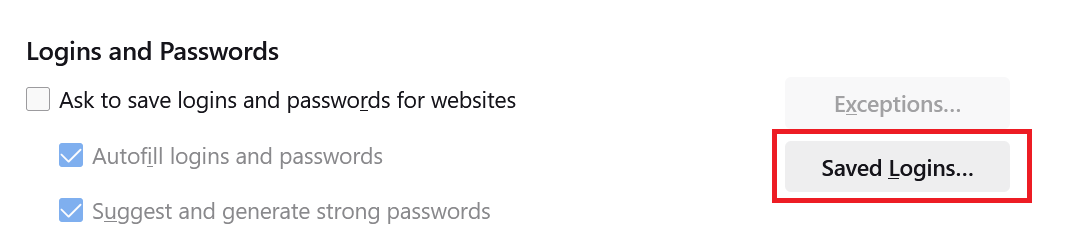
Export Saved Passwords
Click the Saved Logins button beside the Logins and Passwords options.
The Saved Passwords List is displayed.
Click the three dots link beside the Account name. The Context Menu is displayed.
Click the Export Logins Link.
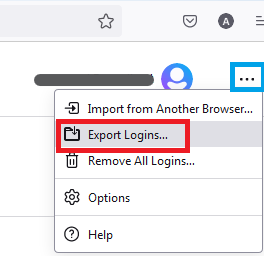
The Passwords are exported in CSV format.
Browser Extension Options
Badge Counter
The Tab Screen of the Browser Extension automatically detects the URI of the currently displayed page.
It finds any Vault Items that have the same URI.
It displays the number of items found for that page on the Badge Counter icon.
It is turned on by default.
It can be turned off by unchecking the Show Badge Counter checkbox in Settings > Options.
TOTP Copy after Auto-fill
If the Login uses WALLIX Authenticator for TOTPs, the shortcut also copies the TOTP to the clipboard after auto-filling the web page with any of the above methods.
Auto-fill for iframes
Auto-fill does not work for untrusted iframes.
An untrusted iframe is defined as one where the src value is not the same as the URI for the Login item, as required in the rules set for Match Detection Behavior.
When the browser extension detects an iframe it responds based on the type of auto-fill being used:
- Auto-fill on Page Load: the browser extension disables the auto-fill on page load and does not warn the user
- Auto-fill using Context menu, Keyboard Shortcut or from Browser Extension: the browser extension warns the user about the iframe.
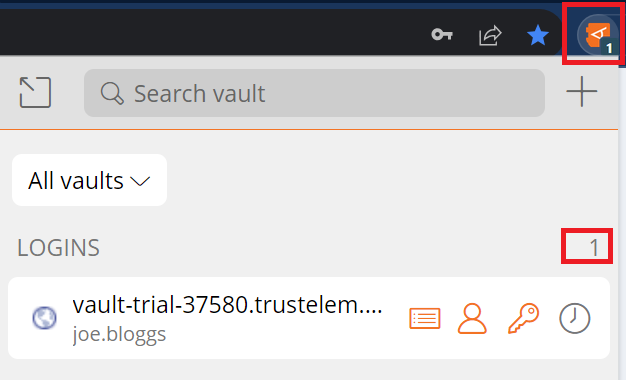
Auto-fill Logins
Prerequisite: The Browser Extension needs to be installed before the Auto-fill feature becomes available.
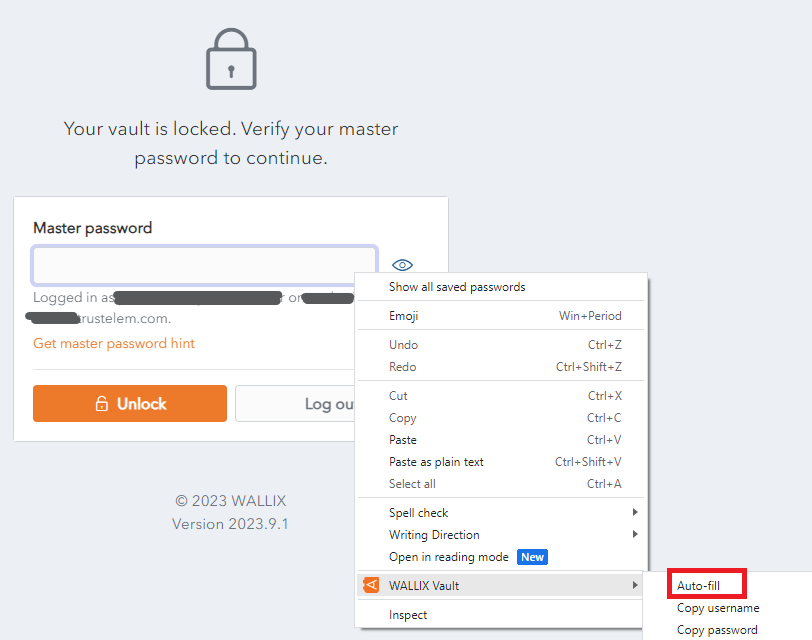
Auto-fill from Context Menu
Right click on the Login Screen of a website. The Context Menu is displayed.
Choose WALLIX Vault > Auto-fill.
If the Login is stored in the Vault, an Auto-fill option is proposed.
Click Auto-fill to retrieve the Login for this website to WALLIX Enterprise Vault.
If you are not signed in to WALLIX Enterprise Vault, you will be prompted to sign in before retrieving the Login.
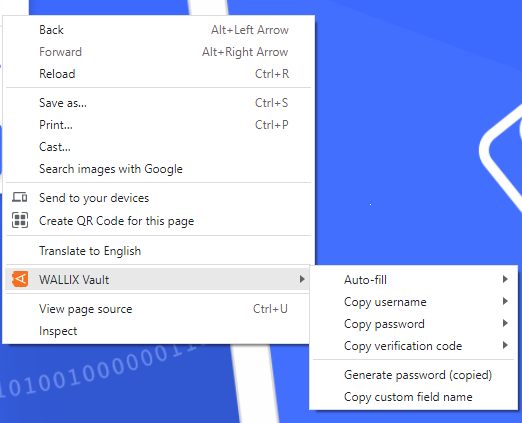
- Copy username: copies the username of the login to the clipboard.
- Copy password: copies the password of the login to the clipboard.
- Copy verification code: copies the verification code of the login to the clipboard.
- Generate password: generates a new more secure password from the copied password.
- Copy custom field name: copies the name of the custom field of the login.
Auto-fill on Page Load
Auto-fill on Page load is a function that automatically populates a Login on a Page when the URI of the page being displayed corresponds to an Item in the Vault.
This is pertinent for Logins, Cards or Identities.
Untrusted iframes: Auto-fill on page load does not work for untrusted iframes.
HTTPS/HTTP: If the Vault Item expects an HTTPS site and a HTTP version of the site is displayed, the user is warned before auto-filling on page load.
Enable Auto-fill on page load
For security reasons, it is automatically disabled and needs to be enabled to work.
To enable Auto-fill on Page Load, from the Browser extension, navigate to Settings> Autofill. The Auto-fill screen opens.
Click the Auto-fill on page load checkbox. This enables the option to auto-fill logins on page load.

From the Default autofill setting for Login items dropdown, choose the default option:
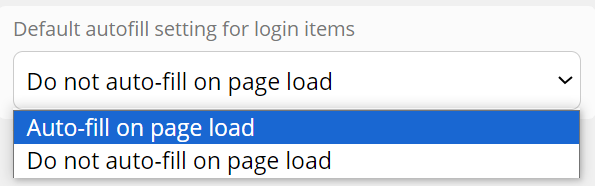
This can be overwritten for each item from the Items Screen. This allows specific auto-fill options to be set for specific items.
From the Default URI match detection dropdown, choose how to match the URL of the webpage with the Login already in the Vault.

Auto-fill Item to Vault on Page Load
If this login is not already saved in WALLIX Enterprise Vault, a prompt displays which offers to save the Login details for this Website.
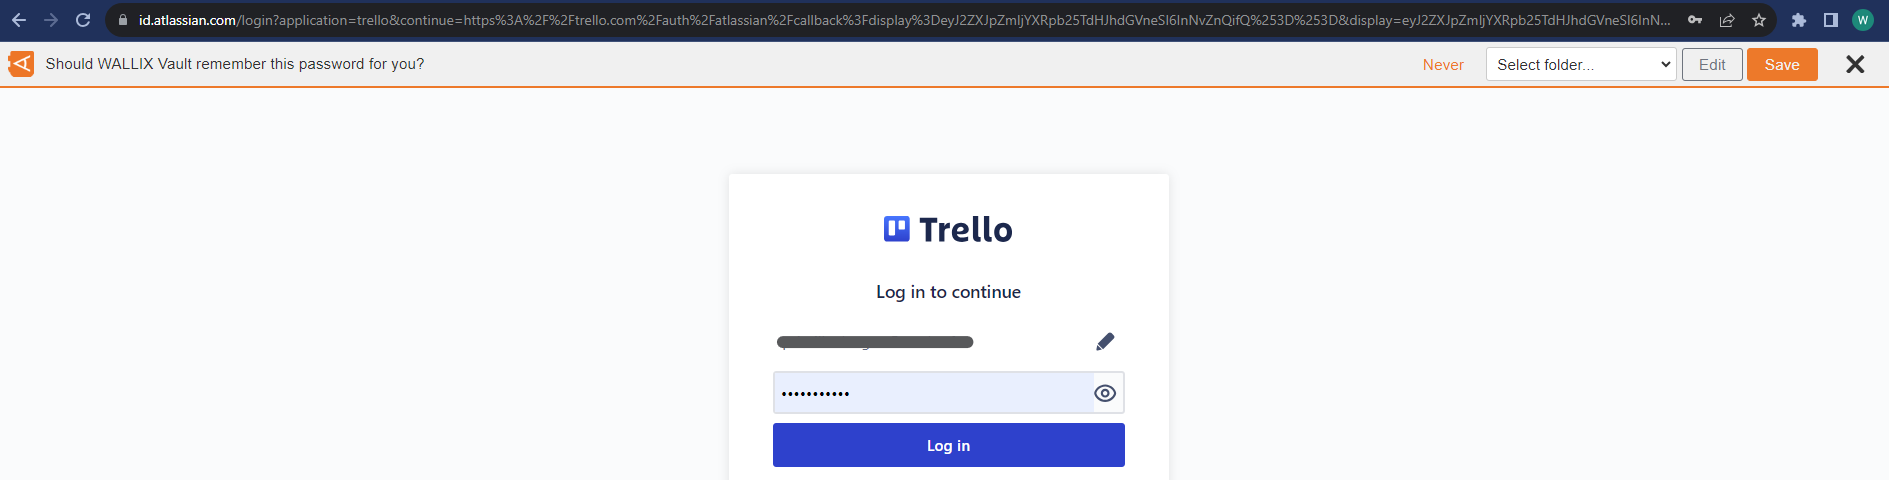
Choose a Folder to add the Login to this Folder in the Vault. This field is optional.
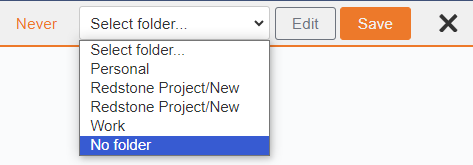
Items are added to the User's Individual Vault and not a Shared Vault.
Click the Save button.
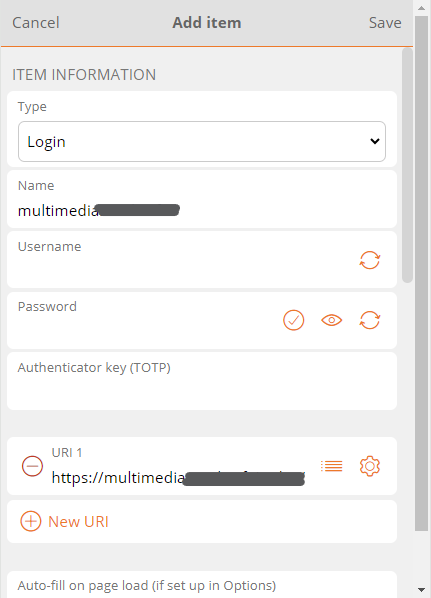
The Add Item Screen displays with the fields pre populated with the Login details.
Modify fields, if required.
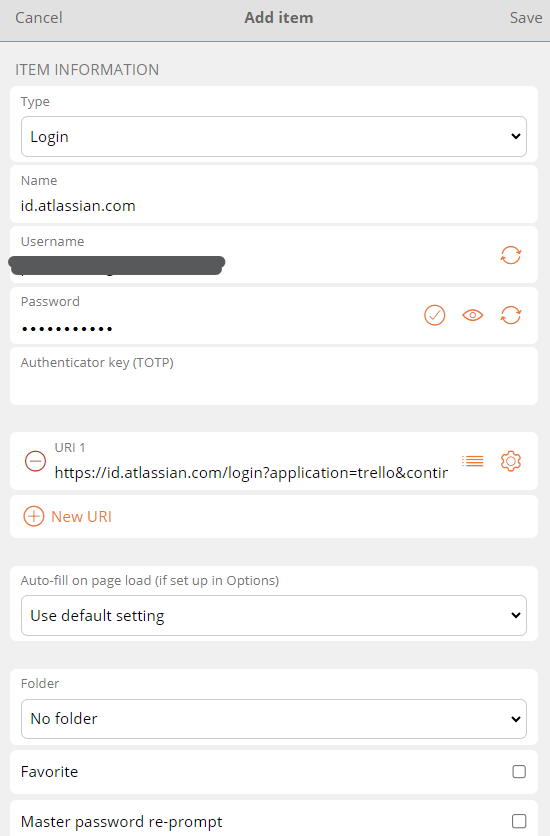
Click Save to Save Item to Vault.
Alternatively, click Cancel to cancel the operation.
Auto-fill Manually
You can manually add a Login that is not already in the Vault.
From the Vault Screen of the Browser Extension, click Add a login.
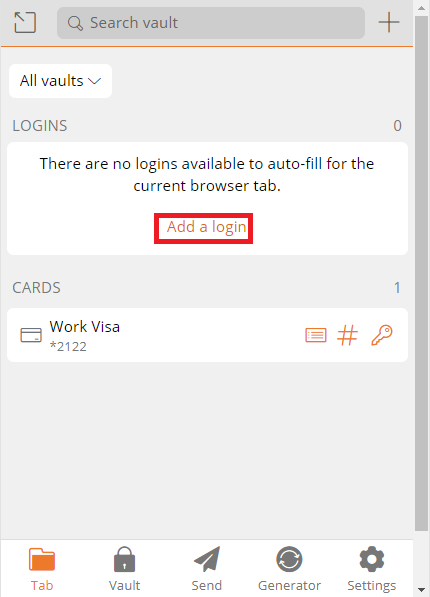
The Add Item Screen opens.
The elements that the Browser Extension could recuperate from the browser are prepopulated.
Enter the remaining fields. Click Save to create Login.
Alternatively, click Cancel to cancel the operation.
Auto-fill using Keyboard Shortcuts
Use the following default keyboard shortcuts (also known as hot keys) to auto-fill a login.
-
Use Ctrl + Shift + L if running Windows of Linux
- Use Cmd + Shift + L if running for macOS
If multiple logins are found for the URI, the last-used login is used for auto-fill.
Keyboard shortcuts can be useful to populating multiple logins in rapid succession.
Configure shortcuts: If the keyboard shortcut doesn't work, it may be because another app is already using it. Either remove the shortcut from the other app or configure WALLIX to use a different shortcut.
TOTP Copy
If the Login uses WALLIX Authenticator for TOTPs, the shortcut also copies the TOTP to the clipboard after auto-filling the web page with any of the above methods.
Auto-fill for iframes
Auto-fill does not work for untrusted iframes.
An untrusted iframe is defined as one where the src value is not the same as the URI for the Login item, as required in the rules set for Match Detection Behavior.
When the browser extension detects an iframe it responds based on the type of auto-fill being used:
- Auto-fill on Page Load: the browser extension disables the auto-fill on page load and does not warn the user
- Auto-fill using Context menu, Keyboard Shortcut or from Browser Extension: the browser extension warns the user about the iframe.
Auto-fill for Cards and Identities
Add to Vault
As for Manually Adding Logins to the Vault, Cards and Identities can be auto-filled directly to the Vault from the browser extension.
Click the Add Item button in the Tab Screen of the Browser extension.
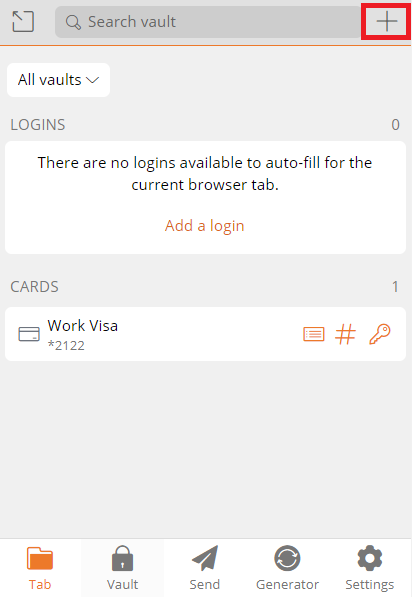
The Add Item Screen is displayed.
Choose Type (Card or Identity).
Add rest of item details.
click Save to add item to Vault.
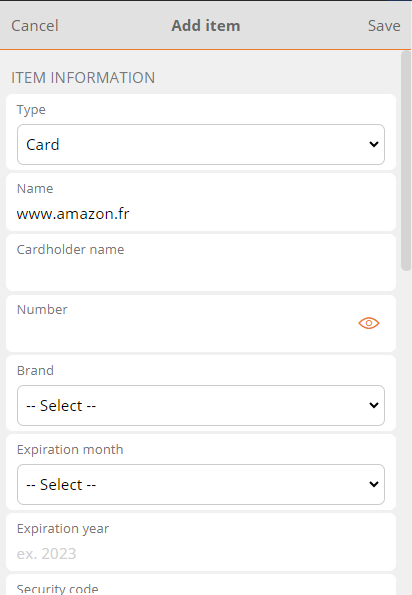
Alternatively, click Cancel to cancel the operation.
Auto-fill Manually
From an ecommerce website, navigate to the add new card page.
Open the Browser Extension.
The Cards saved in the Vault are displayed.
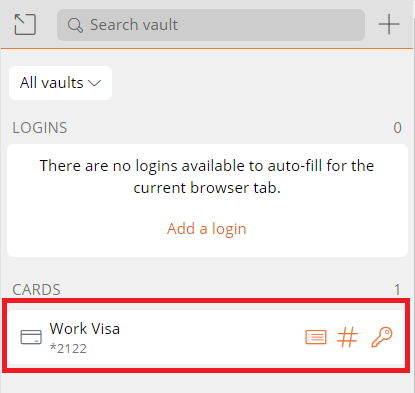
Click a Card. It will automatically populate the webpage.
The procedure is the same for populating an identity on a webpage.
Auto-fill using Context Menu
Cards and identities can be auto-filled to the Vault from the Context menu on the webpage.
This works the same as for Logins.
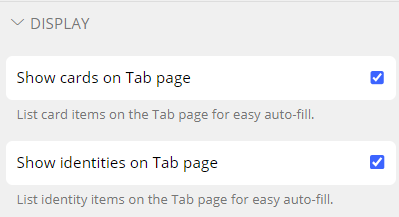
Hide Cards and Identities Option
Cards and Identities are displayed by default in the Tab Screen of the Browser Extension.
Uncheck the following options in Settings > Options > Display in the Browser Extension to hide these from view:
- Show cards on Tab Page checkbox
- Show identities on Tab page checkbox
Auto-fill for Custom Fields
The Browser Extension can be used to auto-fill a web page with custom fields that have been added to Items. A typical application of this is for PINs and Security Questions that are often required in addition to a Username and Password to login to a website.
Auto-field Custom fields can be created for the <form> or <input> elements. A special scenario is possible for <span> elements.
Auto-Fill Custom Fields
Open the Browser Extension on the Webpage that you wish to auto-fill.
The Tab Screen displays.
It automatically detects the URI of the webpage and displays any logins stored in the Vault that correspond with this URI.
Select the Vault Item that contains the custom field to be auto-filled to the webpage.
The Browser Extension finds any fields that match the Custom field Name and auto-fill that field's value.
For this reason it is important to correctly name custom fields.
Linked Custom Fields
Sometimes the Browser Extension is unable to auto-fill usernames and passwords for a webpage. In these cases, Custom fields can be created for the username and password and these can be used instead for auto-fill.
From the Edit Item Screen, add a New Custom Field of type Linked.
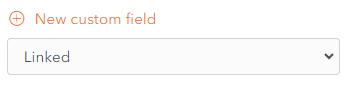
In the Name field, give it the same name as the HTML form element (id, name, aria-label, or placeholder) for the field in question.
This can be found by clicking the Copy custom field name link in the Context Menu of the field in question.
For example, to find the HTML form element for the Master Password in WALLIX Enterprise Vault, click the Copy custom field name link.
The HTML form element for the Master Password is saved to the clipboard.
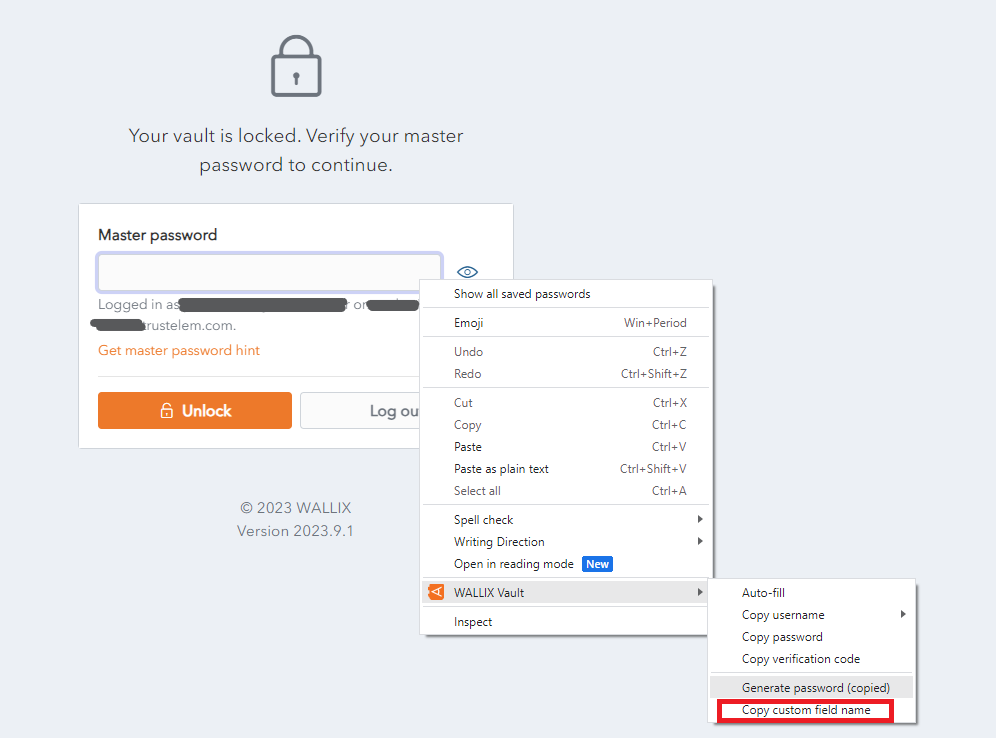
Paste the HTML Form element into the name field of the custom field that you are creating for Master Password.

From the Value dropdown, select Password in the case of a Custom field for password (as in the example above) or Username in the case of a Custom field for username.
This procedure is valid for Auto-field Custom fields can be created for the <form> and <input> elements.
Auto-Fill for Span Tags
A custom field can be created for the id attribute of <span> elements if the data-bwautofill attribute is present in the opening tag.
In the following example, you could create a Custom Field with the name of title. An auto-fill would replace the contents of title (currently "WALLIX Enterprise Vault" with the contents of the custom field.
<span data-bwautofill id="title">WALLIX Enterprise Vault</span>
Using URIs in Auto-fills
A Login Item can have one or more URIs. These are added from the Create Item or Edit Item Screen.

A URI is defined as a :
- Website address (URL)
- Server IP address
- Mobile App Package ID
- etc.
A URI is mandatory for a Login Item in order to auto-fill it into a web page.
URI Components
A URI is made up for a number of components.
https://www.google.com:8080/calendar/item?id=123&type=task
- Scheme https://
- Hostname www.google.com
- Subdomain www
- SLD (second level domain) google
- TLD (top level domain) com
- Port 8080
- Path calendar/item
- Query String ?id=123&type=task
URI Scheme
A URI Scheme should be specified as part of the URI. If it is not specified http:// is used by default.
However, if a Scheme is not specified by the user, the ![]() Launch button, to launch the website or app directly from the Vault, will not work.
Launch button, to launch the website or app directly from the Vault, will not work.

Examples of schemes are
- https:// or http:// are schemes that reference web pages, e.g. https://www.google.com
- androidapp::// is a scheme that references an Android app pacakge ID or name, e.g. androidapp://com.google.android
Mobile App URIs
Every mobile app has it's own URI. In order to save the login of an app into the Vault, it is necessary to save the URI of the app.
Locate App URI for iOS
From the App Login Screen on your iOS device, open the Browser Extension.
The New Item Screen displays and it is prepopulated with the URI of the App.
This only works if the App permits recuperating the URI.
The Item can be saved as a Login Item for this Mobile App.
Alternatively, the URI can be copied and pasted into another Login Item.
Locate App URI for Android
From the App page in the Google Play Store, locate the Share button.
Paste the link to an email or another file where it can be displayed.
The link will look something like this:
https://play.google.com/store/apps/details?id=com.twitter.android
The URI is the id value, in this example, com.twitter.android
URI Match Detection
Each URI associated with an Item in WALLIX Enterprise Vault has a number Match detection options in the that Match detection dropdown can be chosen.
The Match detection option chosen tells WALLIX how to match the URI of the Vault Item with the URI of the web page or mobile app for auto-filling.
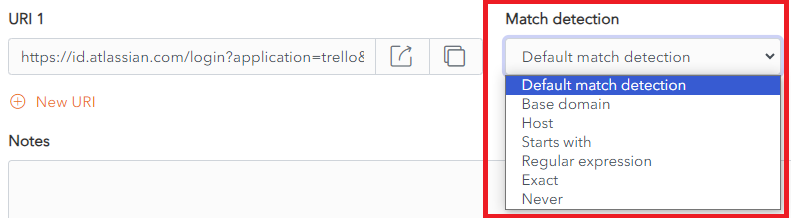
Defaut match detection
Base domain is the default option for URI match detection.
However, this can be changed in Settings > Auto-fill for all Items.
The Default match detection can be specified on a per item basis, in the Item Screen for each item. If not specified, the default option is used.
Base domain
If Base domain is chosen as the Default match detection for a URI, WALLIX will try to auto-fill all pages or apps where the top-level domain (TLD) or second-level domain (SLD) of the Page URI matches a the top-level domain or second-level domain of a Vault Item.
This works with country code top level domains only. Local TLDs, e.g. www.google.local do not work. Local TLDs work with Host matching.
For example,
https://google.com
Auto-fill works:
- www.google.com
- calendar.google.fr
Auto-fill does not work:
- www.google.net
Host
If Host is chosen as the Default match detection for a URI, WALLIX will try to auto-fill all pages or apps where the hostname (and port, if specified) of the Page URI matches a the hostname (and port, if specified) of a Vault Item.
For example,
https://calendar.google.com:8080
Auto-fill works:
- calendar.google.com:8080
- calendar.google.com:8080/home.html
Auto-fill does not work:
- www.google.com (different subdomain and missing port)
- www.google.com:8080 (different subdomain)
- calendar.google.com:8081 (different port)
Starts with
If Starts with is chosen as the Default match detection for a URI, WALLIX will try to auto-fill all pages or apps where the Page URI starts with the URI of a Vault Item.
For example,
https://www.google.com/home/
Auto-fill works:
- https://www.google.com/home/index.html
- https://www.google.com/home/
Auto-fill does not work:
- https://www.google.com
- https://www.google.com:8080/home/ (port number added)
- https://www.google.com/home (missing trailing slash)
Regular expression
If Starts with is chosen as the Default match detection for a URI, WALLIX will try to auto-fill all pages or apps where the Page URI matches a specified regular expression associated with the URI of a Vault Item.
Regular expressions are case insensitive.
For example,
^https://[a-z]+\.google\.com/index\.php
Auto-fill works:
- https://www.google.com/index.php
- https://fr.google.com/index.php
Auto-fill does not work:
- https://www.google.com/index/ (missing .php)
- https://malicious-site.com?q=google.com
For example,
^https://.*google\.com$
Auto-fill works:
- https://www.google.com
- https://fr.google.com/index.html
- https://malicious-site.com?q=google.com
URI matching with Regular Expressions is an advanced option and should only be used by those familiar with using Regular Expressions.
Periods (.) must be escaped (\) otherwise they will match on any character.
Auto-fill does not work:
- https://google.com/index/ (missing period (.))
Exact
If Exact is chosen as the Default match detection for a URI, WALLIX will try to auto-fill all pages or apps where the Page URI is an exact match for the URI of a Vault Item.
For example,
https://calendar.google.com/index.html
Auto-fill works:
- https://calendar.google.com/index.html
Auto-fill does not work:
- https://calendar.google.com/index.htm (index.htm instead of index.html)
- http://calendar.google.com/index.html (http instead of https)
- https://www.google.com/index.html (different subdomain)
For HTTPS, even if Exact matching is not used, the Browser Extension will warn before auto-filling a HTTP site if HTTPS is expected.
Never
If Never is chosen as the Default match detection for a URI, WALLIX will never try to auto-fill all pages or apps using that Vault Item.
Equivalent Domains
It is possible to link equivalent domains, or domains that use the same login.
For example, calendar.google.com can be linked with www.google.com.
This can be done in Settings > Domain Rules.
If Exact match detection is used an equivalent domain will not be allowed.
Auto-fill for iOS
Auto-fill is possible on an iOS device from your Browser Extension on Chrome or Firefox browsers.
Account Switching facilitates multiple logins at one time.
Auto-fill using Custom Fields is not supported on mobile devices.
Vault Timeout must be set to Lock (and not Log Out) if NFC is required for Two-factor Authentication.
Auto-fill using Keyboard
This is the recommended option.
Enable Auto-fill on Keyboard
From your iOS device, tap Settings > Passwords > Password Options.
The Autofill Passwords and Passkeys option is displayed.
Click AutoFill Passwords and Passkeys to toggle it on.
Click WALLIX Vault from the Use Passwords and Passkeys From List
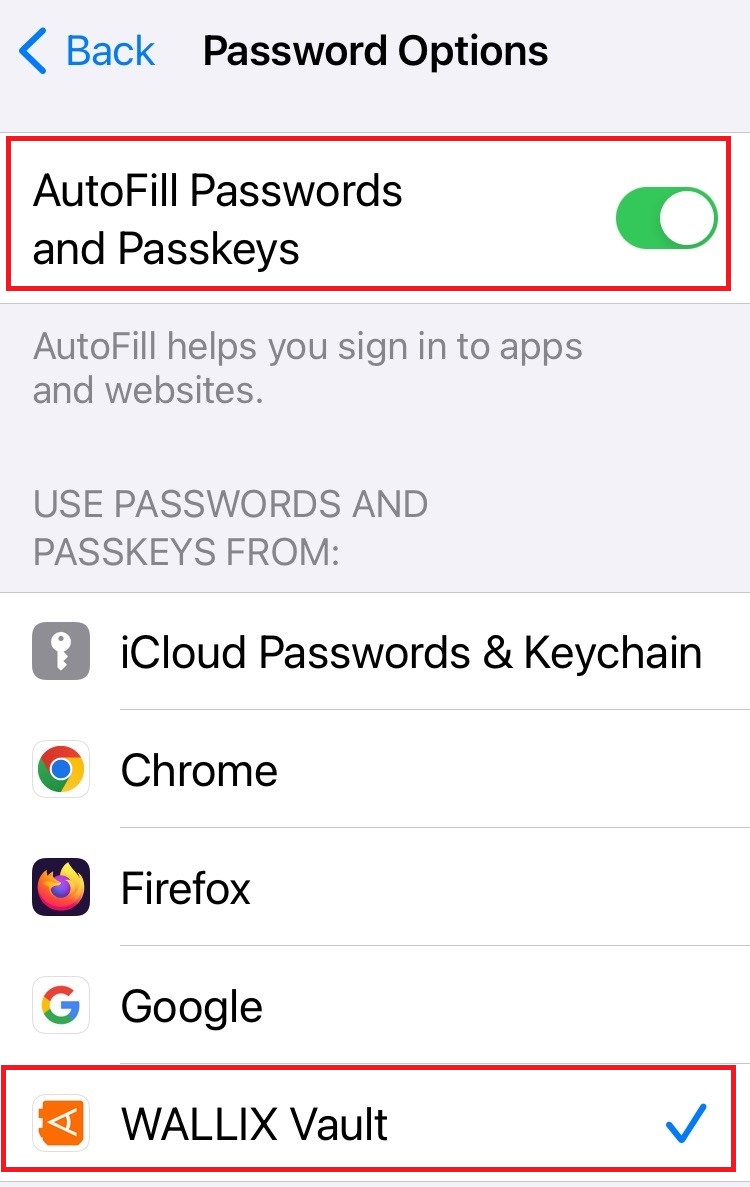
It is recommended that other Auto-fill services are disabled, like Chrome Password Manager or iCloud Passwords & Keychain.
Using Auto-fill on Keyboard
Open an app or website where you are not logged into.
Tap either the Username or Password Fields.
A Username or the Passwords button is displayed.
- If a Username is displayed, tap it. The Login is auto-filled.
- If the Passwords button is displayed, tap it. A list of Logins is displayed. Choose the Saved Login for this website. The Login is auto-filled.
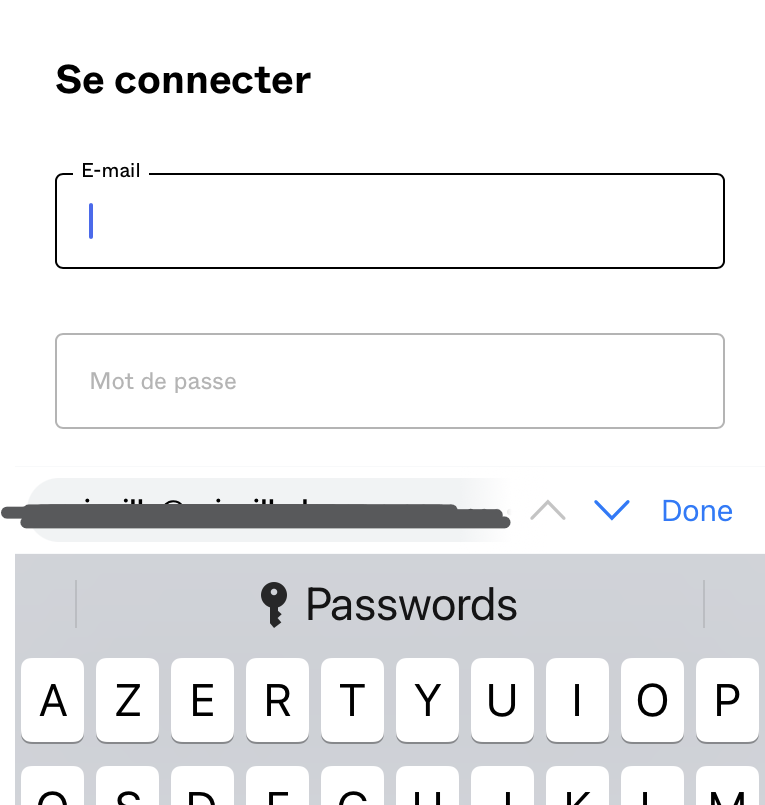
Where a Passwords button is displayed, it is likely because the website URI isn't an exact match on a URI associated with a Vault Item.
Auto-fill using Browser Extension
Enable Auto-fill in Browser Extension
From the WALLIX Browser Extension App, tap Settings > Autofill > App Extension
Tap Enable App Extension button.
Using Auto-fill in Browser Extension
Open an app or website where you are not logged into.
Tap the ![]() Share icon in the Address Bar.
Share icon in the Address Bar.
Click the WALLIX Vault icon. A list of matching Logins is displayed.

Choose the correct Login to auto-fill.
Auto-fill for Android
Auto-fill is possible on an Android device from your Browser Extension on Chrome or Firefox browsers.
Account Switching facilitates multiple logins at one time.
A number of auto-fill options are available, depending on the version of Android that your device is running.
- Auto-fill Service
- Inline Auto-fill
- Accessibility
- Draw-Over
Auto-fill using Custom Fields is not supported on mobile devices.
Vault Timeout must be set to Lock (and not Log Out) if NFC is required for Two-factor Authentication.
Auto-fill Service
This facilitates Auto-Fill from the Login Screen.
Auto-fill Service is available on Android 8+. It requires enabling of Auto-fill Services.
Enable Auto-fill Service
From WALLIX Android App, tap Settings > Auto-fill > Auto-fill Services
Tap WALLIX from the Auto-fill Services List.
Tap Confirm.
Using Auto-fill Service
Tap on Username or Password fields on a webpage or an app.
A pop up screen will display 2 options:
- The Matching Login Item from WALLX Vault. Tapping on this option auto-populates the Login.
- Auto-fill from WALLIX Vault. Tapping on this option opens the Vault if the Vault is unlocked to browse the available Login Items.
If WALLIX Vault is locked, you will be prompted to login to your Vault.
Inline Auto-fill
This facilitates Auto-Fill from the Keyboard Section.
Inline Auto-fill: Available on Android 11+. It requires enabling of Autofill Service and Input Method Editor (IME).
If it doesn't work, it is possible that your IME does not support inline.
Enable Inline Auto-fill
From WALLIX Android App, tap Settings > Auto-fill > Auto-fill Services
Tap the Use Inline Autofill option to toggle it on.
Using Inline Auto-fill
Tap on Username or Password fields on a webpage or an app.
Logins matching the URI are displayed in the keyboard section.
Choose the option required.
It is auto-filled into your webpage or app.
Accessibility
This facilitates Auto-Fill from the Login Screen.
Draw-Over is available in Android 6+. It requires Enabling of Accessibility and Drawover
Enable Accessibility
From WALLIX Android App, tap Settings > Auto-fill > Auto-fill Services
Tap the Use Accessibility option to toggle it on.
Using Accessibility
Tap on Username or Password fields on a webpage or an app.
A pop up screen displays an option to Auto-fill from WALLIX Vault.
Tap on this option.
If the Vault is unlocked, the Vault is opened.
If WALLIX Vault is locked, you will be prompted to login to your Vault.
Drawover
This facilitates Auto-Fill from the Login Screen.
Accessibility is available on all Android Versions. It requires Enabling of Accessibility.
Enable Drawover
From WALLIX Android App, tap Settings > Auto-fill > Auto-fill Services
Tap the Permit drawing over other apps option to toggle it on.
Using Drawover
Tap on Username or Password fields on a webpage or an app.
A pop up screen displays an option to Auto-fill from WALLIX Vault.
Tap on this option.
If the Vault is unlocked, the Vault is opened.
If WALLIX Vault is locked, you will be prompted to login to your Vault.