Send data
Share sensitive data with someone who does not have Entreprise Vault access.
- Send Overview
- Create Send
- Access a Send
- Send Privacy
- Other Send Options
- Send Lifespan
- Edit Send
- Delete a Send
- Send Encryption Process
Send Overview
Using Send is a way to share sensitive Vault data with someone who does not have Vault Access using End-to-End Encryption.
The Send Encryption Process describes how a Send Link is constructed, the Encryption and Decryption process and Send Security Options.
A Send can be Created to send either Plain Text or a File to another person. A Send can also be modified or deleted manually after creation.
A Link can be Copied to the Clipboard and provided to the person to Access the Send. The link can be
Sends are by definition ephemeral and have Limited Lifespan.
- They are Automatically Deleted after a certain time.
- An Expiration Date and Maximum Access Count can also be set for Sends.
A number of Privacy Options are available for a Send.
- A Send can also be Password Protected. In this case the Recipient is required to enter the Password to access the Send.
- The text in Text Sends can be hidden by default to prevent unintended access to a Send.
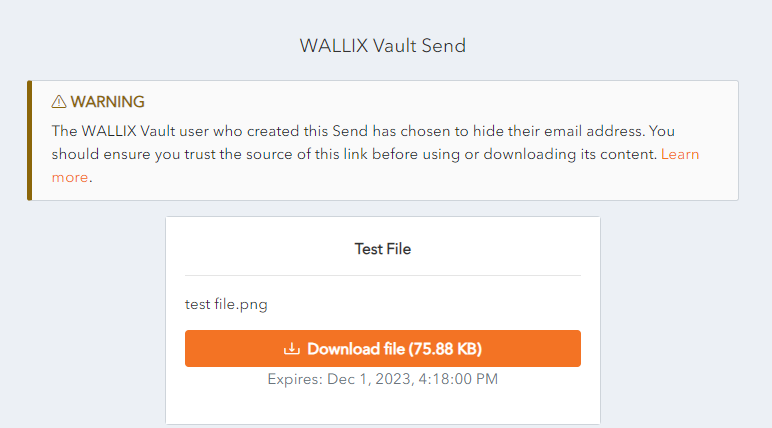
- The Email Address of the sender can be hidden. In this case it is advisable that the Sender inform the Recipient that a Send link will be sent, and that the recipient contacts the Sender to verify the link before accessing it.
- A Private Note can be added to a Send. This is not sent with the Send.
Create Send
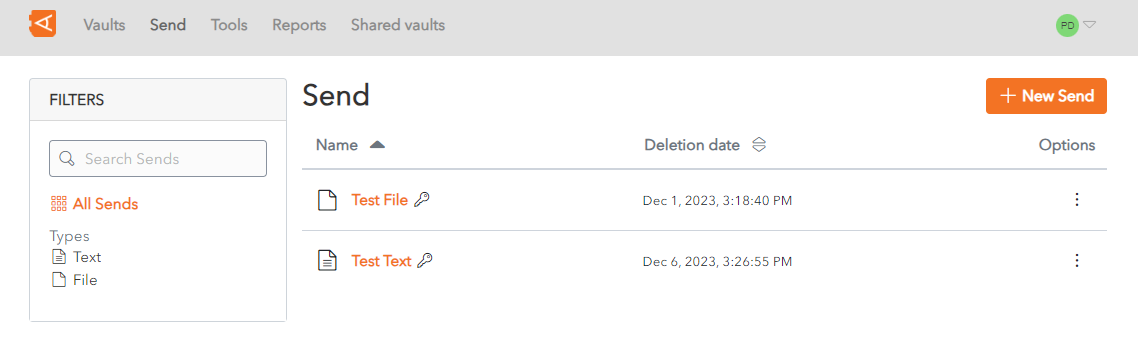
Click on the Send Menu link to access the Send Screen. A List of Sends are displayed.

Click the New Send button to create a New Send. The New Send Screen is displayed.
There are 2 types of Sends that can be created - a File Send and Text Send.
Create a File Send
In the Name field, enter a Name for the Send. This should describe the Send.
Choose File from the What type of send is this? radio buttons.
Upload the File to send.
The maximum file size is 100MB.
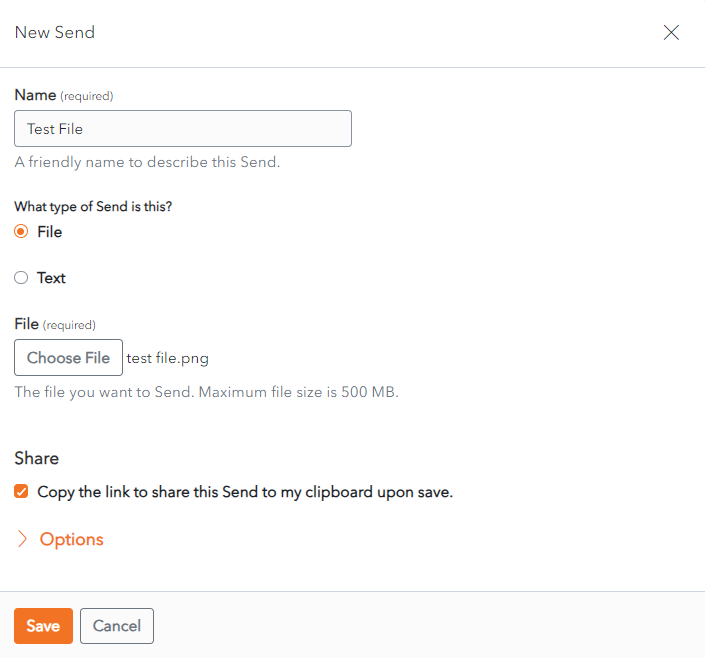
Click Save to Save the send. The Send List Screen displays with the new send in the list.
Alternatively, click Cancel to cancel the operation.
Create a Text Send
In the Name field, enter a Name for the Send. This should describe the Send.
Choose Text from the What type of send is this? radio buttons.
In the Text field, add the text to be sent.
Check the When accessing the Send, hide the text by default. This field is optional. If you check this box, the person accessing the send will need to unhide the text in order to view it, in order to protect the privacy of the text.
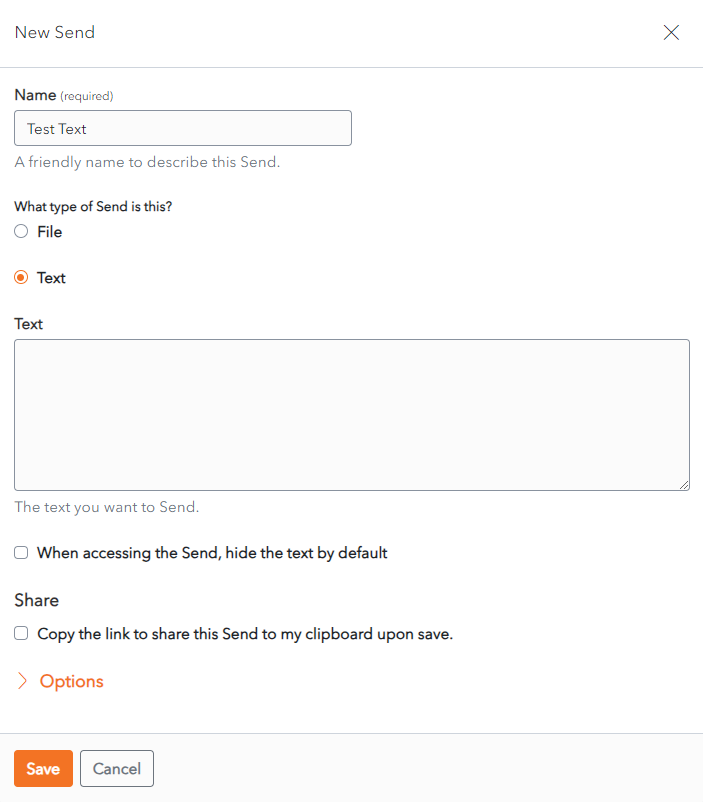
Click Save to Save the send. The Send List Screen displays with the new send in the list.
Alternatively, click Cancel to cancel the operation.
Access a Send
Copy the Send Link provided by the Send owner into your Browser window.

If the Send is Password Protected, enter the Password provided by the Send owner to access the Send.
The Send is displayed.
Send a File
If the Send is a File, the a link to Download the File is provided.
Click the Download file link to download the file to your computer.
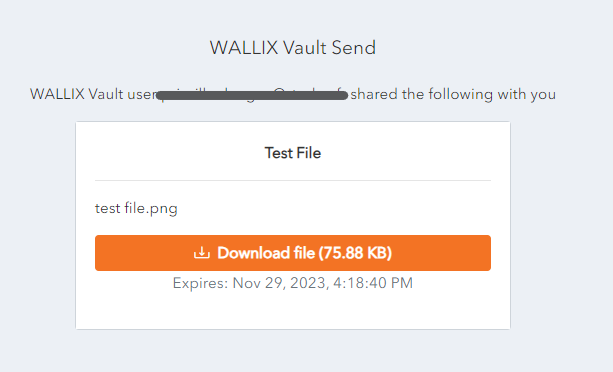
If the Send has an Expiration Date, the link is no longer available after the Expiration Date. The following message is displayed.

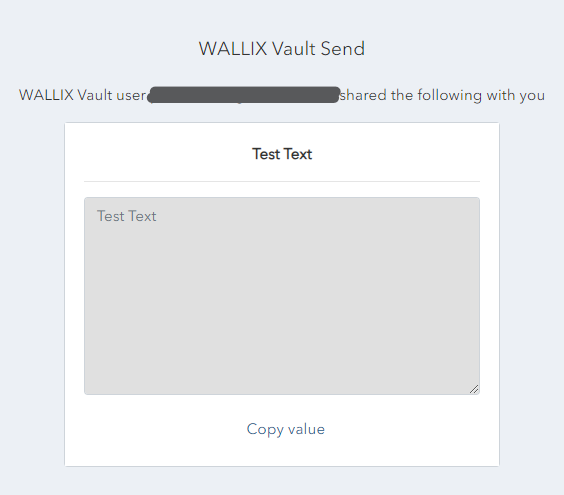
Send Text
If the Send is a Text, the Text is displayed.
Click on the Copy value link to copy the link to the clipboard.
If the text is set to Hidden (by the Send owner), toggle the visibility to display the text.
Send Privacy
There are a number of possible Privacy Options for Sends.
Password Protection
A Password can be added to a Send to prevent unwanted access to the Send. When a member tries to access the Send, they will need to enter the Password to gain access.
Password Protect a Send
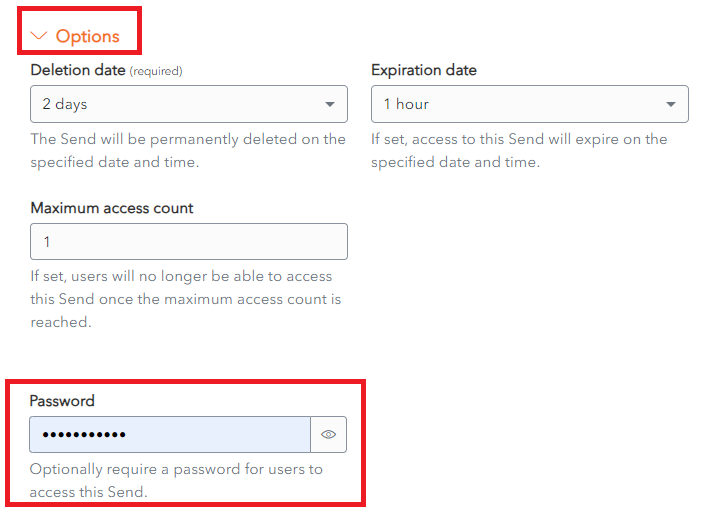
When creating or editing a Send, click on the Options link.
A list of Send Options displays.
Enter the Password to be used by the receiver to access the Send.
This can be left blank if password protection is not needed.
Once set, the password cannot be viewed, but it can be modified or deleted.
Change or Delete a Send Password
Click on a Send to open the Send Screen. The Send is displayed.
To Change the Password used to protect the Send, overwrite the Password in the Password Field with a New Password. Click Save. The Password is changed.
To Remove Password Protection from the Send, delete the password from the Password Field. Click Save. The Password Protection is removed.
Access a Password Protected Send
If the Send is password protected, enter the Password provided by the Send Owner.
Click Continue.
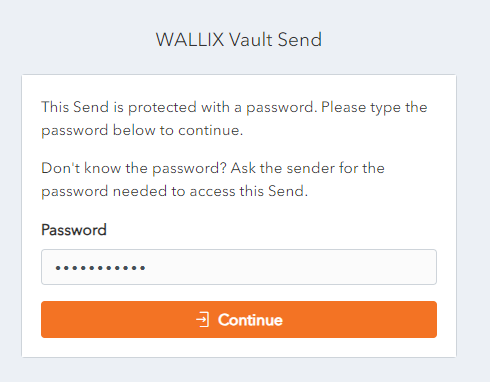
The Send is displayed.
Hide Text
The Text in a Send can be hidden, in order to protect the privacy of the text. When a member accesses it, they will need to unhide the text in order to view it.
Hide Text in Send
When creating or editing a Send, click on the Options link.
A list of Send Options displays.
Check the checkbox When accessing the Send, hide the text by default. Click Save to save changes.
This field is optional.

View Hidden Text in Sends
If the text is set to Hidden (by the Send owner), it is not displayed when the Send is opened.
Click Toggle visibility to display the text.
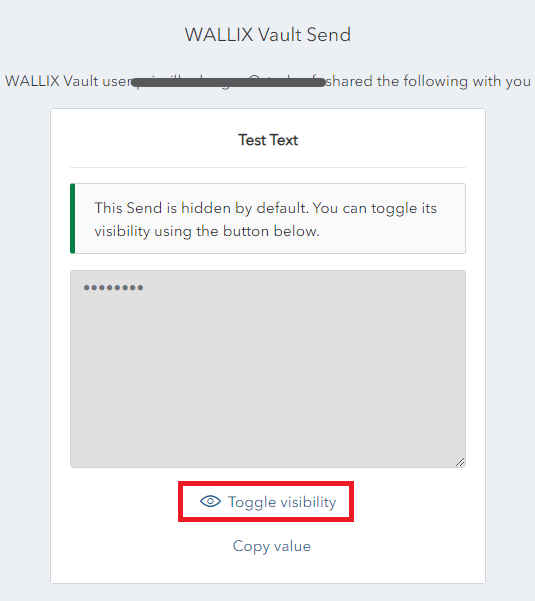
The Text is displayed.
Hide Email
By default the Sender Email address of a Send is displayed to recipients. This can be hidden if required.
Hide Email in Send
When creating or editing a Send, click on the Options link.
A list of Send Options displays.
Check the checkbox beside Hide my email address from recipients.

Click Save to save this option.
When a member accesses this Send, the sender's email address is hidden. The following message is displayed.
Other Send Options
When creating a Send, there are a number of options that are hidden by default. Click the Options Link to unhide the Send Options:
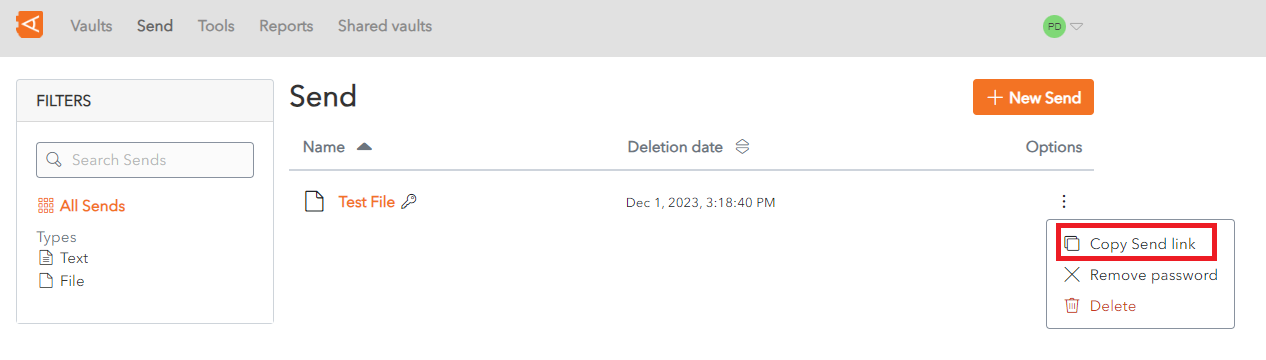
Copy Send Link to Clipboard
Check the checkbox Copy the link to share this Send to my clipboard upon save.
This field is optional.

If you check this box, the link will be copied to your clipboard to facilitate providing it to person you wish to Grant Access to the Send.
The Copy Send Link can also be used to Copy the Send Link to the clipboard.
Add Private Notes
From the Send Screen, click on the Options Link.
In the Notes field, enter any privates notes you wish to make about the send.
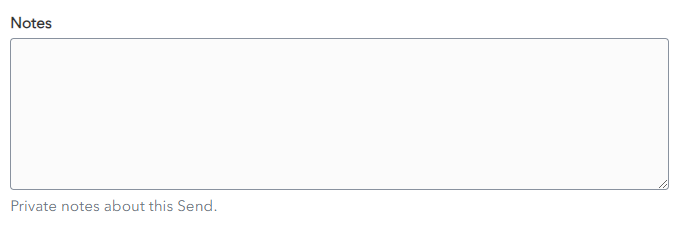
These notes are not sent with the Send.
Send Lifespan
Sends have a limited lifespan. A number of options can be set for each send.
The Options for a send can be set when the Send is created. They can also be modified at a later time.
Click the Options link on the Send Screen.
The Options are displayed for that send.
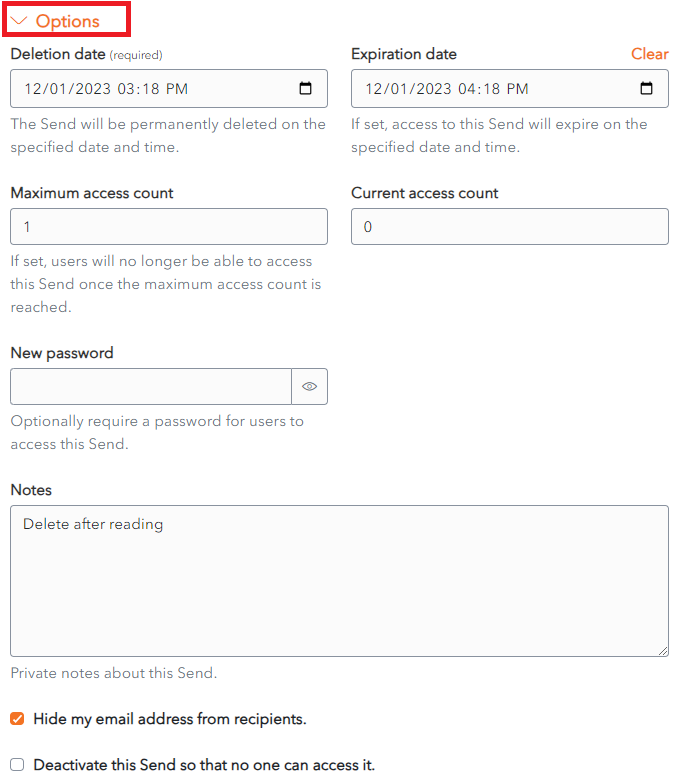
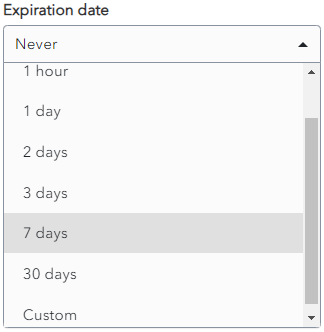
Deletion Date
Choose the period of time to keep the Send from the Deletion Date dropdown.
The options range from 1 hour to 30 days.
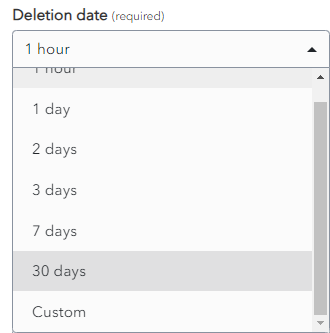
Alternatively, choose Custom, then choose the Expiration Date and Time.
Set Deletion Date
The Send will be permanently deleted on the specified date and time. After this time it will be no longer accessible.
This is a Required field. By default, a Send Lifespan is set at 7 days.
Automatic Deletion of Sends
When the Deletion Date is reached, the Send is Marked for Deletion. A Delete icon appears beside the Send for a few minutes before it is permanently deleted.
Deleted Items are not stored in the Trash. They are permanently removed from the Vault.
Manual Deletion of Sends
From the New Send Screen or the Edit Send Screen, click the ![]() Delete button.
Delete button.
The Delete Send Confirmation Screen appears.

Click Yes to delete the Send.
Click No to cancel the operation.
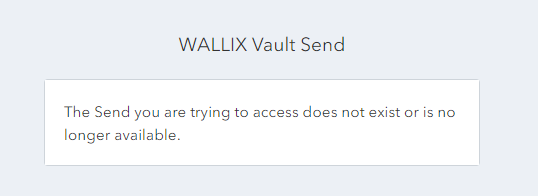
Access Deleted Send
When a Recipient tries to access a Deleted Send, the following Error Message is displayed.
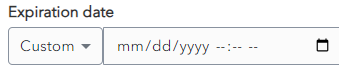
Expiration Date
A Send can be set to expire a fixed period of time after creation or on a specific date.
Set Expiration Date
Choose the period of time to keep the Send from the Expiration Date dropdown.
The options range from 1 hour to 30 days.
Alternatively, choose Custom, then choose the Expiration Date and Time.
By default, a Expiraton Date is set at Never. Unless you specify an Expiration Date, your Send will never expire.
Expired Sends are no longer accessible to Recipients but they are still accessible by the Sender until their Deletion Date.
Access Expired Send
Like for Deleted Sends, when a Recipient tries to access a Expired Send, the following Error Message is displayed.
Maximum Access Count
A Send can be set to have a Maximum Access Count. This means the number of times that it can be accessed by the Recipient before it becomes unavailable.
Set Maximum Access Count
Choose the number of times that the Recipient can access the Send. It can be left blank.
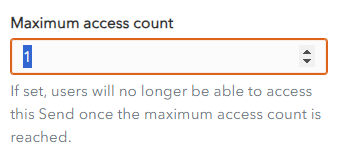
By default, it is blank, which means the Send can be accessed an unlimited number of times before it is deleted.
A Maximum Access Count Reached Icon is displayed beside the Send in the Sender's Inbox.
![]()
Access Send whose Maximum Access Count has been reached
When a Recipient tries to access a Send whose Maximum Access Count has been reached, the following Error Message is displayed.
Deactivate Send
Deactivate a Send
A send can be deactivated so that Recipients can no longer access it.
Check the checkbox Deactivate this Send so that no one can access it.
By default, this field is unchecked.

Deactivated Sends are still available to the Sender until they are deleted.
A Deactivated Icon is displayed beside the Send in the Sender's Inbox.
![]()
Access a Deactivated Send
When a Recipient tries to access a Deactivated Send, the following Error Message is displayed.
Edit Send
From the Send List, click on a Send to open it the Edit Screen.
Modify the Send.
All fields can be modified except the Send Contents (File or Text being sent).
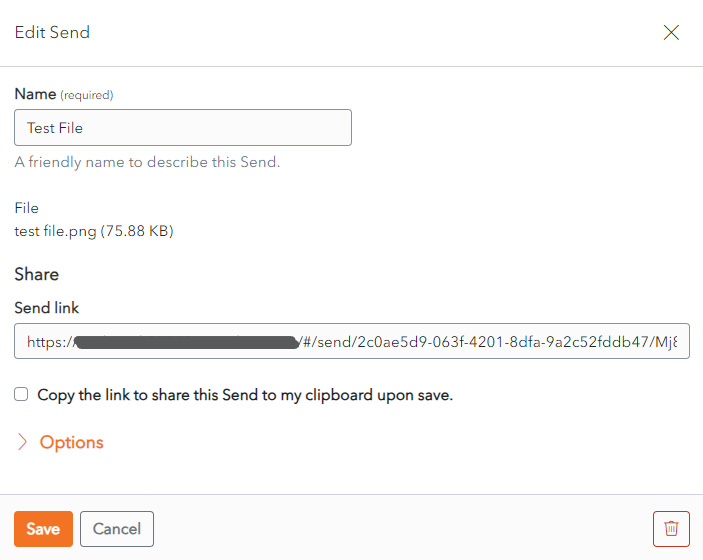
Click Save to save changes.
Alternatively, click Cancel to cancel the operation.
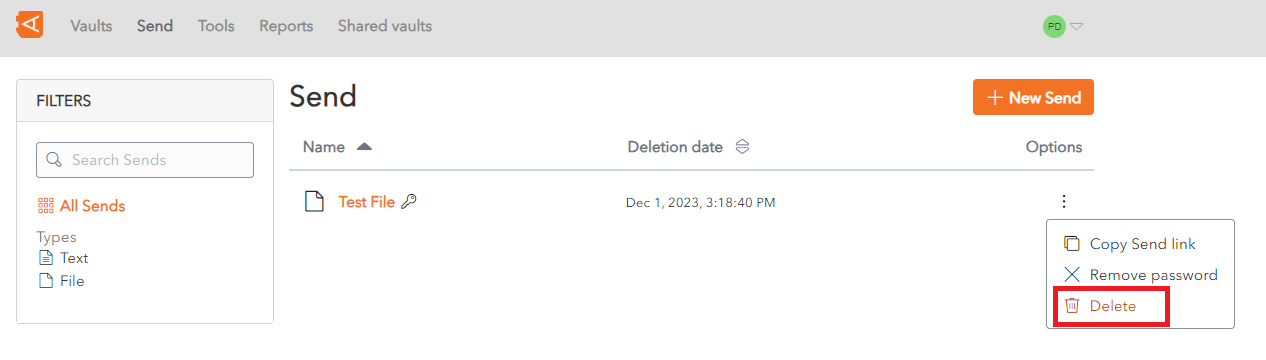
Delete a Send
A Send can be deleted manually at any time from the Create Send or Edit Send Screen, by clicking on the ![]() Delete button.
Delete button.
It can also be deleted from the Context menu of the Send.
The Automatic Deletion of Sends is set in the Options menu of the Send Screen. This is set at Send Creation or can be modified from the Edit Screen.
Send Encryption Process
All Sends are automatically end-to-end encrypted, which means that WALLIX Enterprise Vault encrypts the data in the Send Link and the client-browser uses the encryption key to decrypt the data once received.
Send Link Anatomy
The Send Link is comprised of 3 elements:
https://<WALLIX Vault URL>/#/send/<send_id>/<encryption_key>
- Secure HTTP Protocol: https//:
- Vault URL: <WALLIX Vault URL>
- URL Fragment: /#/send/<send_id>/<encryption_key> which contains the <send_id> and the <encryption_key>
Send Encryption
Here is how it works:
- When a Send is created a 128-bit secret key is generated for that Send.
- A 512-bit encryption key is derived from the 128-bit secret key.
- The Send is AES-256 encrypted using the derived 512-bit encryption. Data (plain text or file) and the Metadata (Name, Filenme, Notes, etc.) are included in the encryption.
- The Encrypted Send is uploaded to WALLIX Servers. The Send ID (used to identify the Send for decryption) is included in upload. The Encryption Key is not included in the upload.
Send Decryption
Here is how it works:
- When a Send Link is accessed, the Web Browser requests the Send Access Page from WALLIX Servers.
- The Send Access Page is returned from WALLIX Servers as a Web Vault Client.
- The URL Fragment (containing Send ID and Encryption Key) is parsed locally by the Web Vault Client.
- Using the parsed Send ID, the Data is requested from WALLIX Servers by the Web Vault Client.
- The Encryption Key is never included in Network Requests.
- The Encrypted Send is returned from WALLIX Servers to the Web Vault Client.
- Using the Encryption Key, the Encrypted Send is Decrypted locally by the Web Vault Client.
Send Security
In order to improve Send Security, two additional steps can also be taken when transmitting a Send. These steps are optional.
1. Use Password Authentication
- When creating a Send, set a Password.
- Provide the Password to the Recipient via a separate channel.
- When the Recipient clicks the Send Link, they are obliged to successfully enter this password before accessing the Send.
- The Encrypted Send is then accessed and decrypted.
The Password is not included in Send Encryption or Decryption. It is only used for Authentication before the Encrypted Send can be accessed and decrypted.
2. Provide Encryption Key Separately
- Provide the Send Link without the Encryption key.
- Provide the Encryption Key via a separate channel.
- The URL should be reassembled to include the Encryption Key, as per the Send Link Anatomy.
The fully Reassembled Send Link is Required to Access the Send.