Former documentation
- Quickstart - product presentation
- Quickstart guide for users
- Quickstart guide for administrators
- Account management
- Account Management Overview
- Create WALLIX Entreprise Vault account
- Get Master Password Hint
- Reset Master Password
- Change Master Password
- Encryption Key Settings
- Login to Vault
- Logout from Vault
- Unlock Vault
- Lock Vault
- Unlock with PIN
- Unlock with Biometrics
- Lock Vs Logout
- Deauthorize Sessions
- Account Switching on Mobile App
- Reset Trustelem Password
- Delete Account
- Administration Overview
- Manage items
- Items Overview
- Create Item
- Edit Item
- Search an item
- Add Logins to Vault
- Delete Item
- Identity Items
- Login Items
- Card Items
- Secure Note Items
- Password Fields for Login Items
- Password Protected Items
- TOTP Authentication
- Item Context Menu
- Move Item to Shared Vault
- Clone Item
- Favorites
- Validate Master Password Reset Request
- Manage attachments
- Grant Trustelem Account Recovery Permissions
- Manage folders
- Manage Data Recovery
- Admin quick start
- Approbators group management
- Create Data Recovery Request
- Manage Data Recovery Requests
- Grant Trustelem Data Recovery Permissions
- Administration application
- Manage Shared Vaults
- Shared Vaults Overview
- Create a Shared Vault
- Rename Shared Vault
- Shared Vault Items Context Menu
- Invite Member to Shared Vault
- Add, Edit or Delete Items
- Edit Member Roles
- Manage Member Access to Collections
- Revoke Access to Shared Vault
- Restore Access to Shared Vault
- Remove Member
- Leave a Shared Vault
- Purge Shared Vault
- Delete Shared Vault
- Manage Account Recovery
- Manage collections
- Collections Overview
- Create Collection
- Edit Collection Information
- Manage Member Access to Collection
- Delete Collection
- Nested Collections
- Add, Edit or Delete Items
- Assign or Remove Items
- Unassigned Items
- Send data
- Send Overview
- Create Send
- Access a Send
- Send Privacy
- Other Send Options
- Send Lifespan
- Edit Send
- Delete a Send
- Send Encryption Process
- Manage browser plugins and mobile apps
- Auto-fill data
- Auto-fill Overview
- Disable Browser Password Manager & Export Saved Passwords
- Browser Extension Options
- Auto-fill Logins
- Auto-fill for Cards and Identities
- Auto-fill for Custom Fields
- Using URIs in Auto-fills
- Auto-fill for iOS
- Auto-fill for Android
- Import / Export data
- Import / Export Data Overview
- Import Data
- Data Import Errors
- Export Unencrypted Vault
- Export Encrypted Vault
- Reimport Encrypted Export
- Avanced options
Quickstart - product presentation
WALLIX Entreprise Vault
Safeguarding user logins and passwords is a critical aspect for businesses, as it addresses challenges associated with security risks and data protection.
Organizations prioritize countering these risks through encryption, access controls, and authentication mechanisms. WALLIX Enterprise Vault centralizes business passwords and sensitive identity data. This solution strengthens security through encrypted storage, reinforcing credential protection and optimizing the user experience.
By fortifying a secure data environment, WALLIX Enterprise Vault enhances collaboration within teams while safeguarding against potential threats. In essence, the platform serves as a comprehensive solution to the multifaceted challenges of credential management.
It is a cloud-based business tool, which means that the data is stored encrypted on a database accessible from anywhere and under the control of administrators.
Features and capabilities
There are 2 populations which interact with the product.
End-User (quickstart guide)
- Zero-Knowledge encryption
- Encrypted data storage in a cloudbased environment
- Authentication with single or multifactor authentication
- Unlimited storage of items: identities, credit card information, notes, and attachments
- Secure credential sharing with users across your organization
- Direct encrypted sharing of text and files by email with non-vault users
- Password Generator
- Ability to change master-password
- Vault Health Reports
Administrator (quickstart guide)
- Account Lifecycle Management through Trustelem
- Entreprise Vault security policies
- Users’ master password recovery
- Event and audit logs
Technical Specifications
Four levels of encryption: User - Shared Vault – Items - Recovery
Application Range: Browser plug-in, Mobile Application, and Web Application
Available reports: Exposed Passwords, Password Reuse, Weak Passwords, Unsecured Websites, and Inactive Two-Step Login
Authentication methods: WALLIX IDaaS, Active Directory, LDAP
Silent Authentication: Kerberos / X509 authentication
Multi-Factor Authentication Methods (MFA): WALLIX Authenticator, TOTP, SMS/ Email OTP, Security Key U2F / FIDO
Native Integration of Directories: Active Directory, LDAP, Azure AD, G Suite Directory
Traceability: Complete logging and audit of access and authorizations
Extension: API and script publication to connect the platform to client environments
Quickstart guide for users
The new documentation is available here
A user can carry out a large number of Enterprise Vault-related actions. Only the most important are listed in this page.
The full list can be found here: https://vault-doc.wallix.com/books/entreprise-vault-usage
Account creation
The user journey begins when their account is created on Trustelem.
- If they are created localy, they will receive an enrolment link to define their password
- If they are synchronized from a directory, the administrators will communicate about the account creation
Then users can access to the Entreprise Vault application using the url: https://vault-your_domain.trustelem.com
First they need to authenticate using Trustelem credentials (Trustelem password or directory password).
Then they can define or provide their master-password, depending on whether it already exists or not. This password will be used for the data encryption.
More information about the account creation and the account management are presented here: https://vault-doc.wallix.com/books/entreprise-vault-usage/chapter/account-management
Entreprise Vault home screen
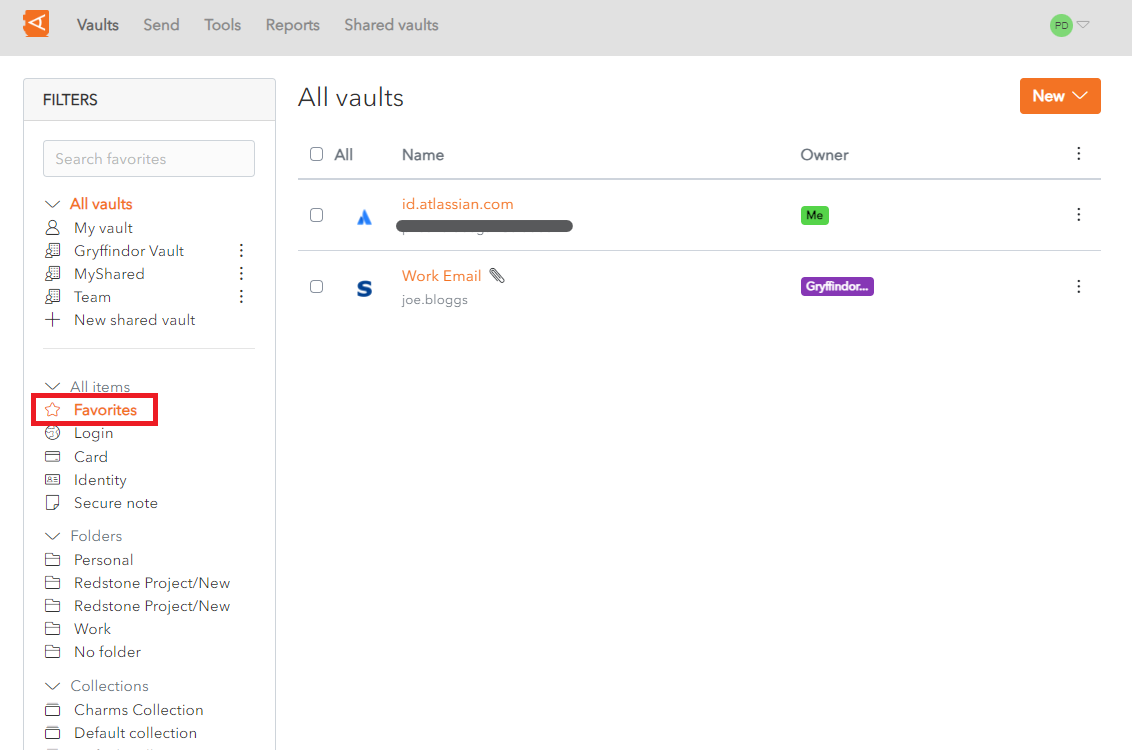
When users log in to WALLIX Enterprise Vault using https://vault-your_domain.trustelem.com, their home screen will display all items in their vaults.
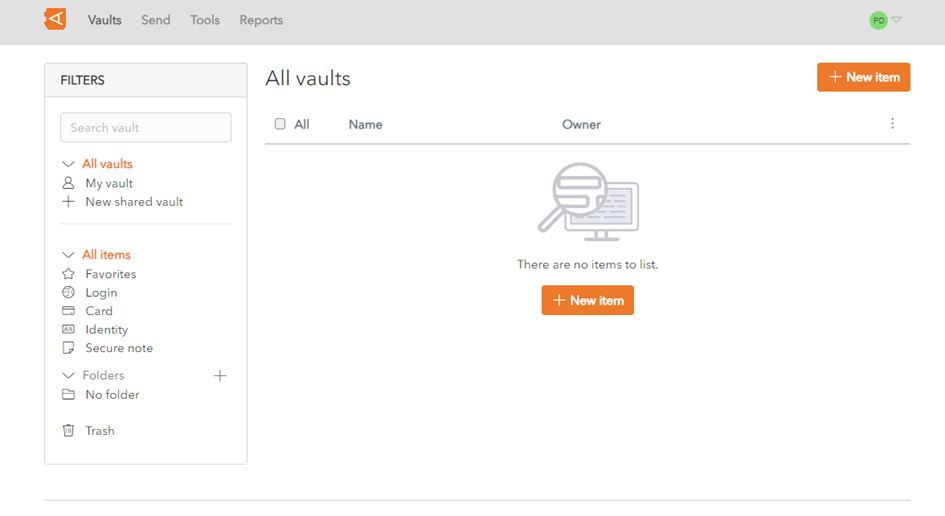
Each user has a Personal Vault which is private.
But users can also create or be invited to access items in one or more Shared Vaults.
The different vaults include items which can be:
- Identities (firstname, lastname, phone number, address...)
- Logins (identifier, password and TOTP for single or multi factor authentication)
- Credit cards
- Secure Notes
This items can be organized using folders in personal vault, and collections in shared vaults.
This home screen also contains a Filters menu by which users can find specific items using:
More information are available here: https://vault-doc.wallix.com/books/entreprise-vault-usage/page/search-an-item#bkmrk-search
After the first authentication on the web page, user are able to choose to use a browser plugin or a mobile app, in addition to the website.
Create Item
An Item can be an Identity (firstname, lastname...), a login (identifier, password, TOTP), a credit card or a note.
It can be created on a personal vault, or in a shared vault.
More information are available here: https://vault-doc.wallix.com/books/entreprise-vault-usage/page/create-item
Create Folder
A folder is used to organize personal vault items.
More information are available here: https://vault-doc.wallix.com/books/entreprise-vault-usage/page/create-folder
Use a Shared Vault
It is possible to access items in a vault shared with you, or create a new shared vault to share items with other.
More information are available here: https://vault-doc.wallix.com/books/entreprise-vault-usage/chapter/manage-shared-vaults
Send data to non-vault user
The "Send" option is used to share data with users who are not in the vault. It generates a link sent by email.
More information are available here: https://vault-doc.wallix.com/books/entreprise-vault-usage/page/create-send
Password generator
If you want to generate a new and secured password, then Entreprise Vault can do that for you.
More information are available here: https://vault-doc.wallix.com/books/entreprise-vault-usage/page/username-or-password-generator
Reset Master Password
If you lost your master password, you can ask for a reset.
More information are available here: https://vault-doc.wallix.com/books/entreprise-vault-usage/page/reset-master-password
Change the settings
Additional settings can be found in the product (customize the tools, change the language, get security reports...).
More information are available here: https://vault-doc.wallix.com/books/entreprise-vault-usage/chapter/avanced-options
Install Browser Extension and mobile application
In addition to the website, you can choose to use a browser plugin, or a mobile application.
More information are available here: https://vault-doc.wallix.com/books/entreprise-vault-usage/chapter/manage-browser-plugins-and-mobile-apps
Quickstart guide for administrators
When the subscription is created, administrators must perform the initial configuration.
Users and accesses are defined via Trustelem, while the Entreprise Vault is managed via a dedicated application.
After that, the work mainly concerns the user lifecycle management: creating or deleting users, unblocking those who need help and finally checking product status and logs.
Trustelem management
Initial setup
The first step when a customer acquires Enterprise Vault is to configure Trustelem. The goal is to define which users will have access to Entreprise Vault and how. These actions are performed by Trustelem administrators.
There are therefore 4 main steps in the setup.
- Add users, created locally or synchronized from directories
- Add Enterprise Vault apps (user + admin)
- Define access rules
- Optionally, define the usable 2nd factors, as well as the enrollment methods
Note: Trustelem administration page should always be secured using multi-factor authentication. To do so you need to enroll a 2nd factor for the admin accounts, then enable multi-factor using the option "Authentication level for Trustelem admin console" on Security settings > General.
Subscription management
When the initial setup is done, Trustelem administration page is still usefull for:
- Managing changes in the setup (new users, new 2nd factors, new enrolment process...)
- Managing user password lost
- Managing advanced features (silent authentication, self-service password reset, siem integration, API automations...)
More information about Trustelem are available here: https://trustelem-doc.wallix.com/books/trustelem-administration - Auditing the authentication
Entreprise Vault setup
In this quickstart guide, a limited action number is presented. To see all the administrators tasks, you can use this link:
https://vault-doc.wallix.com/books/entreprise-vault-administration
Entreprise Vault administration access
To access Entreprise Vault administration page, a Trustelem user must have access to the Entreprise Vault administration application.
By default, the subscription administrator is in the group "Entreprise Vault Admin" which has the access to this app.
To add new Entreprise Vault administrators, the users must be affected to this group.
Entreprise Vault administration page
As mentioned in the previous point, the Entreprise Vault administration is done through an application. So, to access this app the administrators must use their Trustelem dashboard: https://your_domain.trustelem.com.
Manage users
As a reminder, users creation is done through Trustelem admin page and not with Entreprise Vault admin app.
On the Entreprise Vault admin app you can manage:
- The Entreprise Vault users deletion from the Entreprise Vault data base.
It will not remove users fromTrustelem
It will delete all the associated items - The obligation for users to change their master password at the next connection
- The change of user encryption keys
More information are available here: https://vault-doc.wallix.com/books/entreprise-vault-administration/page/administration-application
Manage organization policies
On the Entreprise Vault admin app you can manage the settings applying to the entire company.
You can define rules for the logs, the security, the recovery process...
More information are available here: https://vault-doc.wallix.com/books/entreprise-vault-administration/page/administration-application
Audit the vault
On the Entreprise Vault admin app you can audit user's items, and share vault's items.
More information are available here: https://vault-doc.wallix.com/books/entreprise-vault-administration/page/administration-application
Account management
Manage your account on Entreprise Vault and Trustelem.
Account Management Overview
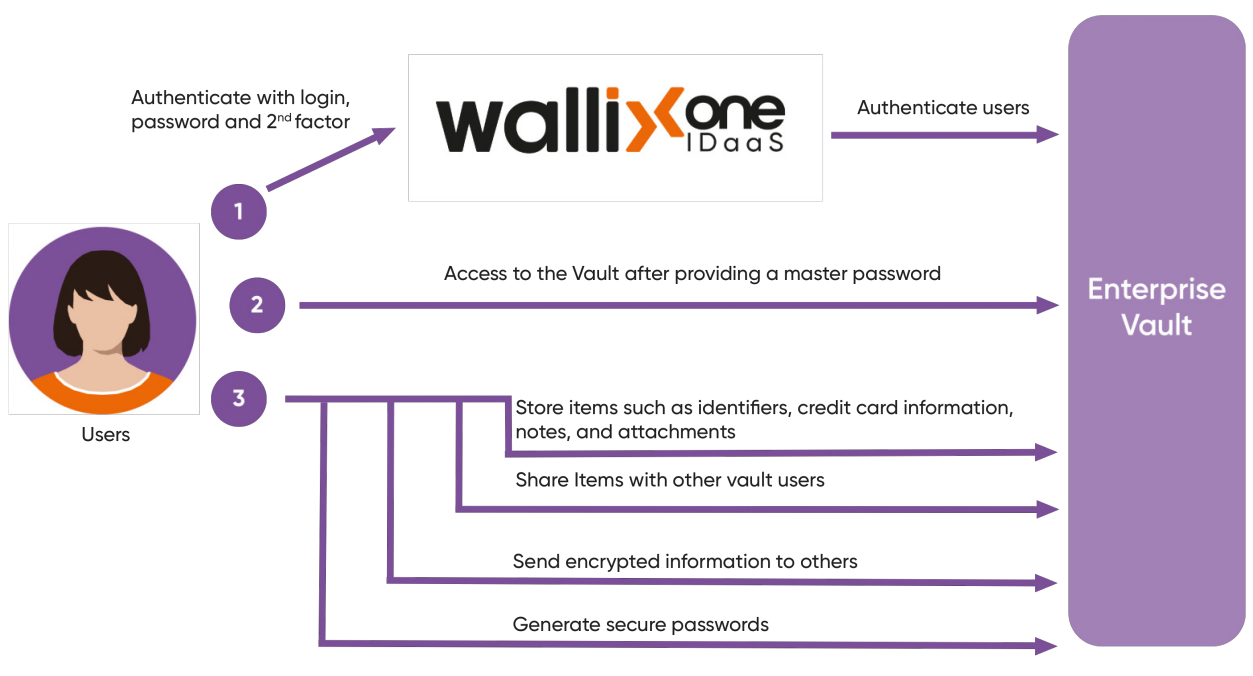
Access WALLIX Enterprise Vault from WALLIX Web Vault, by Installing the WALLIX Web Browser Extension or from the iOS or Android Application, which can be installed easily with the help of a QR code.
WALLIX Enterprise Vault can be used by members to store passwords and other private information. WALLIX Enterprise Vault is accessible via Trustelem, the WALLIX IDAAS platform. To access to your Enterprise Vault account, you have to login to the Trustelem portal first and login to your account with your master password. Additionally, a 2-factor authentication (2FA) can be configured in the Trustelem portal to access to the Enterprise Vault.
Click on Account Invite to create a Master Password that used for the Second level login to WALLIX Enterprise Vault. The First Level Authentication is via your Trustelem Account.
Use the two passwords to Login to Vault once the account is created.
The Web Browser extension can facilitate storing logins in the Vault in realtime, as accounts are accessed in the browser.
Logout from Vault once finished using WALLIX Enterprise Vault.
Lock Vault and Unlock Vault as needed to maximize data security. Unlock using PIN or Biometrics is also possible in certain cases. The differences between Logout and Lock are important to understand.
You can Switch Between Accounts using the Mobile App.
If you forget your WALLIX Trustelem password, follow the Trustelem Password Reset Procedure to change your password.
If you forget your WALLIX Vault password, follow the Get Master Password Hint Procedure.
Some Users are given the right to Manage Account Recovery of other Users. If you have Account Recovery Rights, you can Reset your Master Password.
You can also choose to Change your Master Password. You will be required to enter your current Master Password to do this.
You can change your Encryption Key Settings to manage how secure the Vault is. This can often be a tradeoff between security and performance.
You can also Reset your Trustelem Password or Change your Avatar.
Create WALLIX Entreprise Vault account
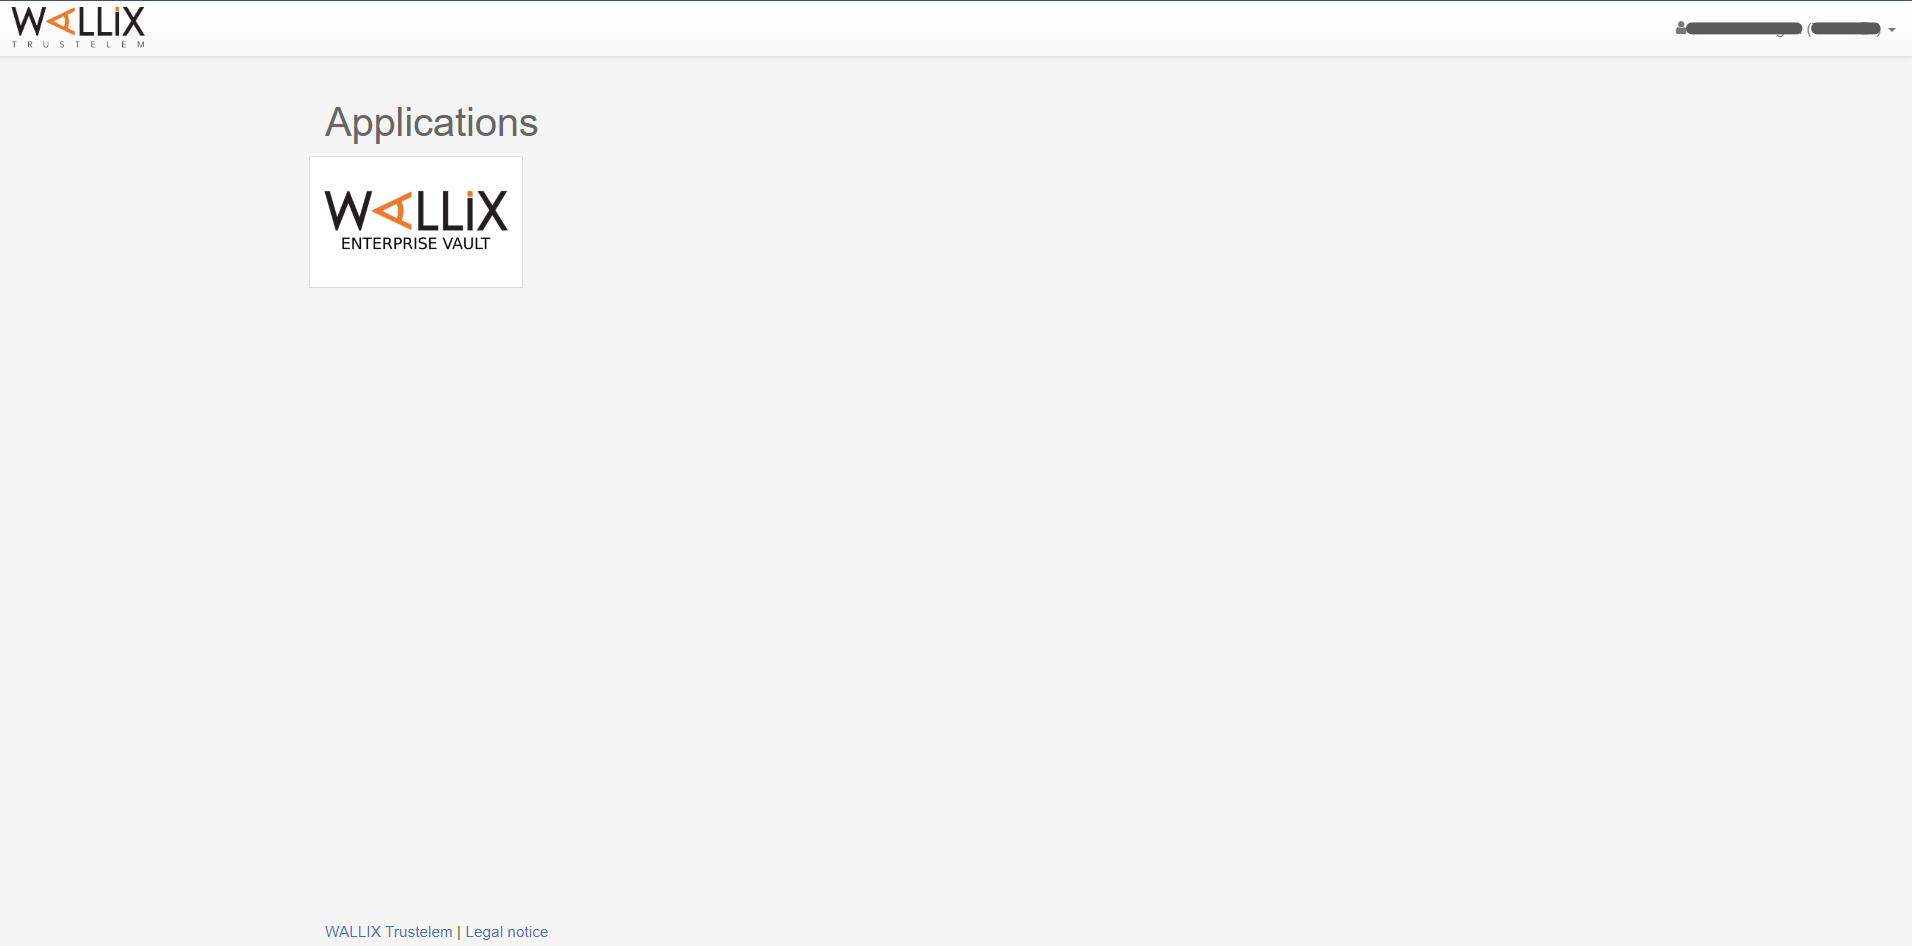
Click on the WALLIX Enterprise Vault application in the WALLIX Trustelem website.
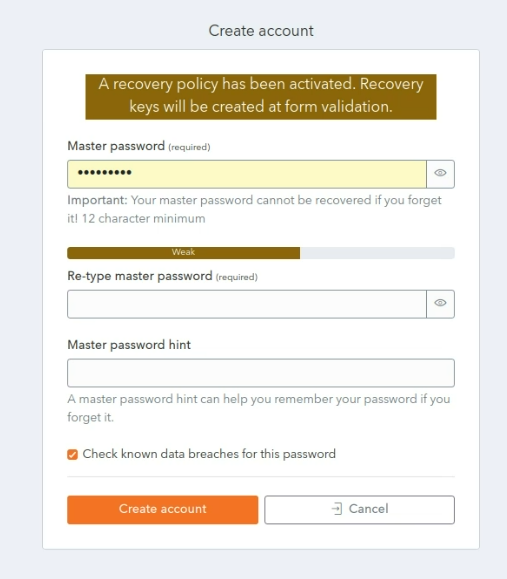
The first time you enter your WALLIX Enterprise Vault you will be presented with a Create Account screen.
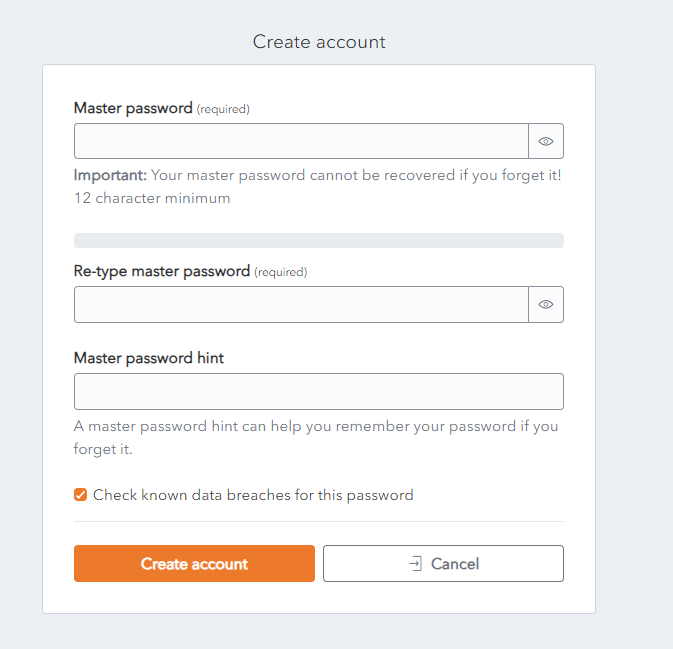
Choose a Master Password and enter it in the Master Password field.
Re-enter the Primary Password chosen in the Re-type master password field.
Enter a Password Hint in the Master password Hint field.
The checkbox Check known data breaches for this password is checked by default. Uncheck only if you do not need this check.
If you forget your Password and click on the Get Master Password Hint link, you will be sent the Password Hint that you created the first time you logged in. This should be a word or phrase that helps you to remember your password but doesn’t help other people to guess your password.
Click on the Create Account button to create your account. The account is created and the Enterprise Single Sign-On Page is displayed.
Alternatively, click Cancel to cancel account creation.
Get Master Password Hint
Follow the instructions below to request the password hint that you created when you first set up your Master Password (2nd level authentication).
From the WALLIX Vault Login Screen or Lock Screen, click the Get master password hint link.
The Password hint screen is open.
Enter your Email Address and click Submit.
An email is sent to that email address containing the Master Password Hint associated with that email address.
Reset Master Password
For users who have this option, the link to Start a password reset procedure appears on the WALLIX Vault Login and Unlock pages. The Vault Administrator gives users access to this option.
Please contact your Vault Administrator if you do not have this option and require it.
Create a Password Reset Request
From the Vault Login or Unlock page, click on the Start a password reset procedure link.
The following screen is displayed.
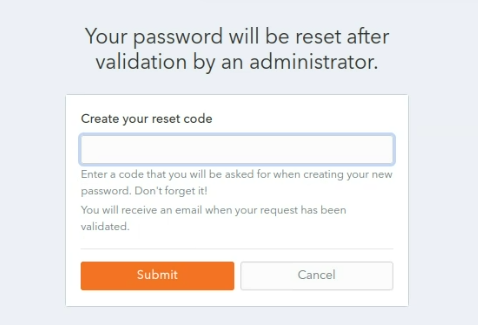
Choose and enter a reset code in the Create your reset code field.
It is important to remember the reset code you choose, as you need it to complete the password reset procedure.
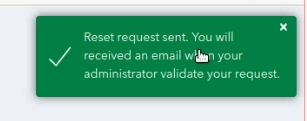
Your Password Reset Request is sent and needs to be validated by the Vault Administrator.
Create a New Password
Once the Vault Administrator validates your Password Reset Request, you receive an e-mail containing a reset link.
Click the Reset Password link.
The Reset your master password screen is displayed.

In the Enter your reset code field, enter the reset code created during the Create a Password Reset Request procedure.
In the New master password field, choose and enter a new master password.
In the Confirm new master password field, re-enter the new master password chosen.
In the Master password hint field, enter the Master Password Hint that you created when you created your Account.
The Check known data breaches for this password checkbox is checked by default. This can be unchecked if you do not wish to check for known data breaches related to your new chosen password.
The Also rotate my account's encryption key checkbox is unchecked by default. This can be unchecked if you wish to rotate your account's encryption key.
Click Change master password to reset your master password. This disconnects you from your current session on all devices, and you must log in again with your new master password.
The following screen is displayed showing a Master Password reset confirmation message.
Alternatively, click Log out to cancel the operation.
Change Master Password
Users can change their master password from WALLIX Vault. This requires remembering the current master password.
This procedure is similar to the Reset Master Password Procedure, which is used when the User cannot remember their current Master Password.
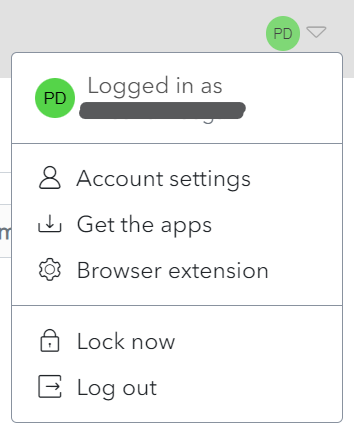
Click on the User Icon, on the top right-hand side of the screen, to display the User Menu.
Click on Account Settings and then Security. The Security Screen is displayed on the Master Password Tab.
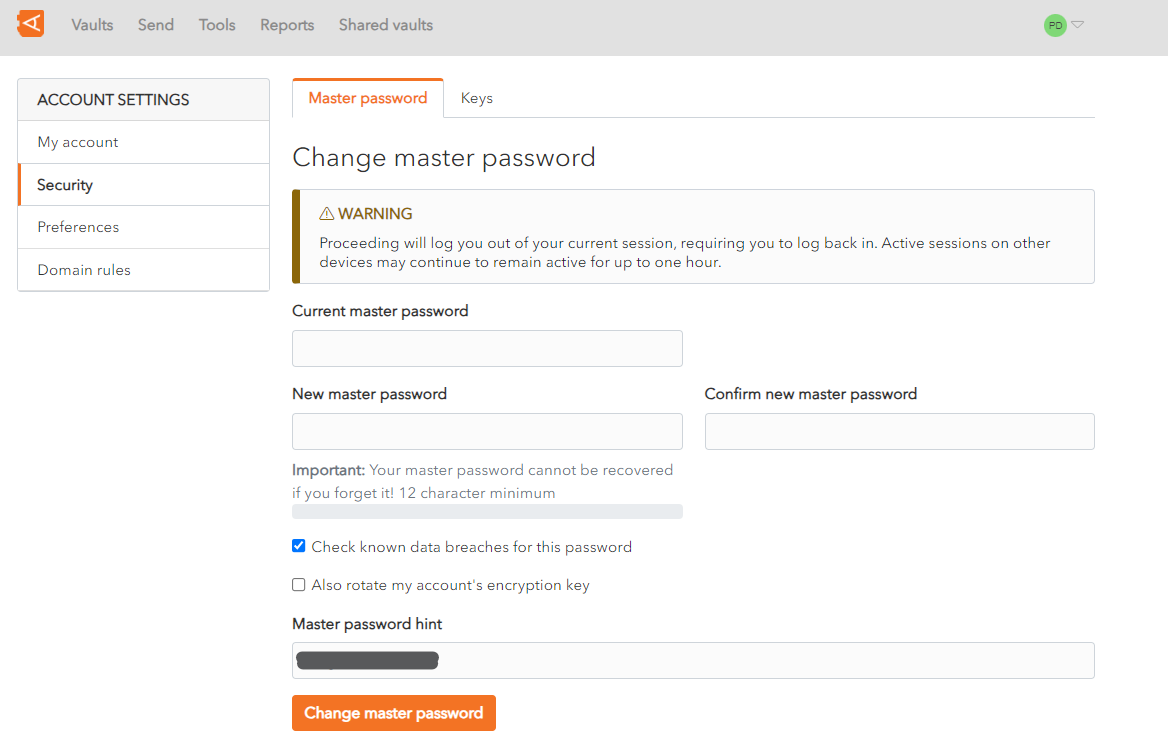
In the Current master password field, enter your current master password.
In the New master password field, choose and enter a new master password.
In the Confirm new master password field, re-enter the new master password chosen.
In the Master password hint field, enter the Master Password Hint that you created when you created your Account.
The Check known data breaches for this password checkbox is checked by default. This can be unchecked if you do not wish to check for known data breaches related to your new chosen password.
The Also rotate my account's encryption key checkbox is unchecked by default. This can be unchecked if you wish to rotate your account's encryption key.
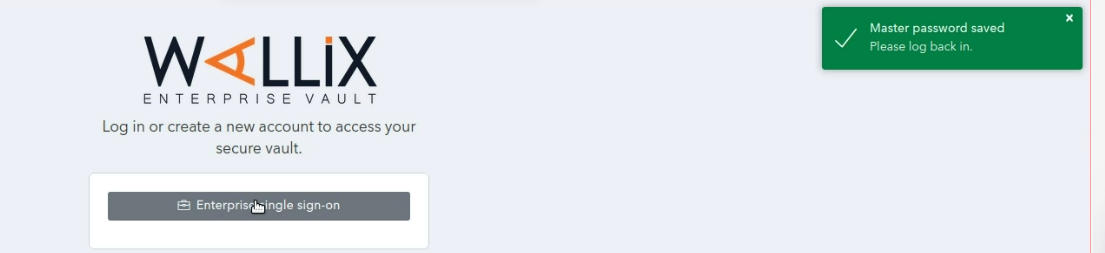
Click Change master password button to change your master password. This will log you out of your current session on all devices and you will be required to log back in with your new master password.
The following screen is displayed showing a Master Password reset confirmation message.
Alternatively, click Log out to cancel the operation.
Encryption Key Settings
It is possible to change the Encryption Key Settings for your Account.
Click on the User Icon, on the top right-hand side of the screen, to display the User Menu.
Click Account Settings and click Security. The Security screen is displayed on the Keys Tab.
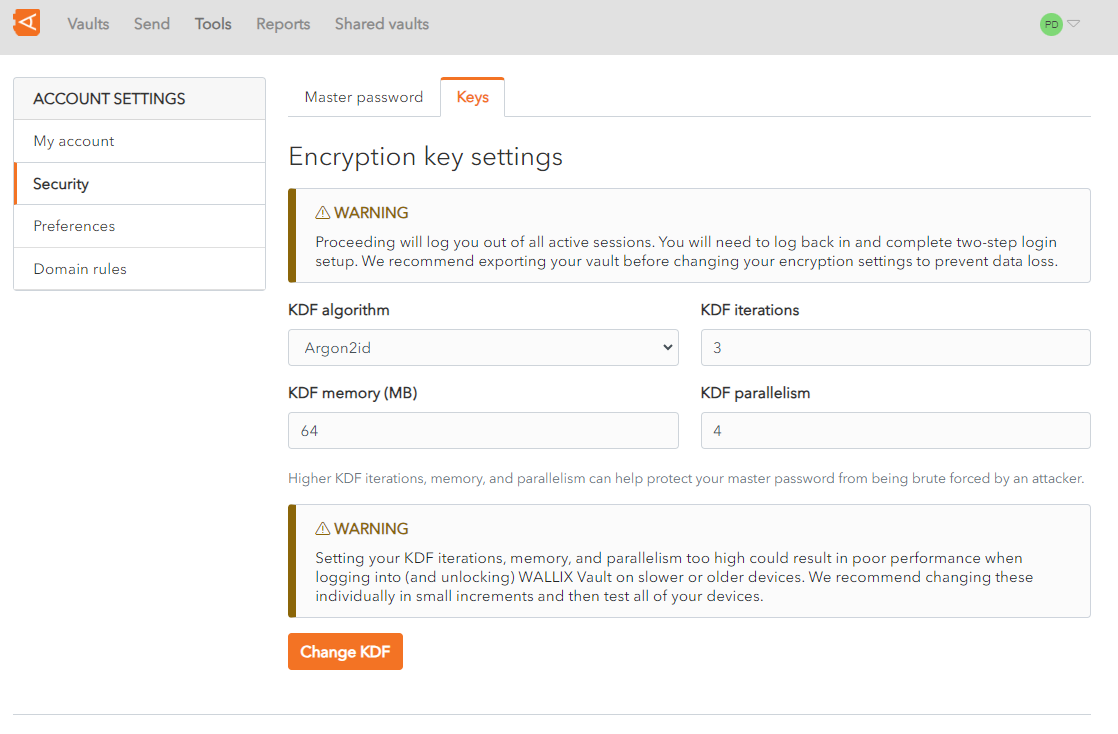
The following options can be changed:
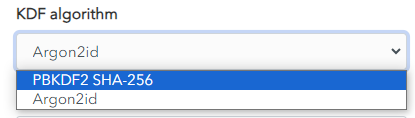
- KDF algorithm: There are 2 choices - Argon2id or PBKDF2 SHA-256.
To be more secure and efficient, use Argon2id rather than PBKDF2.
- KDF Iterations: Choose the number of iterations possible. The default is 3.
- KDF memory (MB): Choose the memory required . The default is 64.
- KDF parallelism: Choose the parallism possible. The default is 4
Higher KDF iterations, memory, and parallelism can help protect your master password from being brute forced by an attacker. However, setting your KDF iterations, memory, and parallelism too high could result in poor performance when logging into (and unlocking) WALLIX Vault on slower or older devices. Changing these parameters individually, in small increments, and then testing all your devices is the best way to ensure performance.
Proceeding will log you out of all active sessions. You will need to log back in and complete two-step login setup. Export your vault before modifying your encryption settings to avoid any loss of data.
Click Change KDF to change the Encryption Key Settings for your Account.
Login to Vault
First Level Authentication
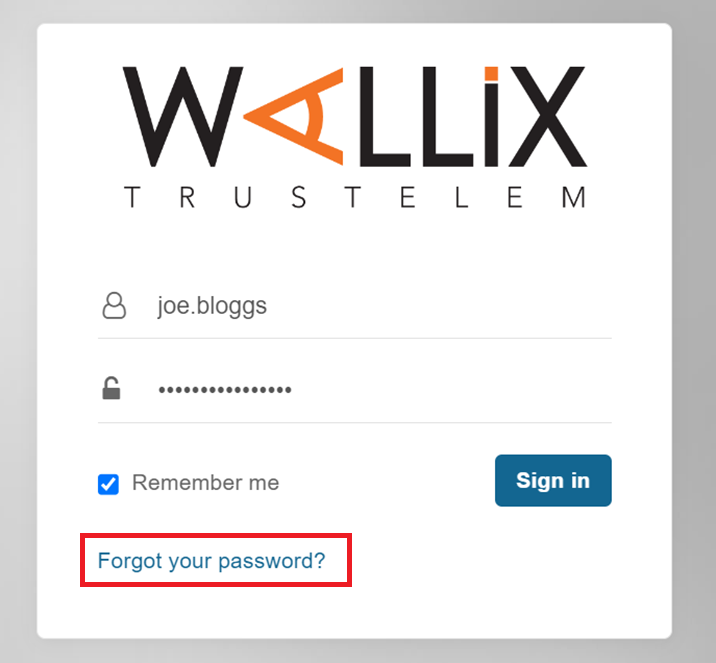
Enter your Email and the Password you chose on first login.
You can check the Remember Me checkbox if you want to save your email and password to avoid re-entering them the next time you login.
Then click the Sign In button.

Note : If you forget your Password click the Forgot your password ? link at any time to request a password reset.
This logs you into the WALLIX Trustelem Portal.
Click on the WALLIX Enterprise Vault button to access WALLIX Enterprise Vault.

Second Level Authentication
The WALLIX Enterprise Vault screen displays an Enterprise Single Sign On button.
Click the Enterprise Single Sign On button.

Enter your Master Password and click the Unlock button. This will bring you into your Vault Home Screen.
Note : If you are already logged into the WALLIX Portal, you can navigate directly to your WALLIX Enterprise Vault and go straight to the 2nd level authentification.
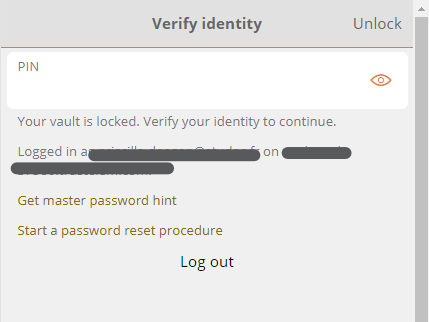
Logout from Vault
You can logout of WALLIX Enterprise Vault from the Vault Screen or the Lock Screen.
Logout from Vault Home Screen
You can log out of WALLIX Enterprise Vault from your WALLIX Enterprise Vault screen.

Click on the Log out button to log you out of WALLIX Enterprise Vault.
Note : This will log you out of the 2nd level of authentification only.
You will be returned to the Wallix Enterprise Vault Login Screen.
Logout from Unlock Screen
You can log out of WALLIX Enterprise Vault from the Unlock screen.
Click on the Log out button to log you out of WALLIX Enterprise Vault.
Note : This will log you out of the 2nd level of authentification only.
You will be presented with a confirmation pop up screen.

Click Log out to confirm log out.
You will be returned to the Wallix Enterprise Vault Login screen.

Unlock Vault
Your WALLIX Enterprise Vault is automatically locked after an extended period of inactivity, which can be changed in WALLIX Vault.
Enter your Master Password and click the Unlock button to access your WALLIX Enterprise Vault.
Lock Vault
You can lock your WALLIX Enterprise Vault from your WALLIX Enterprise Vault screen.

Click on the Lock now button to lock your WALLIX Enterprise Vault.
Note : This will return you to the WALLIX Enterprise Vault Lock Screen.
Unlock with PIN
Unlock with PIN is a feature that is available for WALLIX Vault for the Browser Extension and Mobile apps.
Browser Extension
Enable Unlock with PIN
From the Browser Extension, click the Settings Menu.
Check the Unlock with PIN Checkbox.

A pop up screen is displayed.
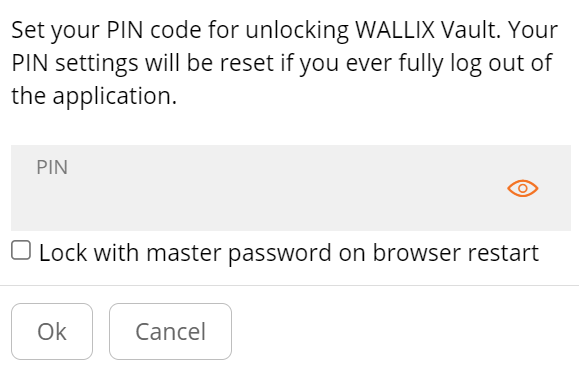
Create and enter a PIN to use for unlocking the Vault.
The Lock with master password on browser restart checkbox is checked by default. This requires the Master Password after Browser Restart.
If unchecked, the PIN will be required on browser restart.
Click Ok to save PIN and activate Unlock with PIN.
If the Lock with master password on browser restart checkbox is unchecked, some sensitive data in memory may not be deleted when the browser extension is locked.
Alternatively, click Cancel to cancel the operation.
If you fully log out of the application, your PIN settings will be reset.
Change PIN
To change the PIN after it has been set, disable the Unlock with PIN checkbox in settings, then reenable it.
This will require a new PIN to be entered.
Use Unlock with PIN
When the Browser Application is locked, you will be prompted to enter the PIN to unlock.
If the browser is restarted, you will be prompted to enter either a PIN or a Master Password to unlock. This is based on the Lock with master password on browser restart option chosen during PIN creation.
Mobile App
Enable Unlock with PIN
From the Settings tab on WALLIX Vault Mobile App, tap the Unlock with PIN Code option.
Create and enter a PIN to use for unlocking the Vault.
A Pop up screen appears to request if you wish to Lock with master password on browser restart.
Tap Yes to require Master Password on browser restart.
If the Lock with master password on browser restart checkbox is unchecked, some sensitive data in memory may not be deleted when the browser extension is locked.
Alternatively, tap No to require PIN on browser restart.
If you fully log out of the application, your PIN settings will be reset.
Use Unlock with PIN
When the Mobile App is locked, you will be prompted to enter the PIN to unlock.
If the browser is restarted, you will be prompted to enter either a PIN or a Master Password to unlock. This is based on the Lock with master password on browser restart option chosen during PIN creation.
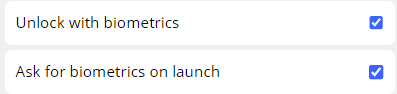
Unlock with Biometrics
Unlock with Biometrics is a feature that is available for WALLIX Vault for the Browser Extension and Mobile apps.
Biometrics are part of you Operating System or Mobile Device. WALLIX Vault does not receive biometric information about an Account.
Enable Unlock with Biometrics
From Settings menu on your mobile device, turn on and enable Biometrics.
From WALLIX Mobile App, open Settings > Account Security.
Check the Biometrics option you wish to enable. For iOS the following options are available:
In iOS, a Pop up screen appears to request confirmation of this change.
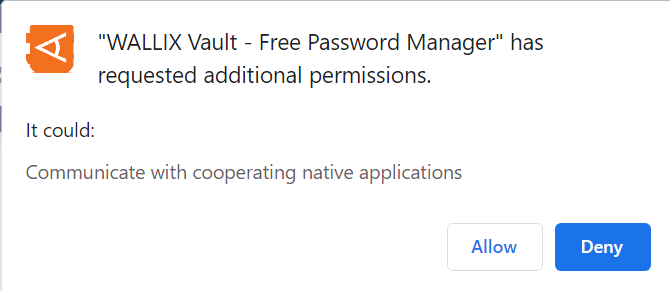
Tap Allow to enable biometrics.
Tap Deny to cancel the operation.
Lock Vs Logout
Lock and Logout do not perform the same function. It is important to understand the differences between them.
WALLIX Vault only stores Encrypted Data on its servers.
Login
The Master Password is needed to Login and gain access to the Account Encryption Key.
An Internet Connection (or Server connection) is needed.
Encrypted Vault Data is downloaded.
It is decrypted using the Account Encryption Key.
Unlock
The Account is already logged in.
The Encrypted Vault Data has already been downloaded.
The Master Password is not needed to unlock (but can be used).
Therefore, Unlock using PIN or Biometrics is possible.
An Internet Connection (or Server connection) is not needed.
Lock and Unlock using Biometrics or PIN
After activation of Unlock using a PIN or a Biometric Factor, a New PIN or a Biometric Encryption Key is created.
This is derived from the PIN or Biometric Factor used to encrypt the Account Encryption Key, which is stored locally when the User is logged in.
Unlock using Master Password on Browser Restart, the Account Encryption Key is stored in memory.
When you Unlock the Vault, the PIN or Biometric Encryption Key is used to decrypt the Account Encryption Key stored locally, which is then used to decrypt the Vault Data stored locally.
When you Lock the Vault, the decrypted Account Encryption Key and Vault Data are deleted.
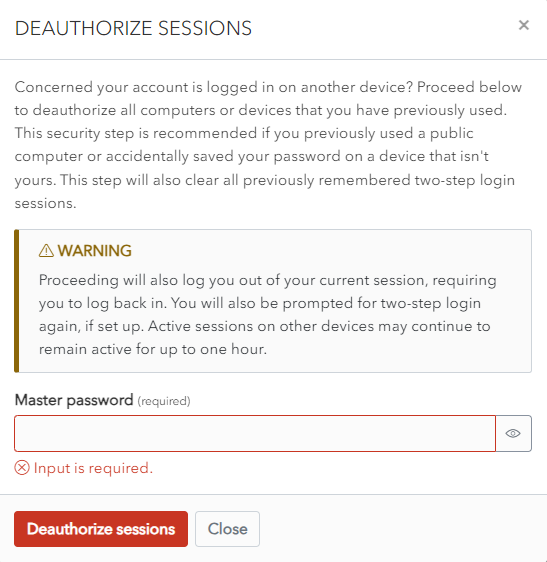
Deauthorize Sessions
This is used if you want to deauthorize all computers and devices that have been previously used to login to WALLIX Vault with this Account.
Click on the User Icon, on the top right-hand side of the screen, to display the User Menu.
Click on Account Settings and then My Account. The My Account Screen is displayed.
Click Deauthorize sessions.
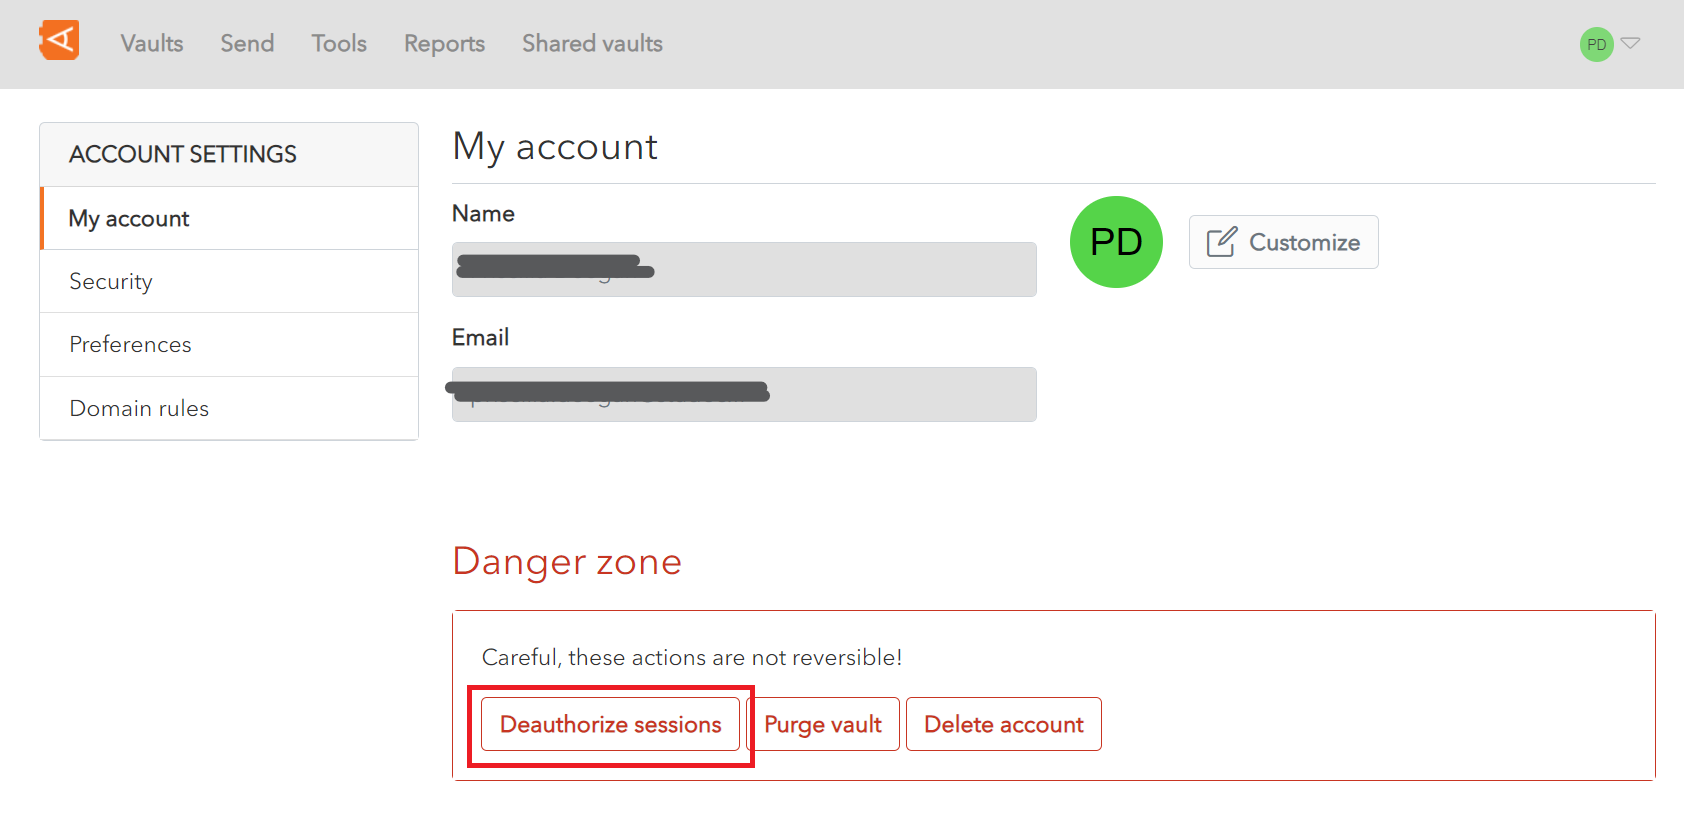
A Confirmation Screen is displayed.
Enter your Master Password and click Deauthorize sessions to deauthorize all previously authorized devices and computers and to log them out of the vault.
Alternatively, click Close to cancel the operation.
Account Switching on Mobile App
It is possible to have up to 5 WALLIX Accounts logged in at any one time on mobile devices.
Login to Multiple Accounts
Login to the WALLIX Vault Mobile App.
The Account Name and Status is displayed in the Top Menu Bar of the Mobile App. The status indicates whether it's Vault is locked or unlocked.
To log in to another account, click the Add Account button from Top Menu Bar.
The Login screen is displayed. Enter Login details to login.
If your Accounts are hosted on Different Servers, select the Server from the Login Screen.
The Account Name and Status is added to the Top Menu Bar.
To Switch between Accounts, choose the Account from the Top Menu Bar.
This becomes the Active Account. It's icon is displayed on the Top Menu Bar.
If you Log Out from an account it will disappear from the Logged In Account List unless Vault Timeout is set to Log Out.
Most Vault Actions (Vault Timeout, Unlock with PIN, Unlock with Biometrics, Auto-fill) only apply to the Active Account
Auto-fill for Multiple Accounts
Auto-fill applies to the Active Account by default.
It is possible to switch accounts during Auto-fill in order to auto-fill from another account.
Reset Trustelem Password
Request Password Reset
Follow the instructions to reset your password for WALLIX Portal (1st level authentication).
Click the Forgot your password ? link to Request a Password Reset.
This sends an email to the WALLIX Enterprise Vault Administrator who sends a Recovery Password email.
Reset Password from Email Link
Click on the Reset Password link in the Recovery Email received from TRUSTELEM. The following screen is displayed.
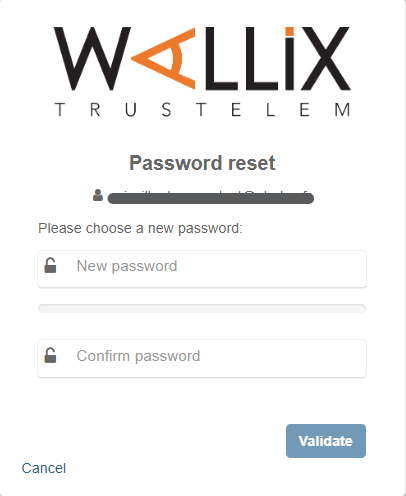
Choose a new password for WALLIX Enterprise Vault and enter it in the New Password field.
Re-enter the new password in the Confirm Password field.
Click the Validate button to save the new password.
Alternatively, click the Cancel button to cancel the operation.
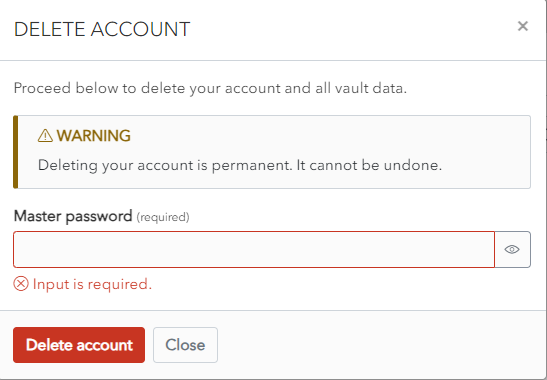
Delete Account
Click on the User Icon, on the top right-hand side of the screen, to display the User Menu.
Click on Account Settings and then My Account. The My Account Screen is displayed.
Click Delete account.
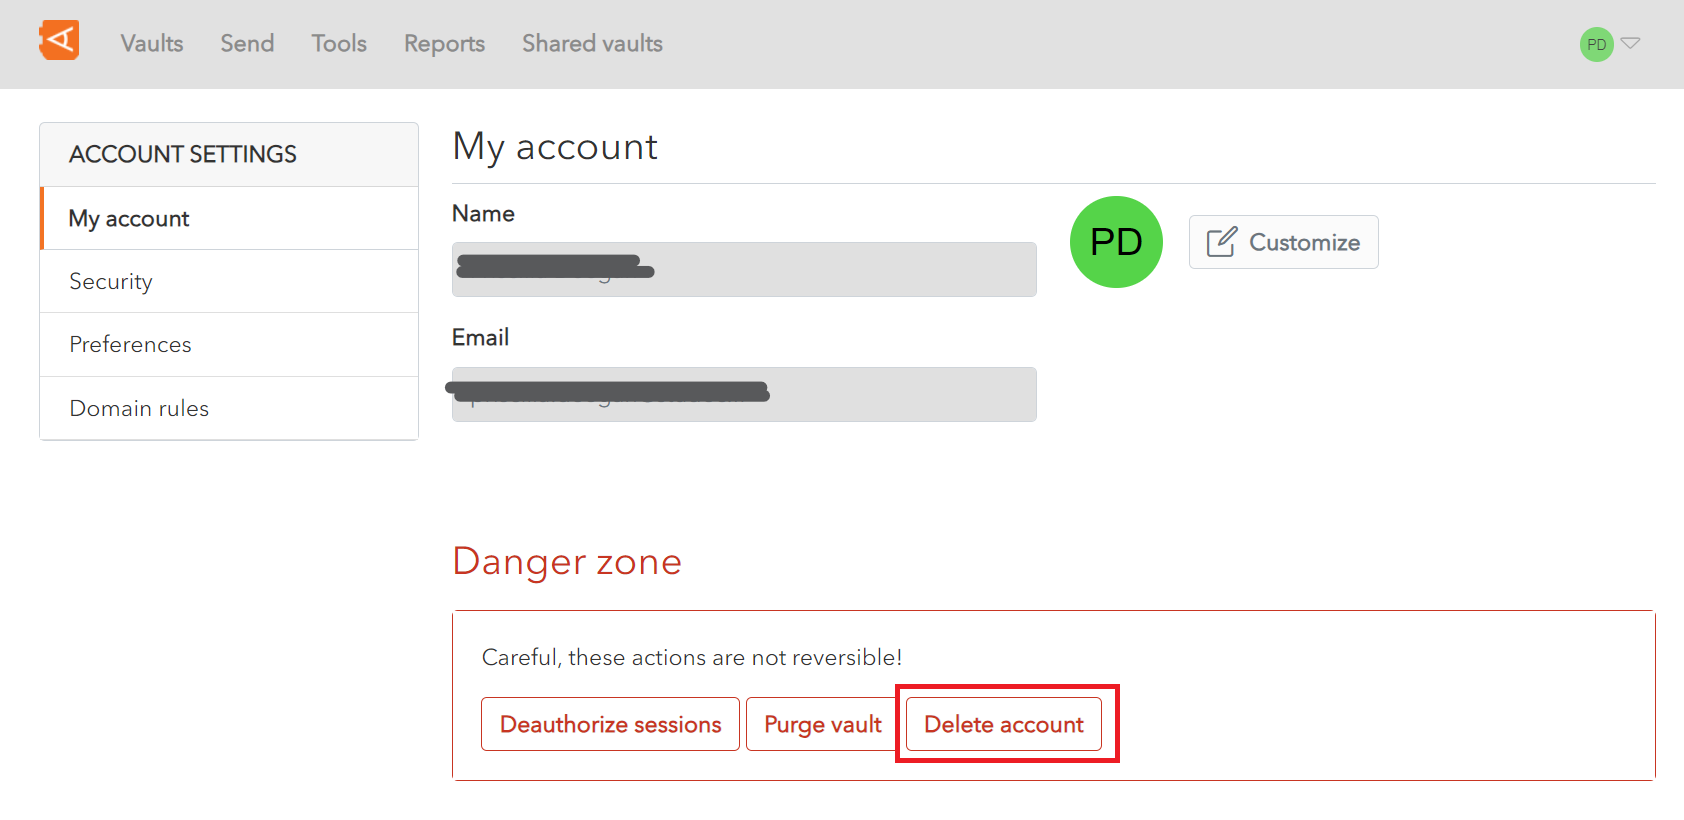
A Confirmation Screen is displayed.
Enter your Master Password and click Delete account to delete the account and all data.
Alternatively, click Close to cancel the operation.
Administration Overview
The Trustelem Administrator is required to perform certain actions:
Grant Master Password Recovery Permissions to certain users so that these users can unblock users who have forgotten their passwords.
Some Users are given the rights to Manage Account Recovery for other Users. If you have Account Recovery rights, you can Validate a Master Password Reset Request when a user requests to reset their Master Password.
After account recovery creation, all users can Reset their Master Password after they have unlocked their account for the first time.
Manage items
Create different types of items: login, identity card and note.
Items Overview
You can create four types of item in your WALLIX Enterprise Vault :
- A Login item can be used to store login information for an account.
- A Identity item can be used to store identity information about a person.
- A Card item can be used to store a credit or payment card information.
- A Secure Note item can use used to store other private information.
Items can be Edited or Deleted.
The Item Context Menu contains some options related to an Item, depending on the Item Type and if it is in a Shared Vault or not.
Items can be Password Protected, Cloned, Moved from an Individual Vault to a Shared Vault, or Added to Favorites.
Specific options are available for Login Items:
- Password Fields such as Password Generation, Checking Password Integrity, Show / Hide Character Count, Copy Password and Show / Hide Password.
- TOTP Generation
- Copy Username
- Copy Password
- Launch URI
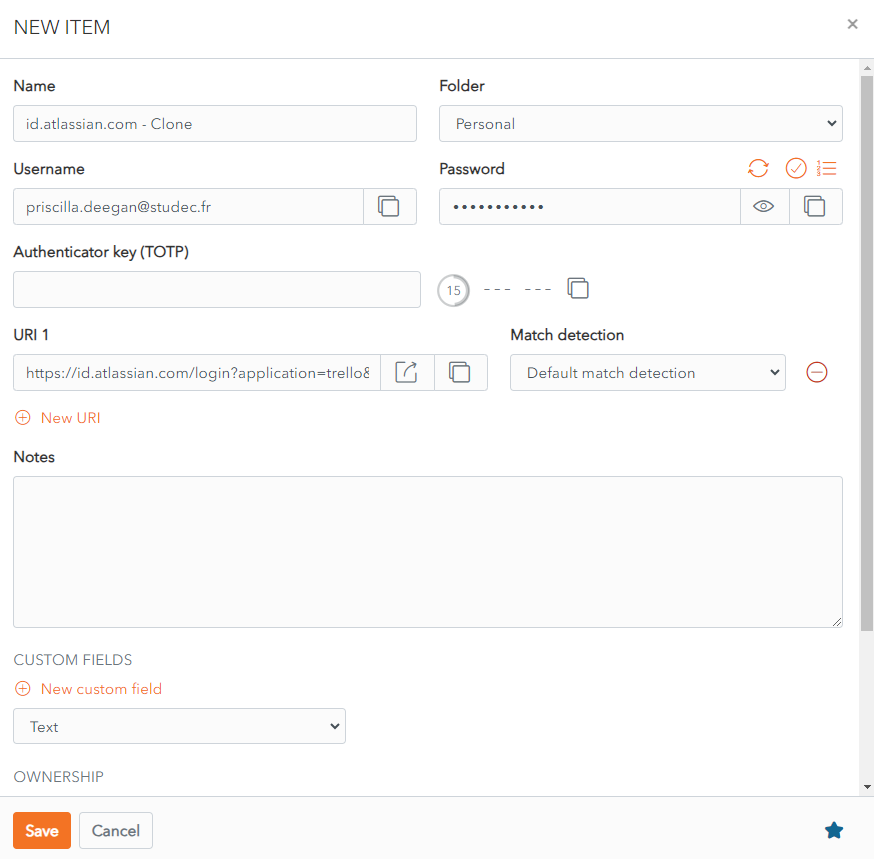
Create Item
Click on the New Item button to add a new Item.
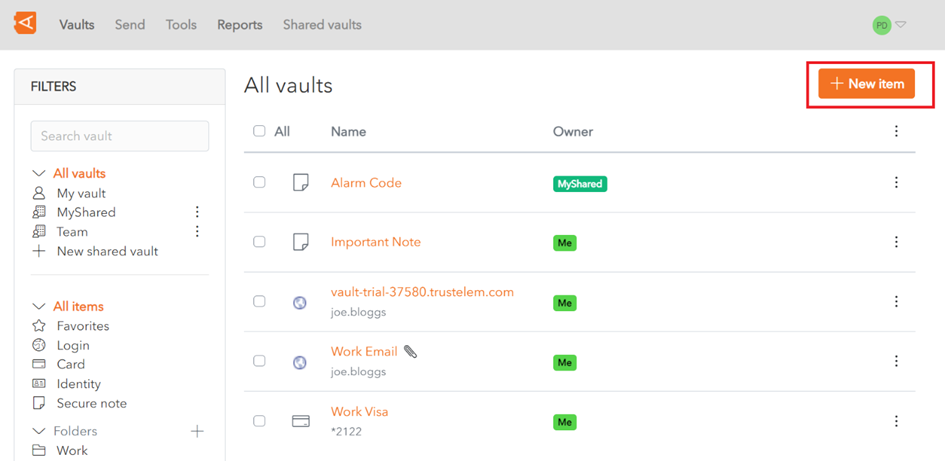
The New Item pop up screen is displayed.
Choose the type of item – Login, Card, Identity or Secure Note. Each item type has it’s own unique set of fields.
Here we will choose Login.
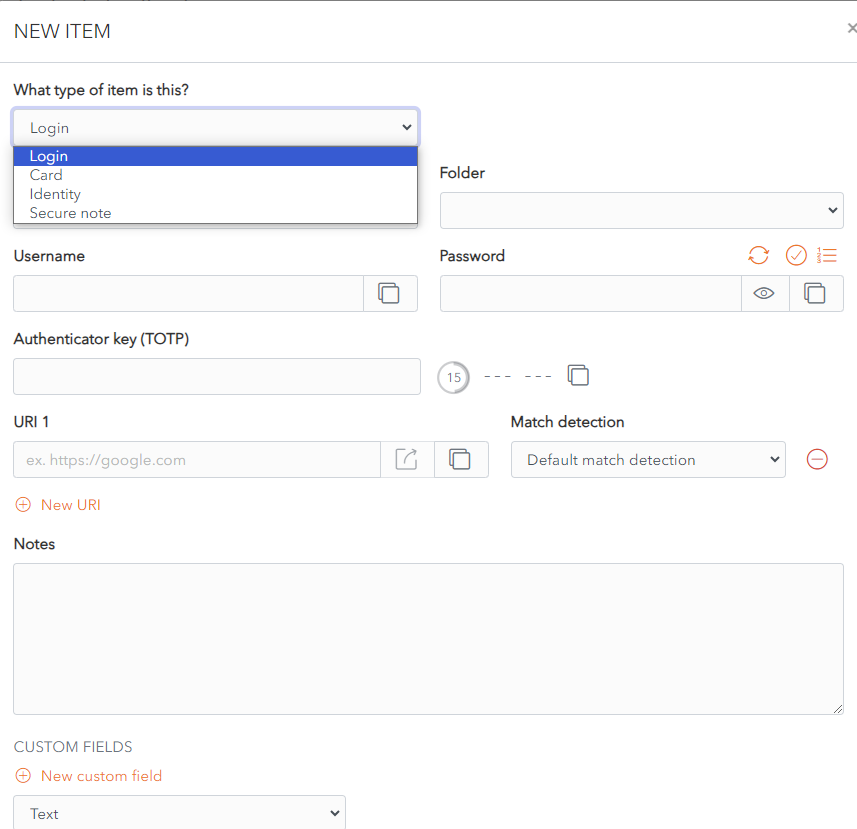
Add the details that you wish to save for new Login Item. The only mandatory field is Name.
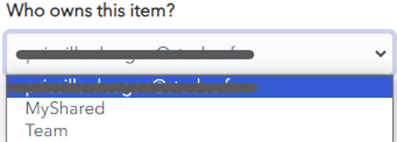
The Item is added to your personal vault by default. To add the Item to a Shared Vault, choose a Shared Vault from the Who Owns this Item? dropdown.
Click the Save button to save the new Item.
It is then displayed in your Items List.
Alternatively, click Cancel to cancel the operation.
Edit Item
Click on an item in your Vault List.
This opens the item in the Edit Screen.

Make changes to your item and click the Save button to save your changes.
If you decide not to save your changes, click the Cancel button to close the Edit Screen.
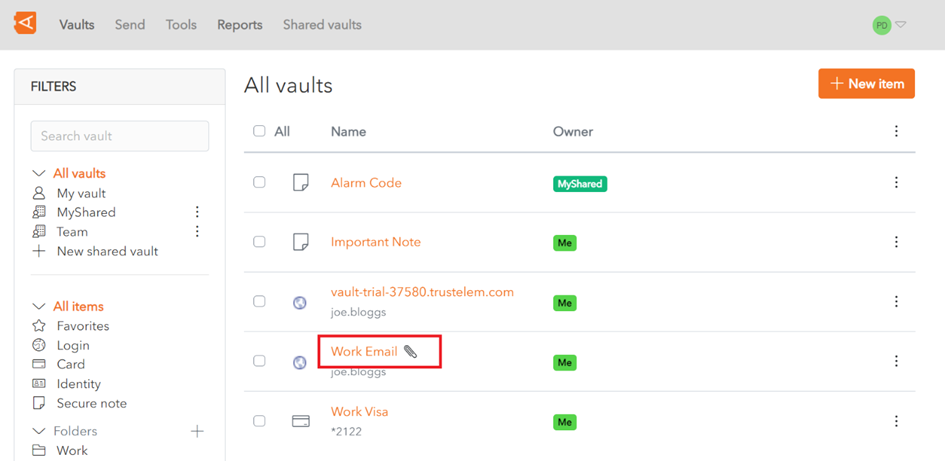
Search an item
Search and Filters can be combined to refine the search result.
Only Item Types and Filters cannot be combined.
Filter Menu
You can also filter by Vault, Item Type or Folder from Filters Menu.
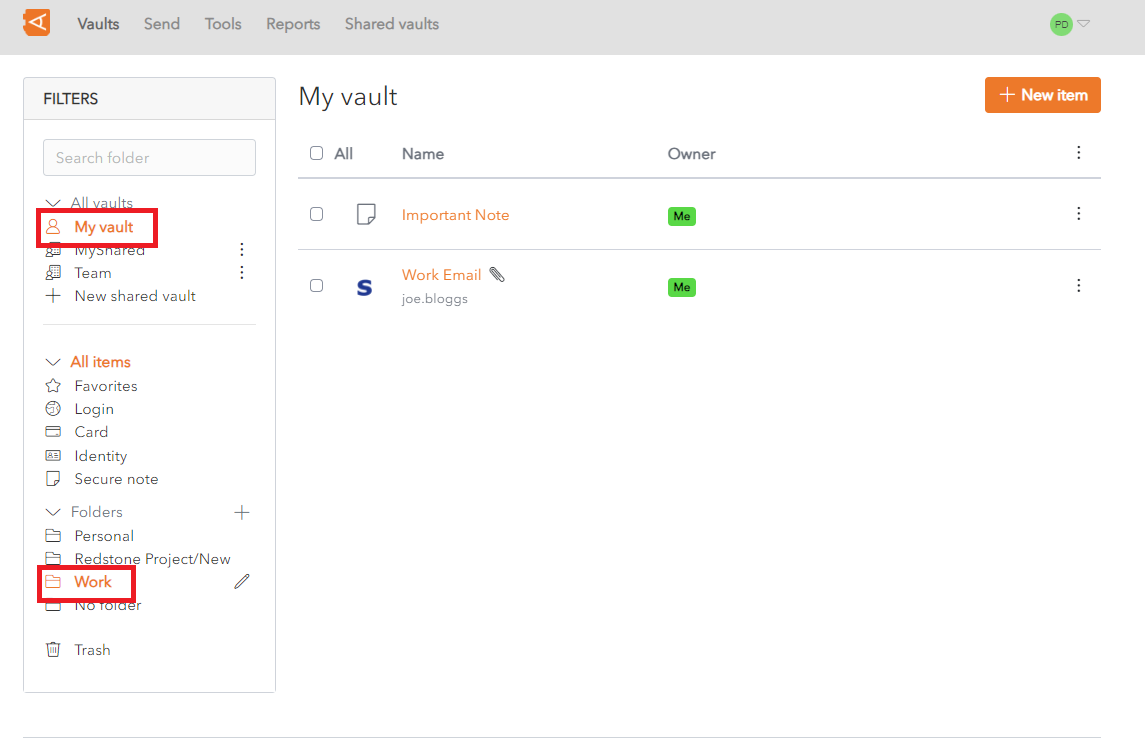
In the following example, click on the vault My vault and item type Login to return items of type Login in the folder My vault.

In the following example, click on the vault My vault and the folder Work to return all items in the folder Work and also in the vault My vault.
Basic Search
This is available in Mobile Apps.
You can search on the following indexed fields in your items:
- All Items: name
- Logins: username, URI
- Cards: brand, last 4 digits of the card number
- Identities: name
Leading and Trailing Wildcards are included in Searches. For example, searching for googl will return items where the search fields contain google, googling or googlemail.
In this example, enter 21 in the Search Field to return all items where one of the fields being searched contains 21, in this case a Card item with 21 in the last 4 digits of the card number.

Search results are sorted based on a scoring algorithm, based on the number of fields that a search term appears in.
Full-Text Search
This is available in the Web Vault and Browser Extension.
You can search on the following indexed fields in your items:
-
shortid: This is the 1st 8 characters of the Item ID
-
sharedvaultid: This is the Shared Vault ID, for Items in a Shared Vault
-
name: Item Name
-
subtitle: This depends on the Item Type. It can be Username, Login, Last 4 digits of Card Number, Card Brand or Identity Name.
-
notes: Notes field of an Item. Matches on full words only unless wildcards are used.
-
fields: This is the Name or Value in Custom Fields. It is only available for Custom Fields of type Text
-
attachments: This is the Name of a File that is attached to an Item.
-
login.username: This is the Username of a Login Item
-
login.uris: This is the URI Hostname of a Login Item
In this example, enter 21 in the Search Field to return all items where one of the fields being searched contains 21, in this case a Card item with 21 in the last 4 digits of the card number.
Search results are sorted based on a scoring algorithm, based on the number of fields that a search term appears in.
If no results are found using a Full-Text Search, WALLIX Vault will use Basic Search.
Special Search Parameters
Various wildcards and parameters can be used to make the search more specific:
- Leading and Trailing Wildcards
- Other Wildcards:
- >fieldname searches only on that field name
- >-fieldname searches on all fields except that field name
- * searches everything
- >fieldname:search term searches for that search term in that fieldname
- Search parameters available in Lunr js, like Term Presence or Fuzzy Matching.
- + prefix indicates that what follows must be contained in the search results
- - prefix indicates that what follows must not be contained in the search results
- ~ prefix is used for Fuzzy Matching.
Some examples include
- >googl returns all items that start with googl
- >name:Google will return all Items where name equals Google
- >-name:Google will return all Items where name does not equal Google
- >-login.username:*@hotmail.com will return all Items where of type Login where the Username starts with @hotmail.com
Add Logins to Vault
There are 2 ways to auto-fill a Login to the Vault.
This function is available for Logins, Cards and Identities.
Add to Vault using Automatic Prompt
If this login is not already saved in WALLIX Enterprise Vault, a prompt displays offering to save the Login details for this Website.
Choose a Folder to add the Login to this Folder in the Vault. This field is optional.
Items are added to the User's Individual Vault and not a Shared Vault.
Click the Save button.
The Add Item Screen displays with the fields prepopulated with the Login details.
Modify fields, if required.
Click Save to Save Item to Vault.
Alternatively, click Cancel to cancel the operation.
Add to Vault Manually
From the Vault Screen of the Browser Extension, click Add a login.
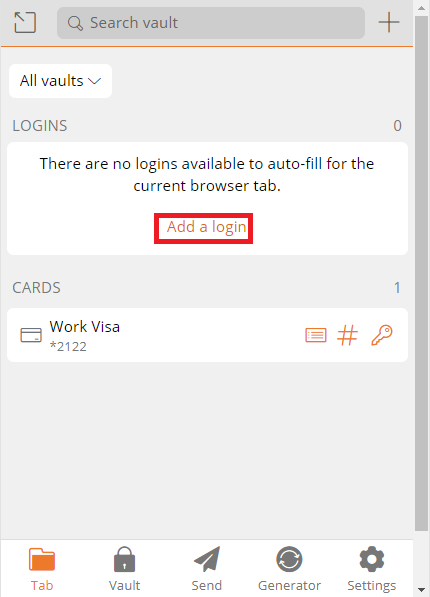
The Add Item Screen opens.
The elements that the Browser Extension could recuperate from the browser are prepopulated.
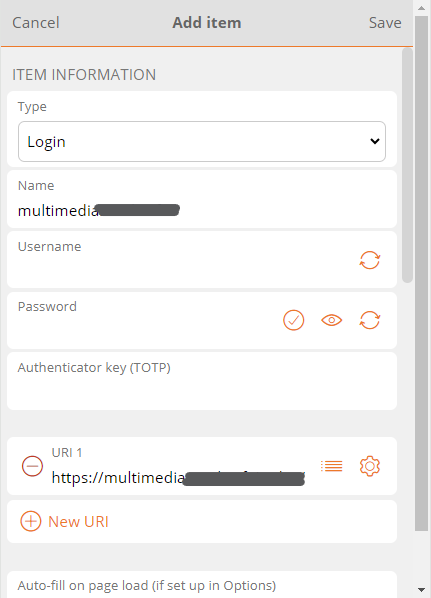
Enter the remaining fields. Click Save to create Login.
Alternatively, click Cancel to cancel the operation.
Delete Item
There are 2 ways to delete an item, from the Item List or from the Edit Item Screen.
Delete Item from Item List
From the Item List, click on the ![]() Context Menu link beside an Item. The context menu for that item opens.
Context Menu link beside an Item. The context menu for that item opens.
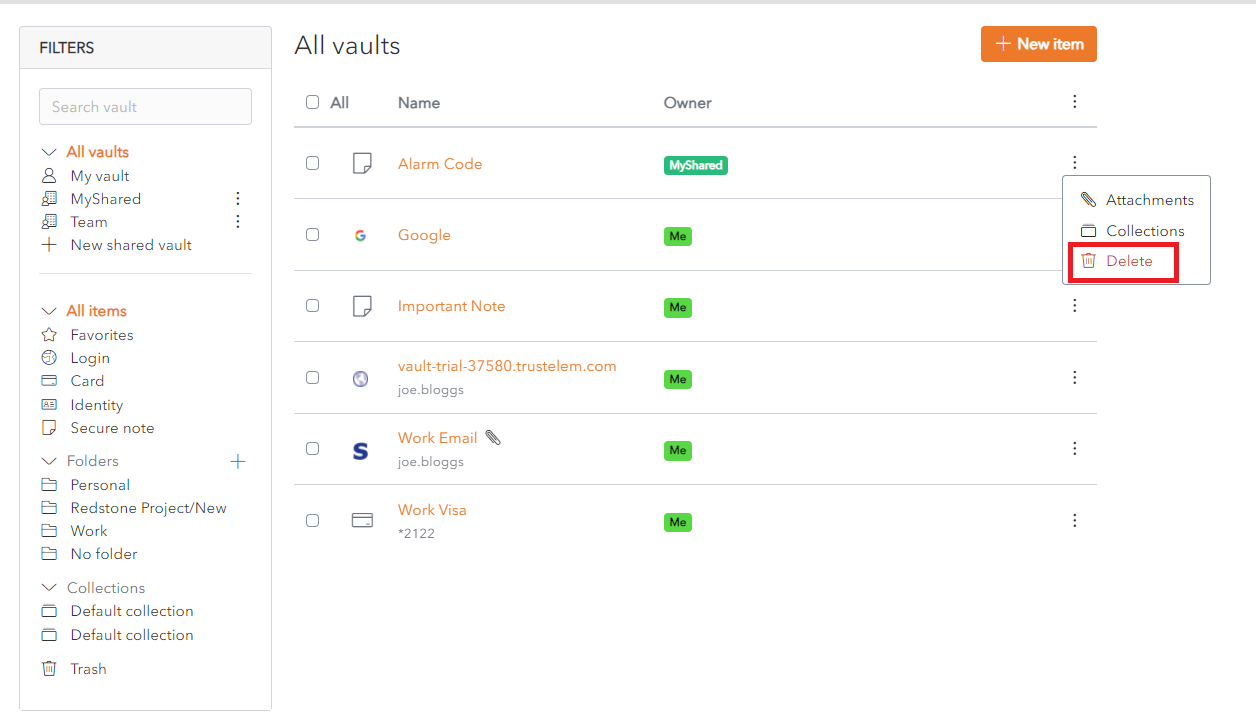
Click the ![]() Delete link. A Delete Item Confirmation pop up is displayed.
Delete link. A Delete Item Confirmation pop up is displayed.
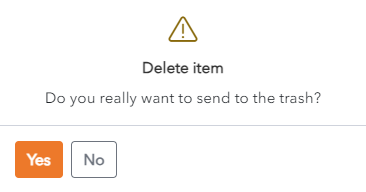
Click Yes to delete the Item.
Click No to cancel the operation.
Delete Item from Edit Item Screen
Click on the Item to be deleted. The Edit Screen opens.
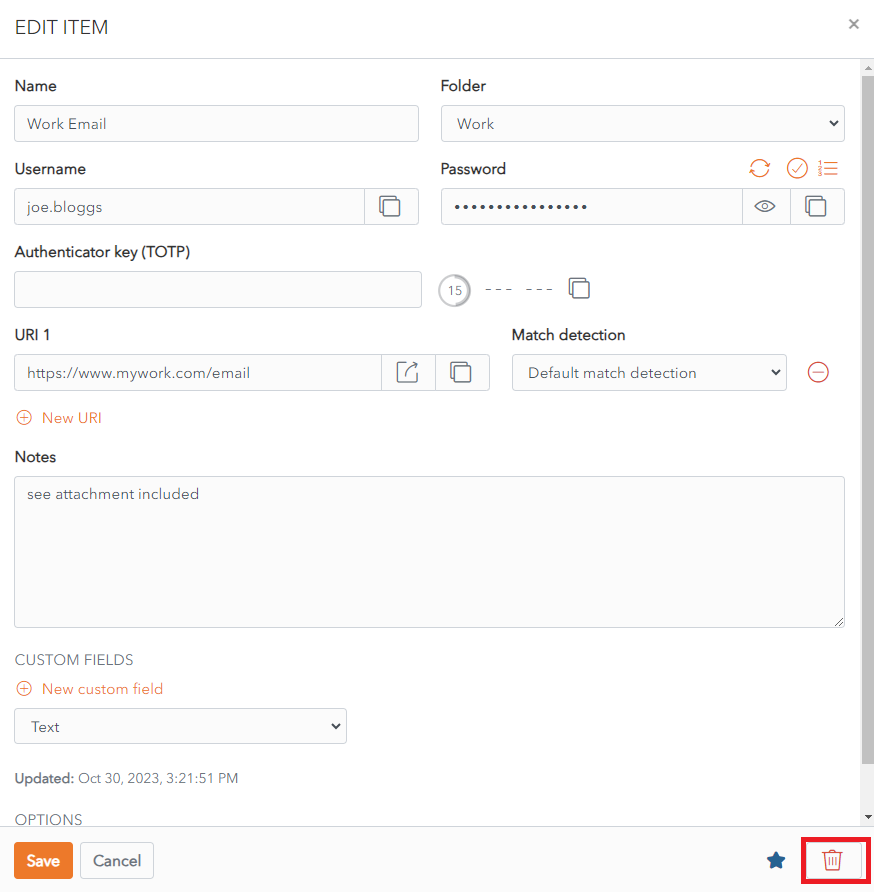
Click the ![]() Delete button. A Delete Item Confirmation pop up is displayed.
Delete button. A Delete Item Confirmation pop up is displayed.
Click Yes to delete the Item.
Click No to cancel the operation.
Identity Items
You can use a Identity Item to store information about a person’s identity.


The following fields are available. Only the name field is mandatory.
- Type: Identity, for Identity Item.
- Name: Choose a name that easily identifies the item.
- Folder: This dropdown allows you to choose the folder you want to add the login to.
- Title: Use dropdown to choose from common titles.
- First name: You can add a first name.
- Middle name: You can add a middle name.
- Last name: You can add a last name.
- Username: You can add a username.
- Company: You can add a company
- Social Security Number: You can add a social security number.
- Passport number: You can add a passport number.
- License number: You can add a driver’s license number.
- Email: You can add an email.
- Phone: You can add a telephone number.
- Address 1: You can add the first line of the address.
- Address 2: You can add the second line of the address.
- Address 3: You can add the third line of the address.
- City / Town: You can add the city or town.
- State/Province: You can add the state or province
- Zip/Postal Code: You can add the zip code or postal code.
- Country: You can add the country.
- Notes: You can add notes about this identity.
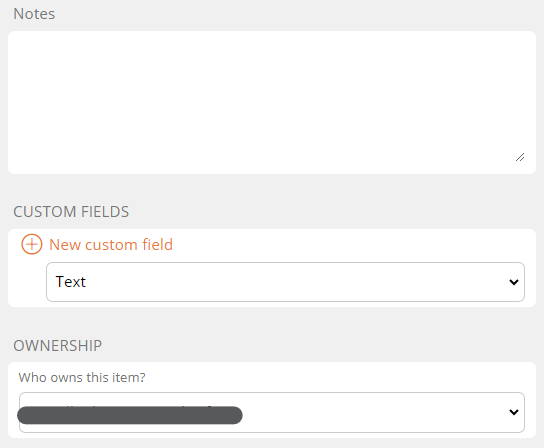
- Custom Fields: You can add one or more custom fields. Learn more about Custom Fields.
- Master Password re-prompt: Check this box to be prompted to enter your Master Password to access this login.
- Ownership: Choose which Vault owns this item from the dropdown menu. By default it is owned by your Vault unless you choose otherwise.

Click the ![]() Favourites button to add this item to your favourites.
Favourites button to add this item to your favourites.
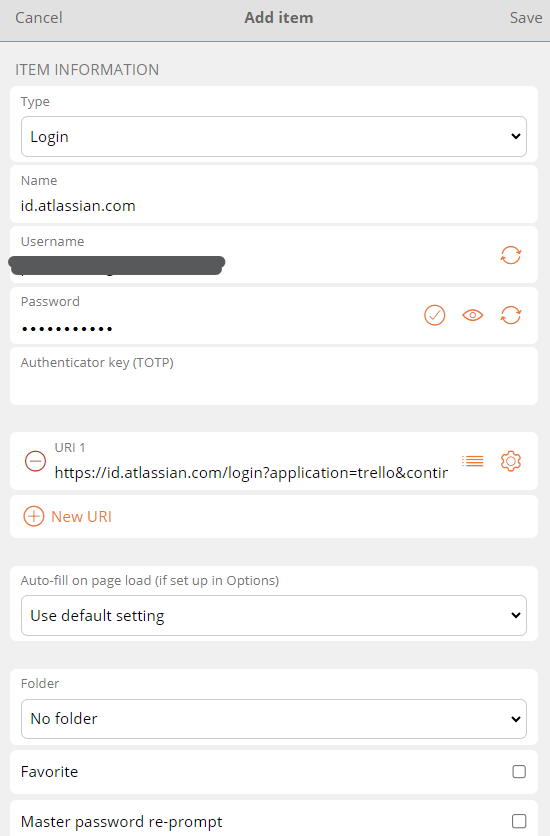
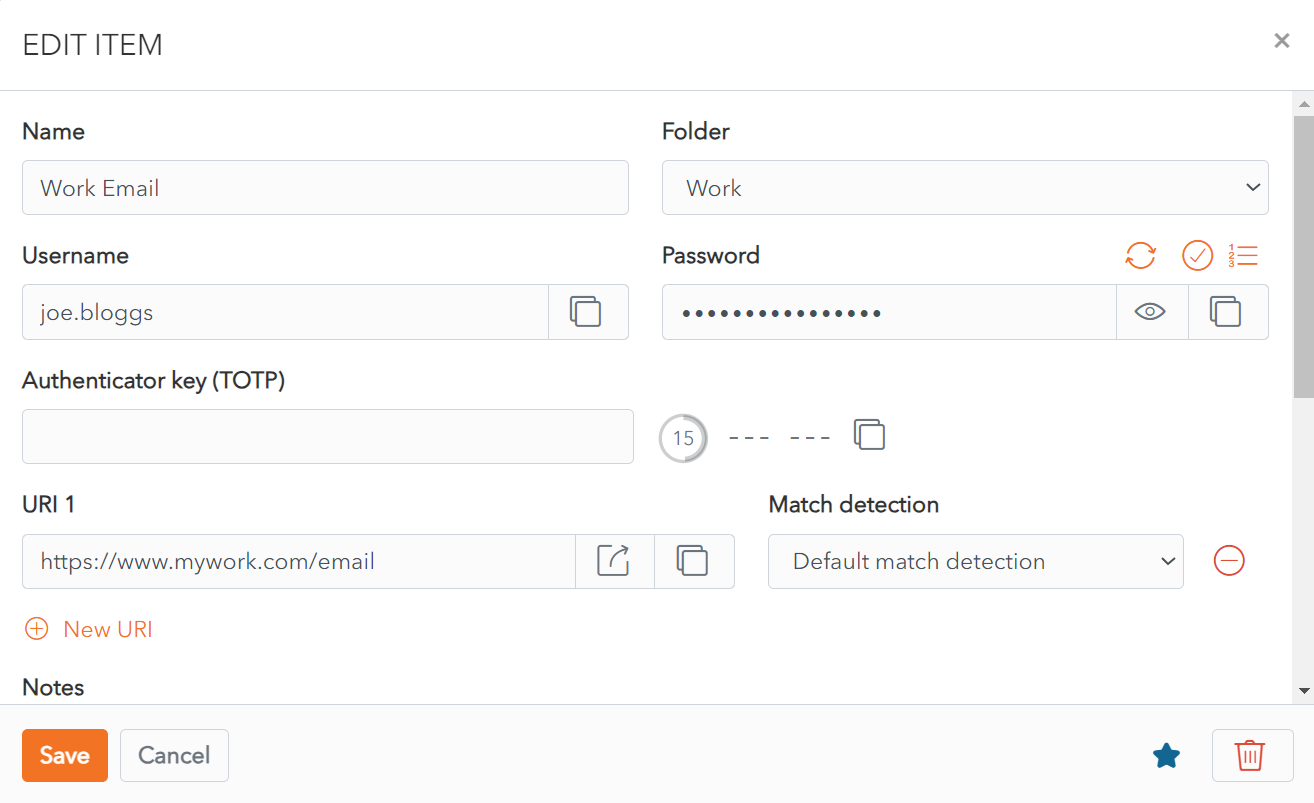
Login Items
You can use a Login Item to store information about an account that requires a login, for example an email account, a CRM account or a social media account.


The following fields are available. Only the name field is mandatory.
- Type: Login, for Login Item.
- Name: Choose a name that easily identifies the item.
- Folder: This dropdown allows you to choose the folder you want to add the login to.
- Username: Your account username.
- Password: Your account password. You have different password options to improve the security of your passwords.
 Password Generator button generates a strong password for your login.
 Check Password Integrity
 Show/Hide Password Character Count
 Copy Password to clipboard
 Show/Hide Password
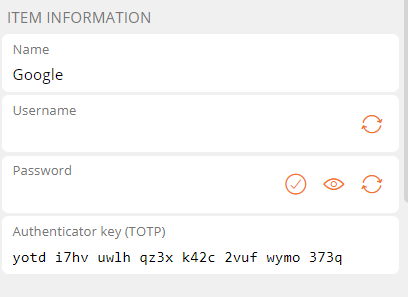
- Authenticator key (TOTP): Your authenticator key use to generate a Time-based One-Time Password (if in place for this account).
- URI 1: Uniform Resource Identifier (URI) or Website address for this account.
- You can add extra URIs using the
 button.
 - You can click on the
 button to open the URI in a new browser window to easily confirm the correct URI.
 - You can also choose from different options in the Match Detection dropdown to match the URI to an existing URI.
- You can add extra URIs using the


- Notes: You can add notes about this login.
- Custom Fields: You can add one or more custom fields. Learn more about Custom Fields.
- Master Password re-prompt: Check this box to be prompted to enter your Master Password to access this login.
- Ownership: Choose which Vault owns this item from the dropdown menu. By default it is owned by your Vault unless you choose otherwise.
- Click the
 favourites button to add this item to your favourites.
Card Items
You can use a Card Item to store information about a credit or other payment card.


The following fields are available. Only the name field is mandatory.
- Type: Card, for Card Item.
- Name: Choose a name that easily identifies the item.
- Folder: Dropdown allows you to choose the folder you want to add the login to.
- Cardholder Name: Name, as written on the card.
- Brand: Dropdown menu allows you to choose the card brand, as written on the card. If your card brand is not in the list, choose Other.
- Number: Card number, as written on the card. This field can be hidden or displayed using the
 Display/Hide toggle button. The
  copy button allows you to copy to the clipboard.
 - Expiration month: Dropdown allows you to choose expiration month, as written on the card.
- Expiration year: Enter expiration year, as written on the card.
- Security code (CVV): Enter 3 digit security code, as written on the back of the card.
- Notes: You can add notes about this card.
- Custom Fields: You can add one or more custom fields. Learn more about Custom Fields.
- Master Password re-prompt checkbox: Check this to be prompted to enter your Master Password to access this login.
- Ownership dropdown: Choose which Vault owns this item. By default it is owned by your Vault unless you choose otherwise.
Click the ![]() favourites button to add this item to your favourites.
favourites button to add this item to your favourites.
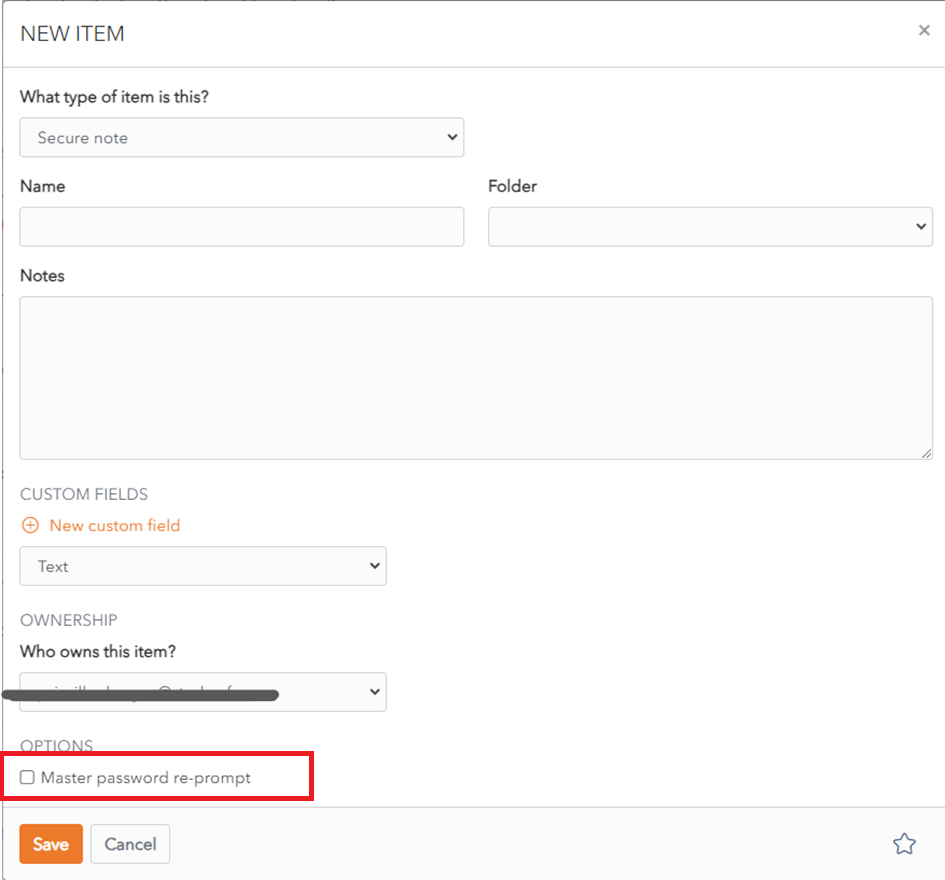
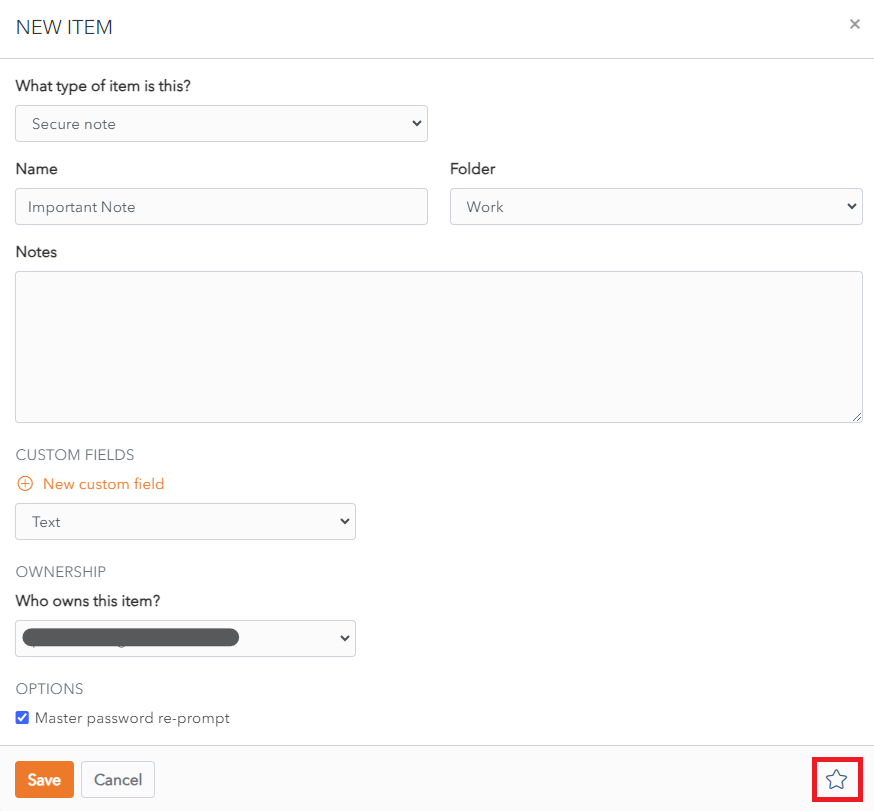
Secure Note Items
You can use a Secure Note Item to store private information that doesn’t fit into one of the other categories.

The following fields are available. Only the name field is mandatory.
- Type: Identity, for Identity Item.
- Name: Choose a name that easily identifies the item.
- Folder: This dropdown allows you to choose the folder you want to add the login to.
- Notes: You can add secure notes in this field.
- Custom Fields: You can add one or more custom fields. Learn more about Custom Fields.
- Master Password re-prompt: Check this box to be prompted to enter your Master Password to access this login.
- Ownership: Choose which Vault owns this item from the dropdown menu. By default it is owned by your Vault unless you choose otherwise.
Click the ![]() favourites button to add this item to your favourites.
favourites button to add this item to your favourites.
Password Fields for Login Items
WALLIX Enterprise Vault provides different options for your Password fields to improve the security of your passwords.
Generate Strong Password
Click on the Generate Password button to generate a secure password for your login.
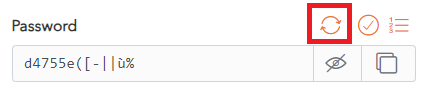
A pop up screen will require you to confirm that you wish to overwrite your current password.
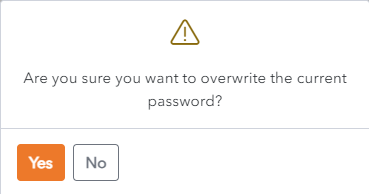
Alternatively, click on the No button to keep your current password.
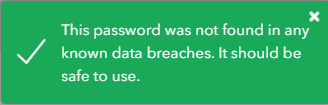
Check Password Integrity
Click on the Check Password button to check if your password has been exposed.
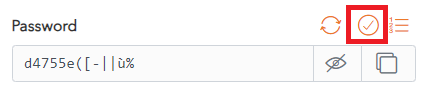
WALLIX Enterprise Vault will check if your password has been found in any known data breaches.
Show / Hide Character Count
Click on the Toggle Character Count button to display the Password Character Count of your password.

This can help you check if your password is secure enough.
Click the Toggle Character Count button to hide the Password Character Count display.
You can also click the Hide button to hide the Password Character Count display.
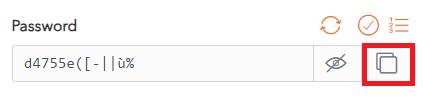
Copy Password
Click on the Copy Password button to copy the password entered to the clipboard.
Show / Hide Password
Click on the Show/Hide Password toggle button to display the password as you enter it.

Click again on the Show/Hide Password toggle button to hide the password.
Password Protected Items
An Item can be password protected to add an extra layer of security. The Master Password must be entered to open the Item or the Item's attachments.
Add Password Protection to an Item
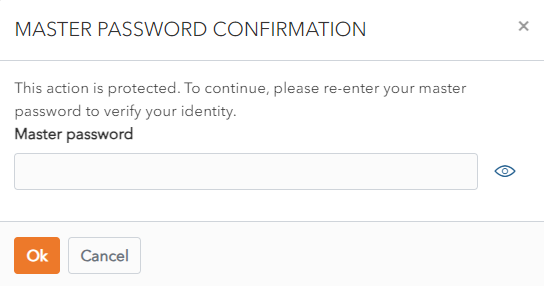
When creating or editing an Item, check the Master password re-prompt checkbox.
Click Save to save changes.
Alternatively, click Cancel to cancel the operation.
Open Password Protected Items
If the Item is password protected, a Master Password Confirmation pop up screen displays when you click on the Item to edit it.
Enter the Master Password and click Ok to enable Item modification. This also applies to Item attachments.
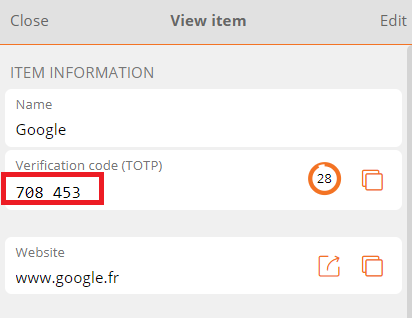
TOTP Authentication
A TOTP (Time-based one-time password) is a password that is generated by a TOTP Generator, to be used one time only as part of a 2 step login.
Many Accounts propose (or require) 2-factor authentication :
- The first step is Account's username and password.
- The second step is a TOTP that is generated by a TOTP Generator from the Account's Authentication Key.
WALLIX can be used to store the Authentication Key for a Login and use it to generate a TOTP using SHA-1 that is valid for 30 seconds.
This is possible in the WALLIX Web Vault, the WALLX Web Extension and the WALLIX Authenticator Mobile App.
WALLIX Web Vault
From the Item Screen of a Login Item, add the Authentication key for that Login.
A TOTP is automatically generated for the Login and can be copied using the ![]() Copy button.
Copy button.

Enter the TOTP into the Login Screen of the requesting web page.
WALLIX Web Extension
From the Add or Edit Item Screen of a Login Item, add the Authentication key for that Login.
From the Item Screen, a TOTP is automatically generated for the Login and can be copied using the ![]() Copy button.
Copy button.
Enter the TOTP into the Login Screen of the requesting web page.
WALLIX Authenticator
From the WALLIX Authenticator Mobile App, click the ![]() button to Create a New Login.
button to Create a New Login.
2 Options are possible.
The first option is to tap Scan the QRCode to open you Camera App to scan the QR Code to create the Login.
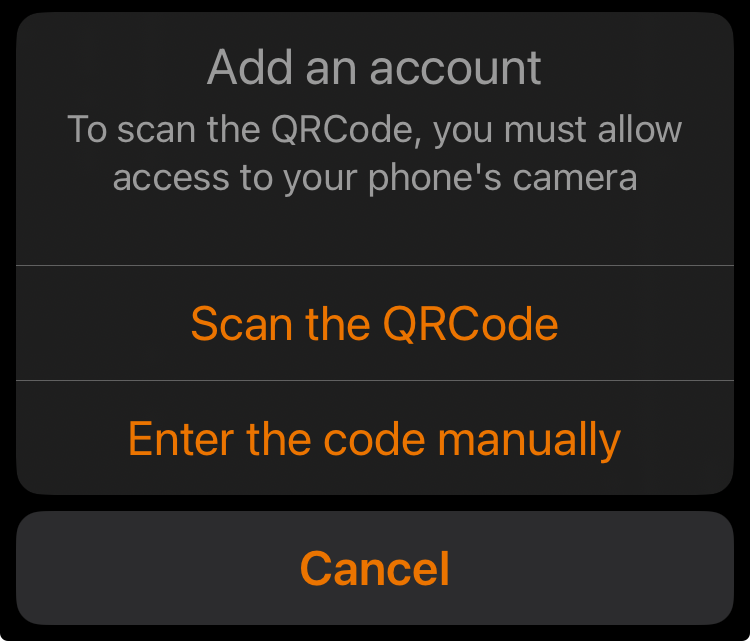
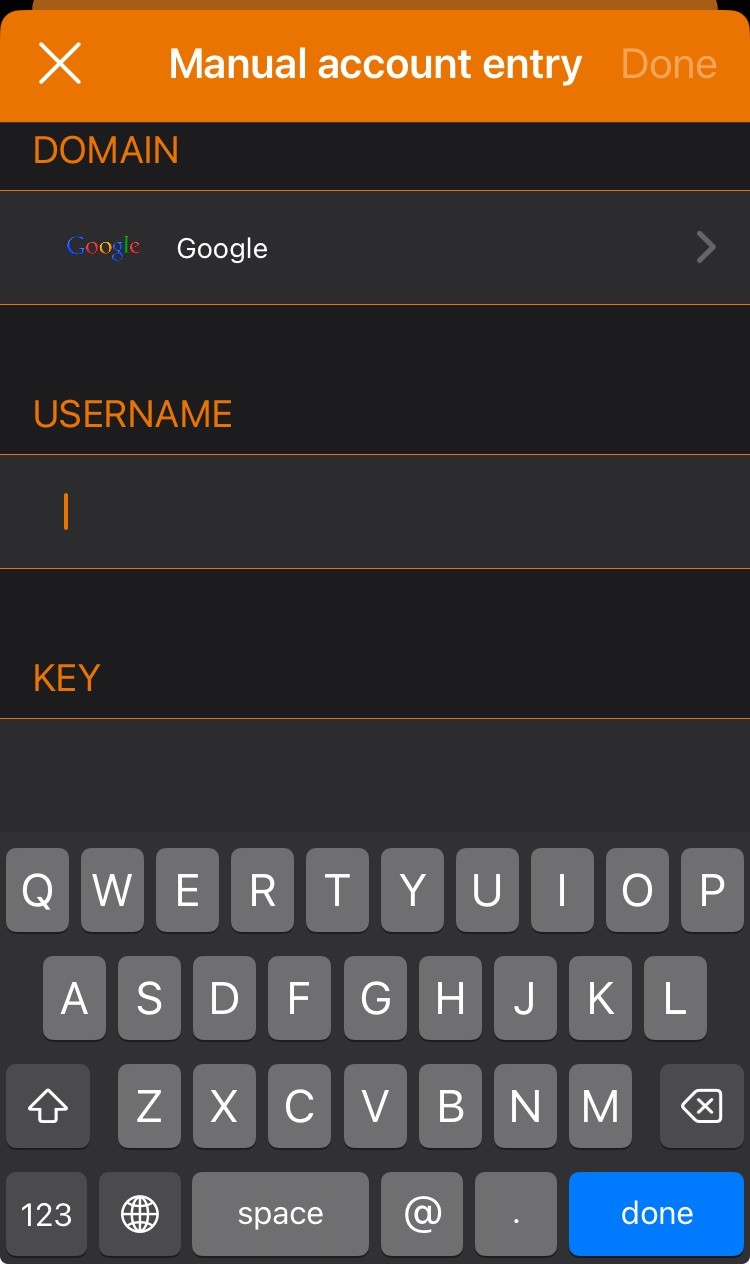
Alternatively, tap Enter the code manually.
- Choose the Domain from the Domain dropdown.
- In the Username Field, enter the Username.
- In the Key Field, enter the Authentication Key.
- Tap done to Save the Login.
From the Item Screen of a Login Item, add the Authentication key for that Login.
A TOTP is automatically generated for the Login and can be copied using the ![]() Copy button.
Copy button.
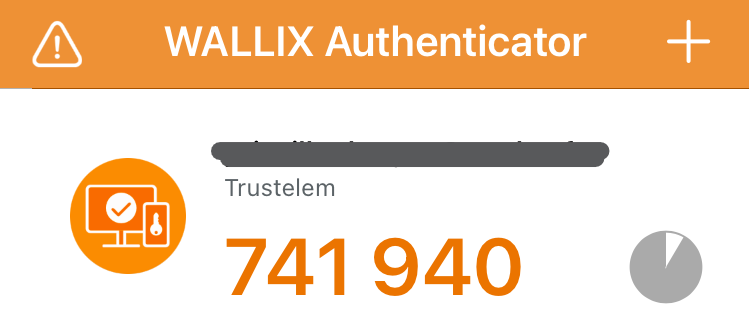
Enter the TOTP into the Login Screen of the requesting web page.
The device WALLX Authenticator is installed must used the same time and timezone as that of the server that hosts the web page being accessed. Otherwise the code will not work. It is recommended to set the device's time and timezone to automatic.
Item Context Menu
From the Item List click the ![]() More Button of a Shared Vault Item.
More Button of a Shared Vault Item.
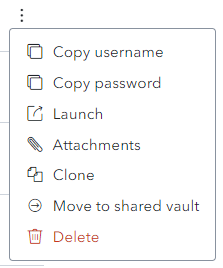
A number of options are available (depending on the Item Type):
- Copy username: Copies the Username to the clipboard (for Login Items)
- Copy password: Copies the Password to the clipboard (for Login Items)
- Launch : Launches the URI associated with the Item (for Login Items)
- Attachments: Displays the Attachment Screen
- Clone: Clones the Item
- Move to Shared Vault: Moves the Item to a Shared Vault
- Collections: Displays the Collections Screen
- Delete: Deletes the Item (after Confirmation)
Move Item to Shared Vault
From the Item List click the ![]() More Button of an Item.
More Button of an Item.
The following screen is displayed.
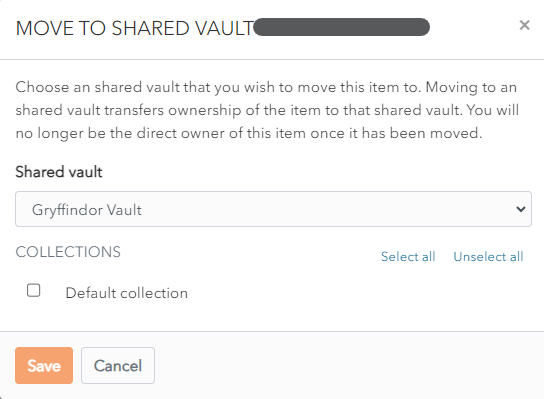
In the Collection section, the list of Collections in the Shared Vault is displayed.
Check the checkbox beside the Collections to add the Item to.
Click Save to move the Item to the chosen Shared Vaults and Collections.
Click Cancel to cancel the operation.
Clone Item
From the Item List click the ![]() More Button of an Item.
More Button of an Item.
The following screen is displayed.
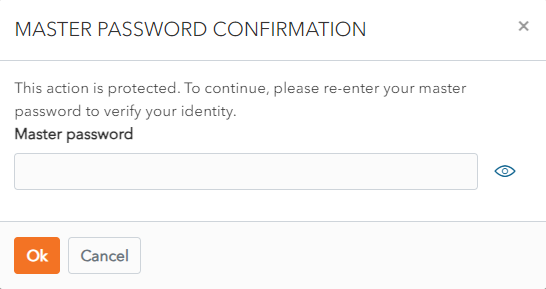
Enter Master Password and click Ok.
A Clone is created.
Click Save to Save the Cloned Item
Alternatively, click Cancel to cancel the operation.
Favorites
An Item can be marked as a favorite to make it easier to locate. All favorites are grouped together.
This works for Individual Vaults and Shared Vaults.
Marking an Item in a Shared Vault as a favourite puts it in your favourites only. It will not be marked as a favourite for other users of the Shared Vault.
Add to Favorites
From the Create Item or Edit Item Screen, an click on the ![]() Favorites button.
Favorites button.
The Favorites button turns blue ![]() .
.
Click Save to save the change. The Item is displayed in Favorites.
Alternatively, click Cancel to cancel the operation.
Display Favorites
From the Item List, click the Favorites link in the Filter Menu.
All Items marked as Favorites are displayed.
Remove from Favorites
To remove an Item from favorites, click on an Item in the Item List open it.
The Item Screen displays. The favorites button is blue ![]() .
.
Click the favorites button. The favorites button turns white ![]() .
.
Click Save to save the change. The Item is now removed from favorites.
Alternatively, click Cancel to cancel the operation.
Validate Master Password Reset Request
A Vault Administrator is required to validate all Master Password Reset Requests. At each creation of a Master Password Reset Request by a user, Vault Administrators are notified by email.
This procedure details the steps to be followed by a Vault Administrator to Validate a Master Password Reset Request.
Click Tools and then Recovery. The Master Password Confirmation prompt is displayed.

Enter your Master Password and click Ok. The Recovery Screen is displayed.
Alternatively, click Cancel to cancel the operation.
Click the Rescue users who have created a reset master password request link.
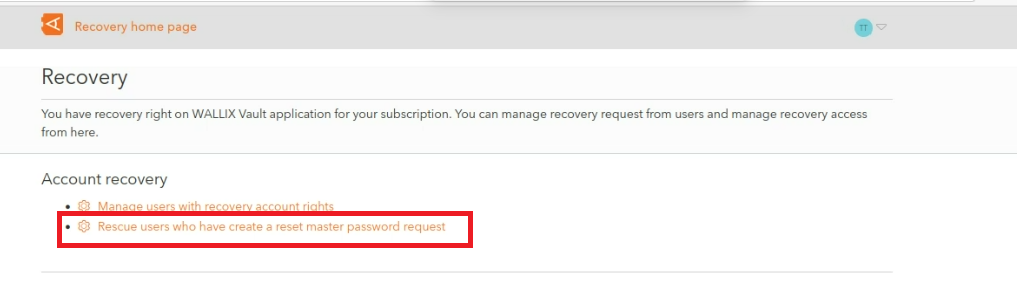
The Account Recovery Screen is displayed.
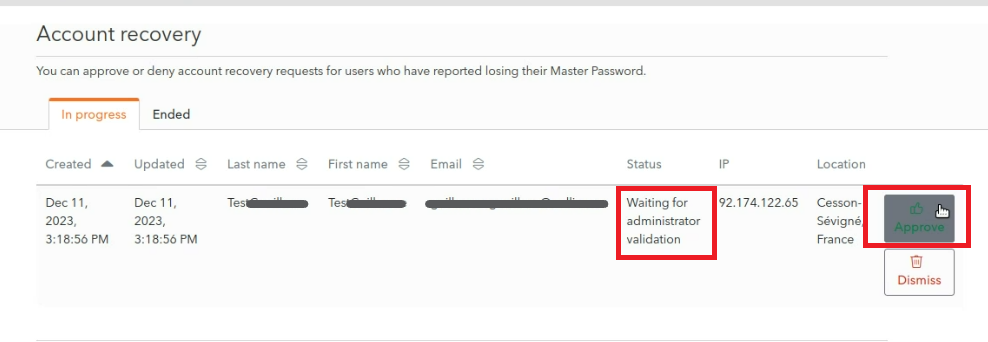
In the In progress tab, Master Password Reset Requests that are currently in progress are displayed.
Requests that have not yet been treated have Waiting for administrator validation status.
Click the Approve button to validate the Master Password Request. This should only be done where it is clear that this is a request from a valid user.
Alternatively, click the Dismiss button to deny the Master Password Request.
For validated requests, the following screen is displayed. A Reset confirmation message is displayed.
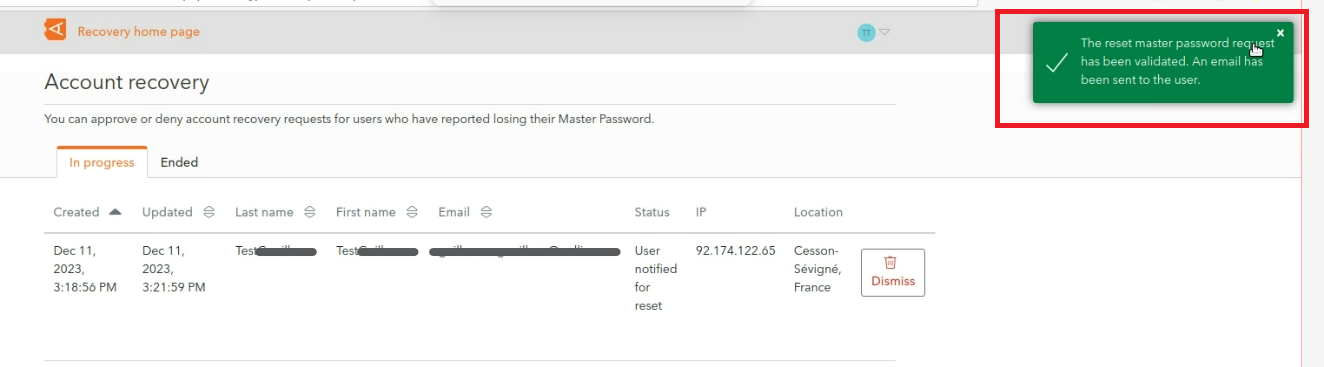
An email is sent to the user with a reset link which allows them to reset their master password.
Manage attachments
Attach files to your items.
Attachments Overview
WALLIX Enterprise Vault provides the facility to Attach Files to your Items.
These attachments can also be Deleted or Downloaded onto your computer.
Attachments on Password Protected Items are subject to a Master Password Re-prompt to open the Item.
Add Attachments
From the Item List, click on the ![]() More button beside an Item.
More button beside an Item.
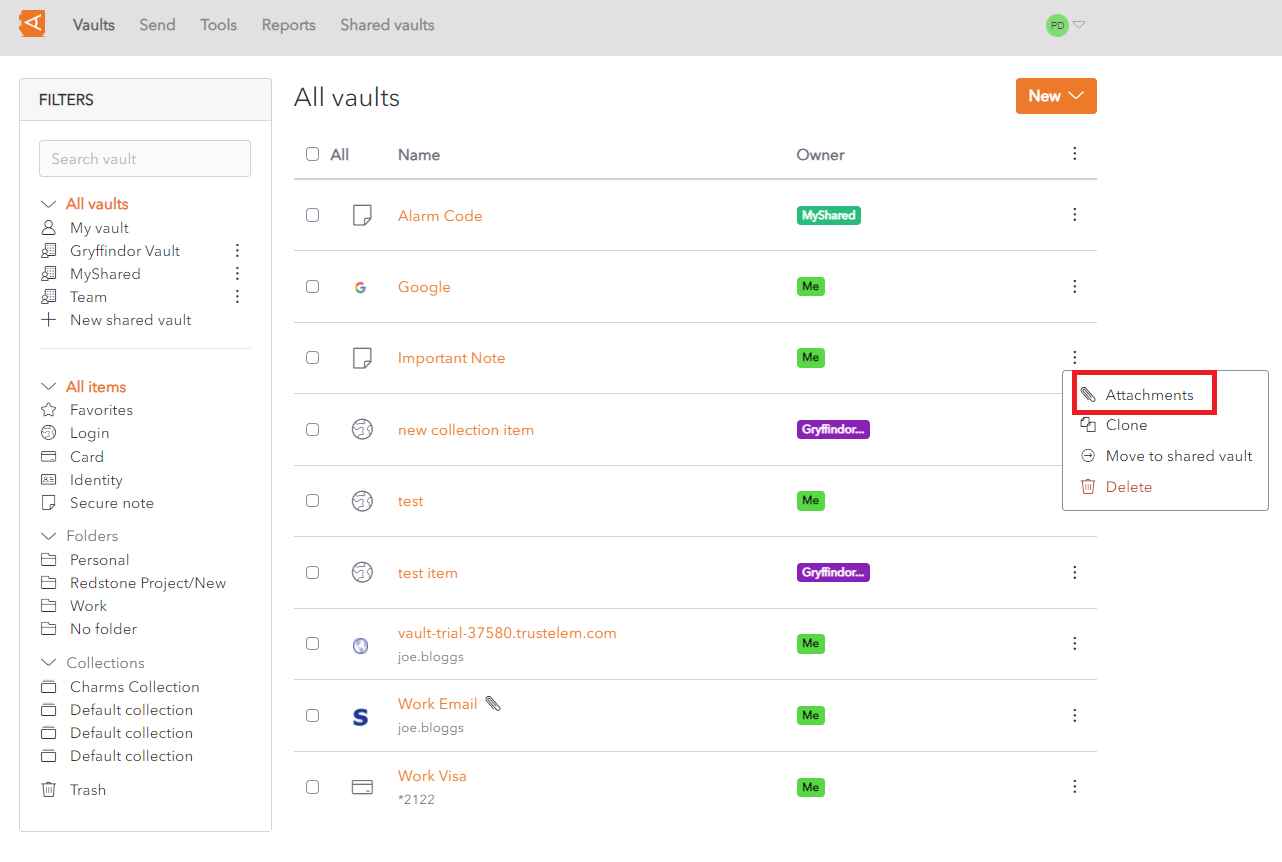
See Password Protected Items procedure for Items that require a Master Password to access them.
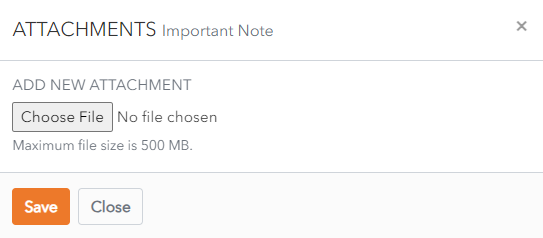
The Attachments Screen displays.
Choose a file to attach and click Save.
The maximum file size of an attachment is 100 MB. This is restricted to 50 MB if uploading from a mobile device.
The attachment is created.
Multiple attachments can be created in this way.
Once finished creating attachments, click Close to close the Attachments Screen.
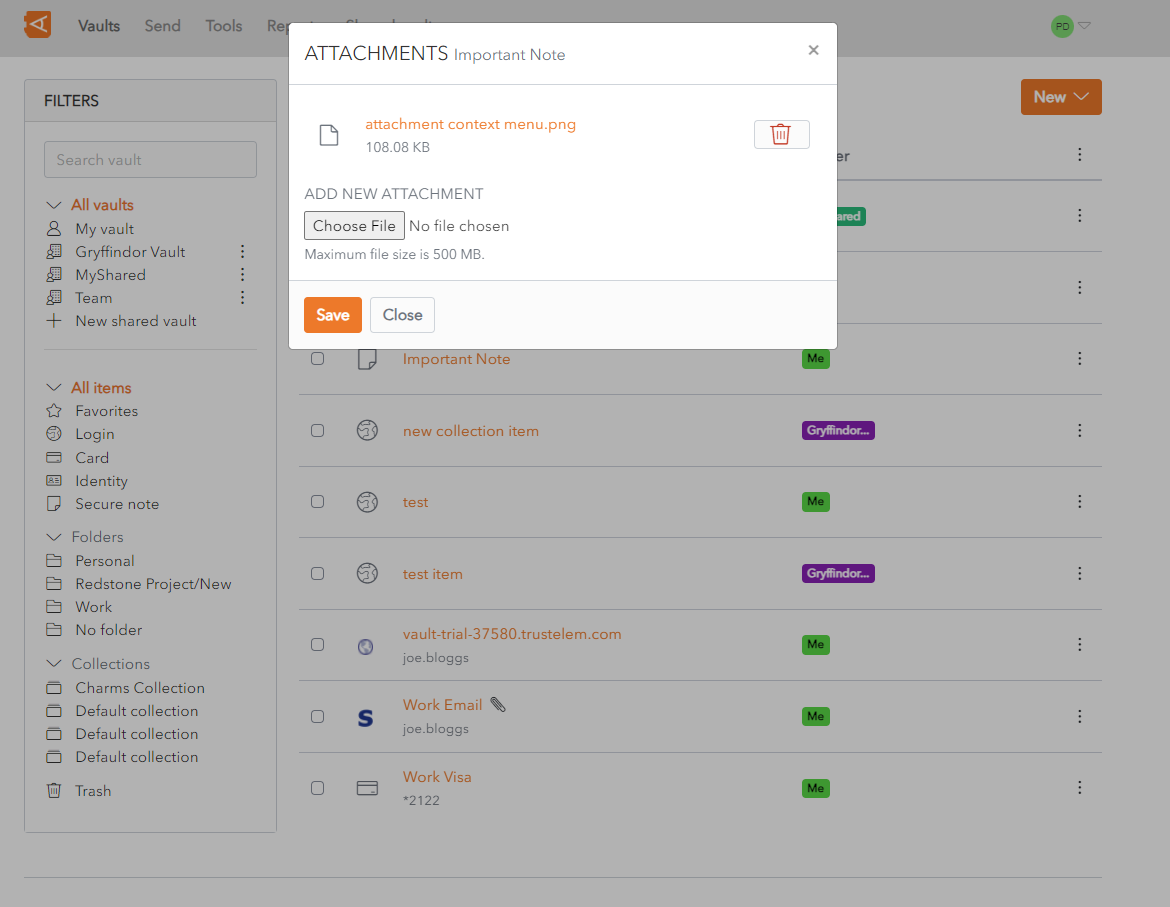
A ![]() Paperclip icon beside the Item in the Item List indicates that the Item contains one or more Attachments.
Paperclip icon beside the Item in the Item List indicates that the Item contains one or more Attachments.
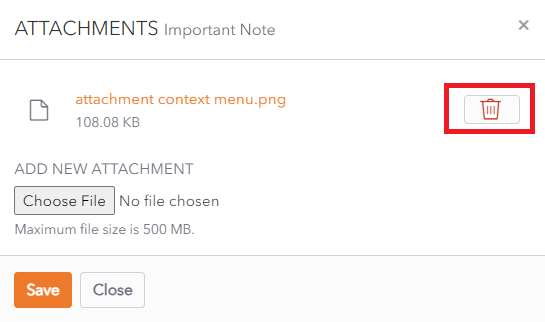
Delete Attachments
From the Item List, click on the ![]() More button beside an Item.
More button beside an Item.
See Password Protected Items procedure for Items that require a Master Password to access them.
The Attachments Screen displays.
Click the ![]() Delete button beside an Attachment.
Delete button beside an Attachment.
The Delete Attachment Confirmation Screen displays.
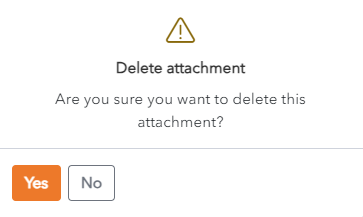
Click Yes to delete the attachment. The Attachments Screen displays.
Click No to cancel the operation.
Download Attachments
From the Item List, click on the ![]() More button beside an Item.
More button beside an Item.
See Password Protected Items procedure for Items that require a Master Password to access them.
The Attachments Screen displays.
Click on an Attachment to download it.
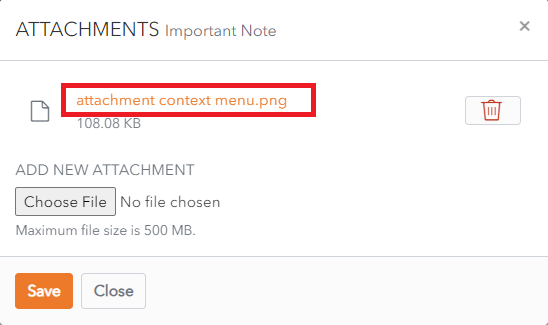
The attachment is saved in the Downloads folder on your computer.
Note: If the attachment is in a file format that can be readily displayed in the browser, it is opened directly in the browser.
Grant Trustelem Account Recovery Permissions
As an Vault Administrator, follow this procedure to Grant Password Recovery Permissions in the Trustelem application to an User.
Users with this permission can unblock users who have forgotten their passwords.
Grant Recovery Permissions
Connect to Trustelem.
Select the User to give Password Recovery permissions to and click the Modify button. The User Update screen is displayed.
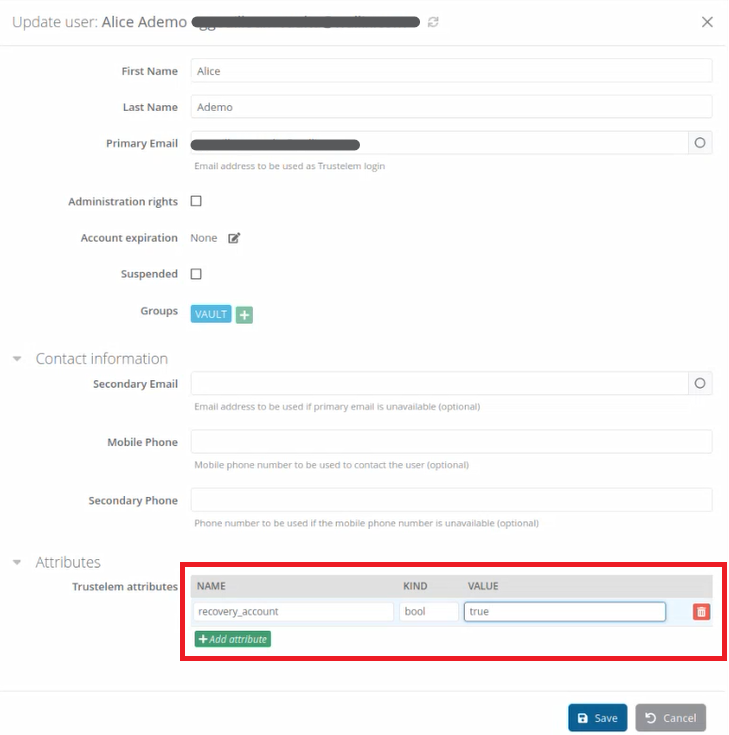
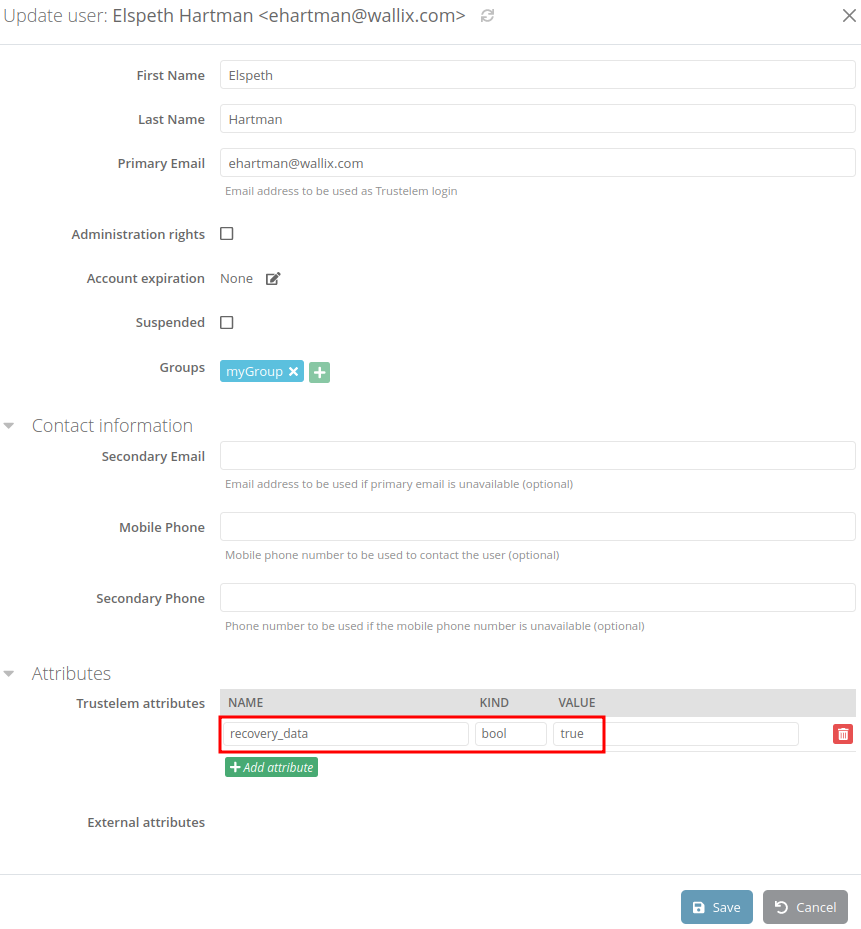
In the Attributes section, click the Add an Attribute button. A blank line is added to the Trustelem Attributes table.
Complete the fields as follows:
- NAME : recovery_account
- TYPE : bool
- VALEUR : true
Click the Save button to save the new attribute to the User.
The Trustelem attribute recovery_account displays in the Attribute List.
This User can now unblock users who have forgotten their passwords.
Manage folders
Create folders to organize your personal items.
Folders Overview
Folders can be created and used to organize personal items in your Personal Vault to make them easier to find.
Folders and Items in your Personal Vault are private to you and are never accessible to another user. Because they are in a Peronal Vault they cannot be shared. Only Items in a Shared Vault can be shared with other users.
Items can be searched for in Folders using the Filters menu.
The following functions are available for Folders:
- Create Folder
- Edit Folder
- Delete Folder
- Create Nested Folder
- Move Item to Folder
- Search for Item in Folder
Create Folder
Click on the + button beside Folders in the Filters Menu.

The Add Folder pop up window is displayed.
Enter a folder name and click the Save button.

The New Folder is displayed in your Folder List.

Edit Folder
Click on a folder in your Vault List.
The ![]() Edit button is displayed beside the folder.
Edit button is displayed beside the folder.
Click on the ![]() Edit button to open the Folder in the Edit Screen.
Edit button to open the Folder in the Edit Screen.
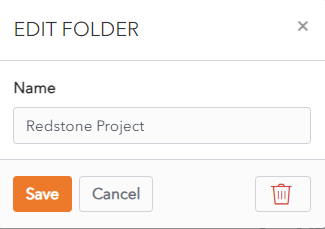
Change the folder name and then click the Save button to save your changes.
Alternatively, click the Cancel button to cancel the operation.
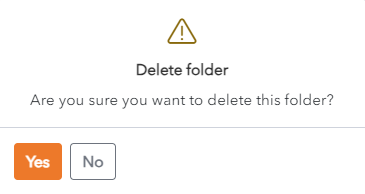
Delete Folder
From the Edit Folder Screen, click the ![]() Delete button to Delete the Folder.
Delete button to Delete the Folder.
A Delete Folder Confirmation Popup is displayed.
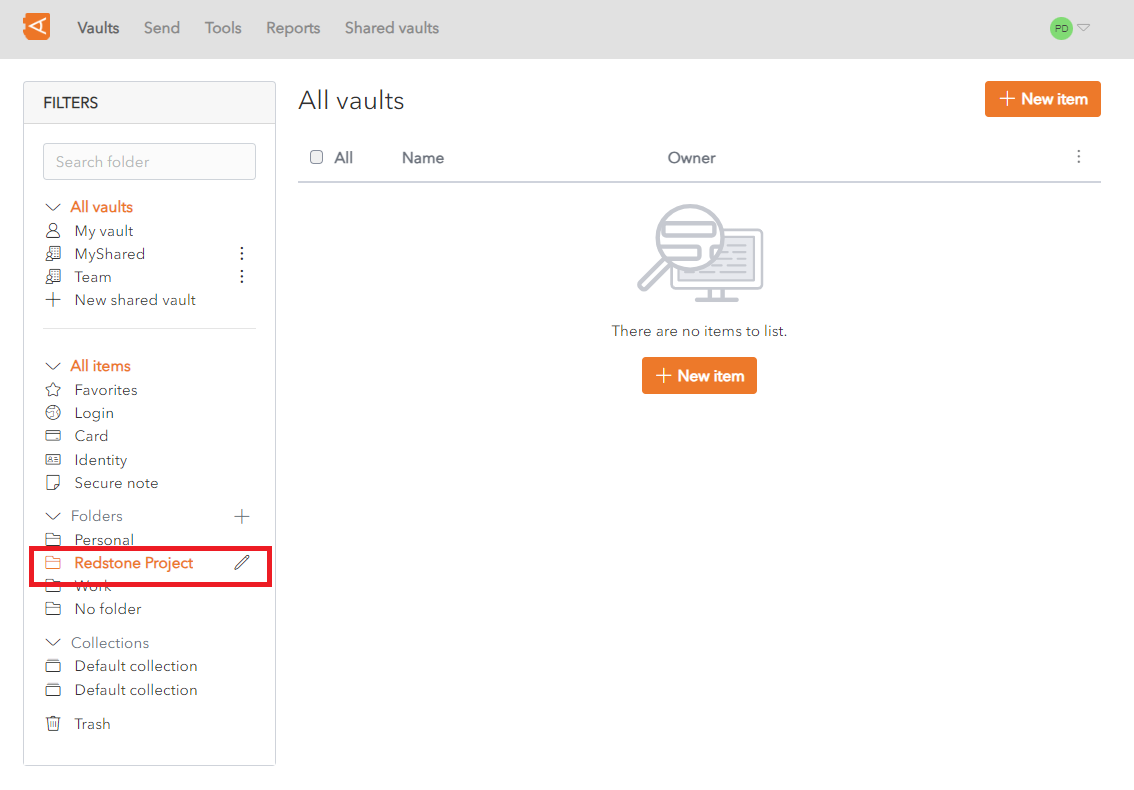
Create Nested Folder
Folders can be created or nested inside other folders.
Click on the New Folder button to create a new Nested Folder.
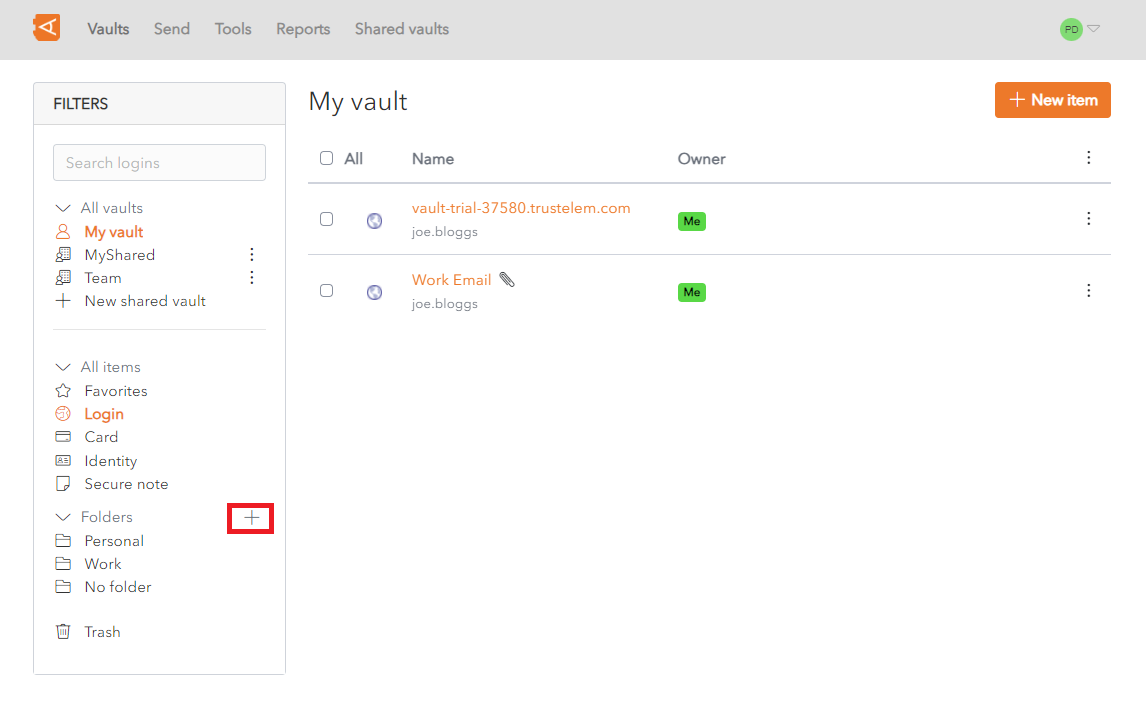
Use the « / » forward slash delimiter to define the folder structure of your nested folder.
For example, create a new folder called Redstone Project/New.
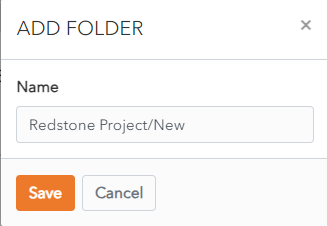
If the folder called Redstone Project already exists, a nested folder called New is created inside the Redstone Project folder.
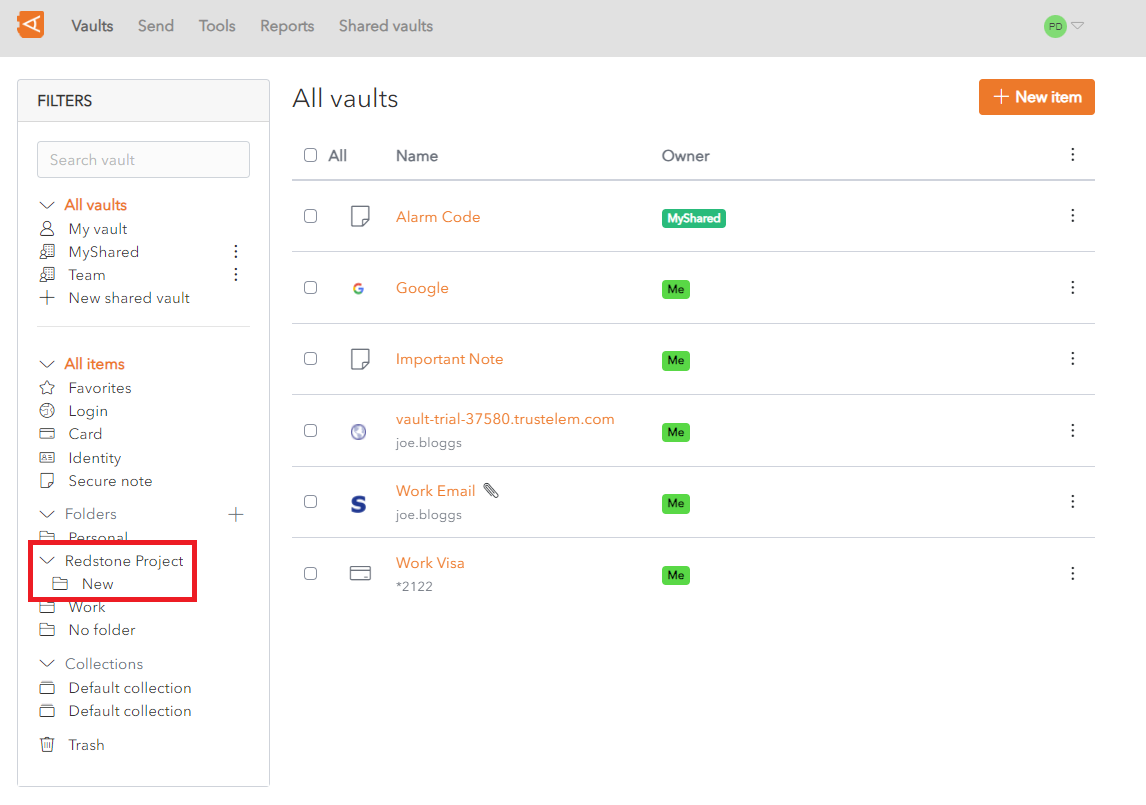
If a folder called Redstone Project does not already exist, a new folder will be created called Redstone Project/New.
To create a nested folder called Trees inside the New Folder, create a new folder called Redstone Project/New/Trees.
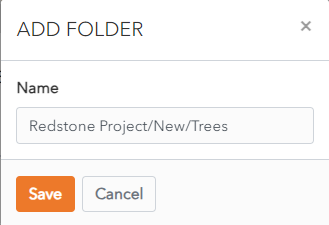
A nested folder called Trees is created inside the New folder.
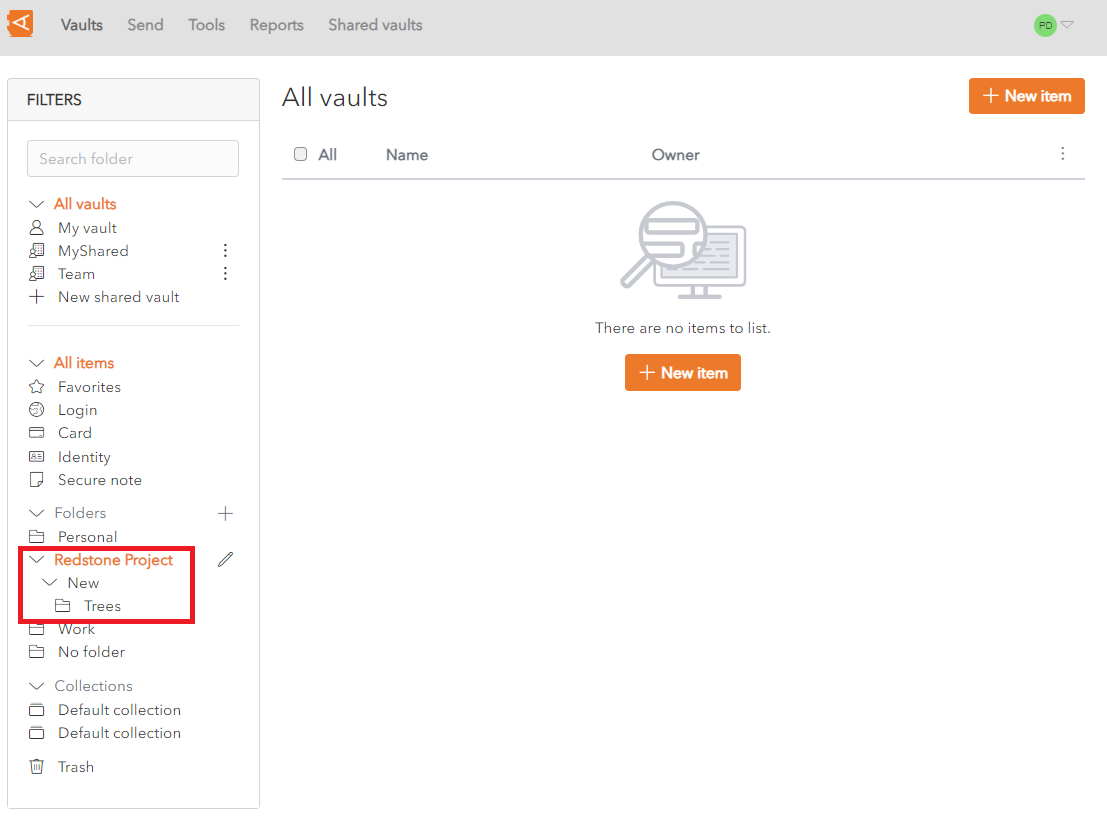
If you Search inside the Redstone Project Folder, it will return items in the Redstone Project Folder but not items inside the New and Trees nested folders.
There is no limit to the depth of nested folders, but it can be impractical to create too many.
Move Item to Folder
From the Edit Item Screen Screen, choose a Folder from the dropdown menu.
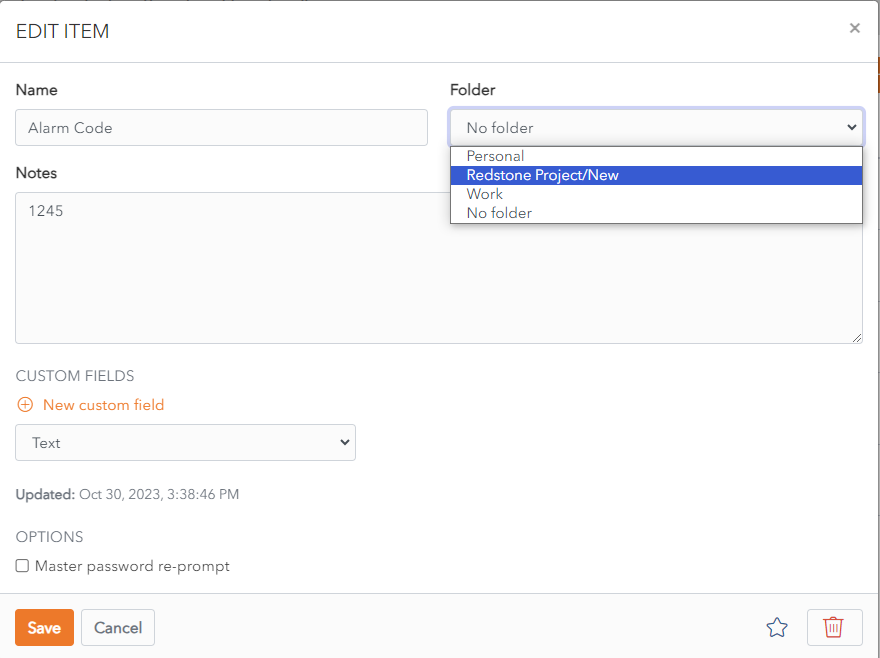
You can add an Item from a Shared Vault into a Folder. This will be organized in this Folder in your Vault. It will not provide access to this item to another user.
Manage Data Recovery
This is only available for users who have recovery options. These options have to be granted by a Trustelem Administrator.
Admin quick start
Prerequisites:
- in the Vault administration application:
- recovery data policy activation
-
set the recovery_data attribute to the users who want to recover user data
- recovery data policy activation
-
set up the approbators group(s)
As a authenticated user, the standard workflow to access to user data is:
- Create a data recovery request (described here)
- Notification is sent to the approbators, waiting for their vote
- If the request is approved, an email is sent to the user who emit the request
- The user has to re-log in and can now access to the user data (see an example below)

Approbators group management
All the data recovery requests enforce a validation process that consists to be approved by all approbators group. In each group, a quorum is defined so, when the quorum is reached, the request is considered validated by the group.
A validation group is composed by one or several Trustelem Vault users.
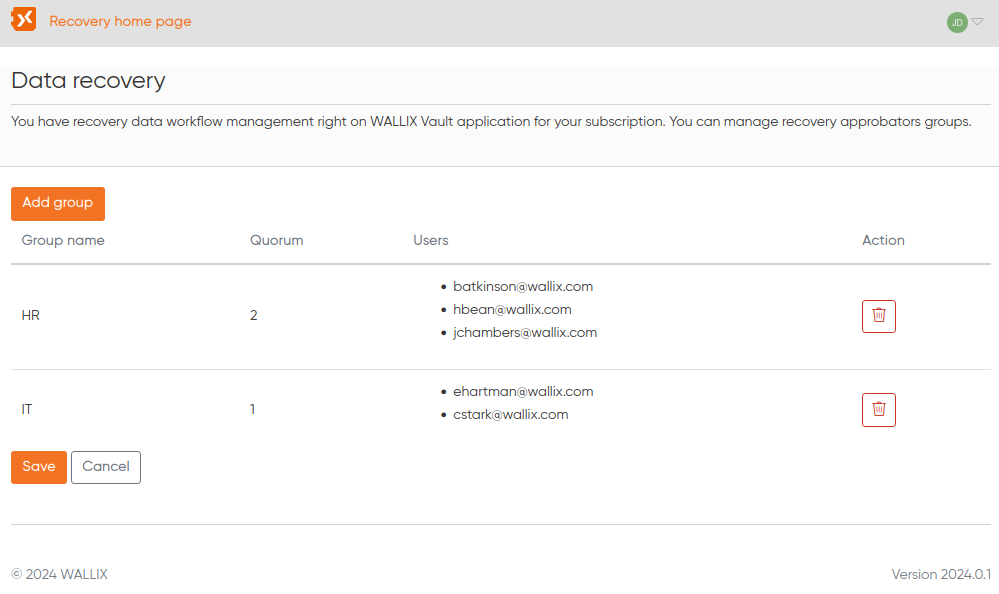
You can edit each group by clicking on the desired property (name, quorum or users list), add a brand-new approbators group. or remove a whole group. Here is what you get when you want to modify the approbators of a specific group:
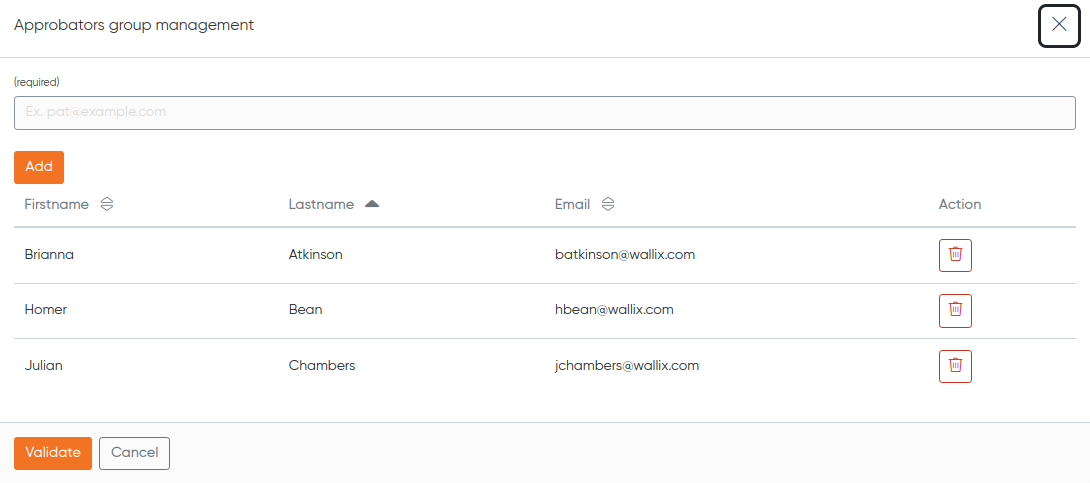
Note: only a valid Vault user is allowed to be added to a group.
When a data recovery request is submitted, an email is sent to each approbators.
Create Data Recovery Request
This section is only authorized to Vault users with specific rights (i.e. the recovery_data attribute and the cipher key shared). For more information about how the authorizations are granted, see the grant data recovery permissions page.
To perform a data recovery request, go to the "Create a data recovery request" section to perform the request:
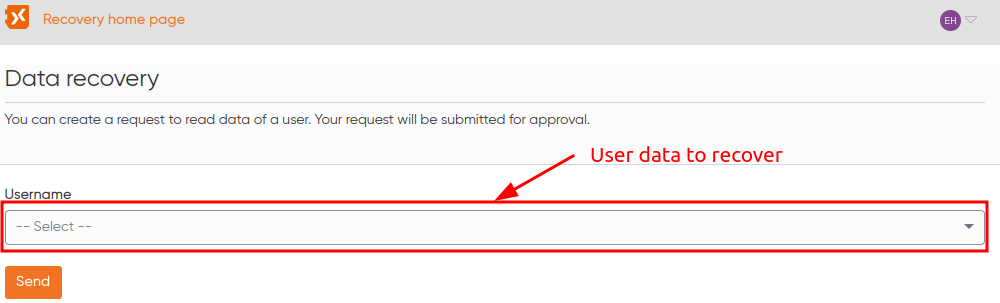
The user can emit a new data recovery request for a specific Vault user included in the droplist component. The user can cancel the request for any reason if needed until the request is approved or refused.
An history of the already emitted requests is available at the bottom of the page.

Here you will find all the request statuses available:
- Waiting for administrator validation: the request has been emitted and no approbator already votes;
- Approved: so, rather self-explanatory;
- Cancelled: the user who creates the request has manually cancelled the request (cf "Cancel" button);
- Request expired: the request reaches the configured timeout. The timeout policy is defined in the vault administration application;
- Data recovery session ended: an approbation has manually revoked the data recovery session (see the manage requests page).
Manage Data Recovery Requests
This section is only authorized to approbators (i.e. the user must be included in at least approbation group). On the "In progress" tab, you can monitor the current open and non-resolved data recovery requests.
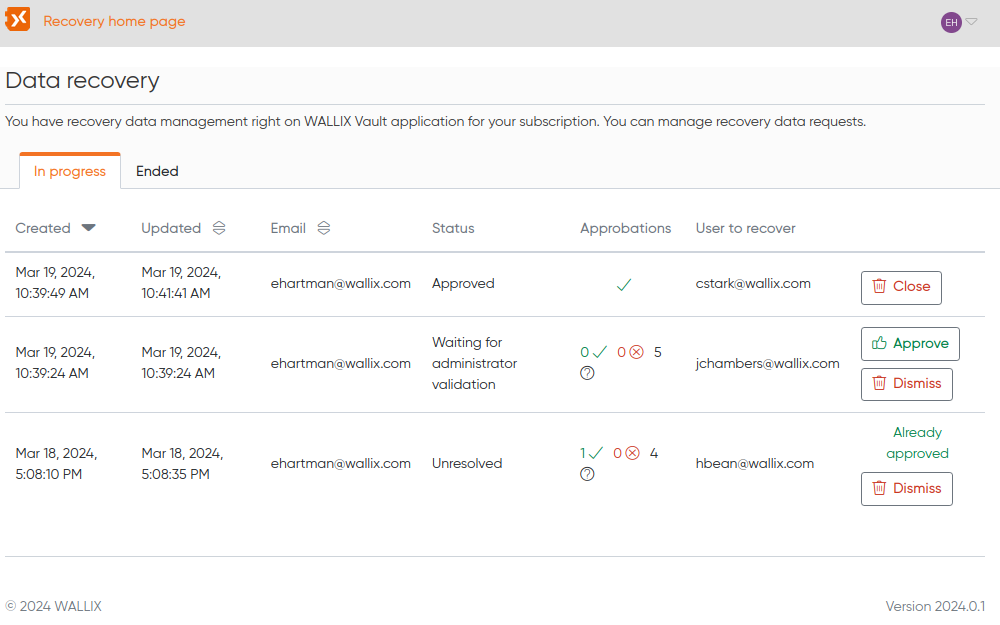
Until the approbator votes, all the vote options are displayed. After voting, either the "Approve" or the "Dismiss" button is hidden, depending how the approbator votes. Non-resolved status means that at least one approbator has submitted his vote but all the emitted votes are not sufficient to reach each of the group quorum.
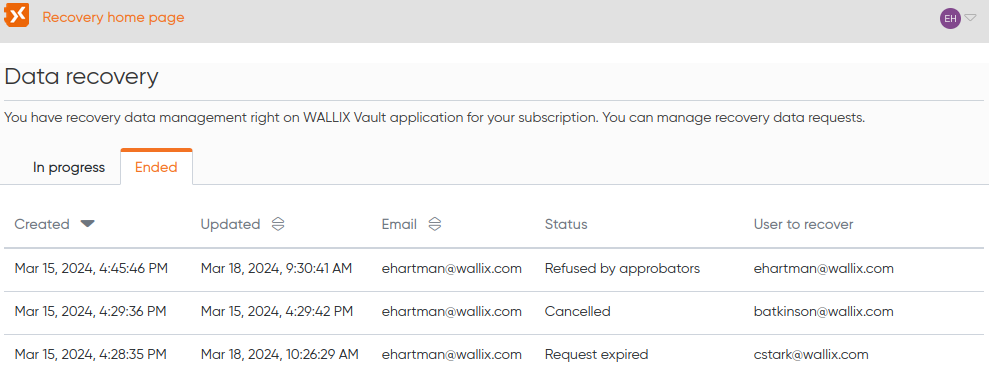
On the "Ended" tab, you have the complete data recovery requests history, regardless of who requested it and regardless of which account was target by the recovery process.
Grant Trustelem Data Recovery Permissions
As an Vault Administrator, follow this procedure to Grant Data Recovery Permissions in the Trustelem application to an User.
Users with this permission can create data recovery requests.
Grant Recovery Permissions
Connect to Trustelem.
Select the User to give Password Recovery permissions to and click the Modify button. The User Update screen is displayed.
In the Attributes section, click the Add an Attribute button. A blank line is added to the Trustelem Attributes table.
Complete the fields as follows:
- NAME : recovery_data
- TYPE : bool
- VALEUR : true
Click the Save button to save the new attribute to the User.
The Trustelem attribute recovery_data displays in the Attribute List.
This User can now create data recovery requests.
To manage approbator groups for data recovery, the user must have an attribute recovery_data_workflow. After that he can manage approbators groups.
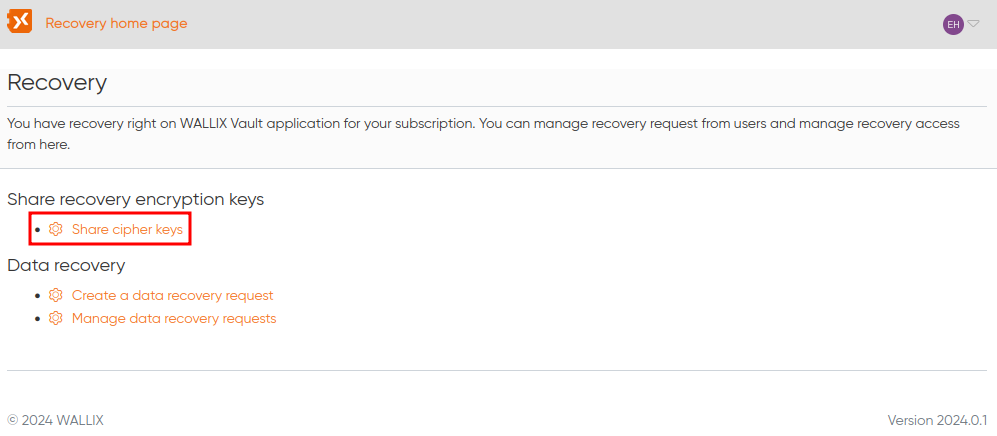
Share cipher key
In order to enable completely the data recovery permissions, you have to share the cipher key.
Important: This step must be done after granting the recovery_data attribute.
Go to the recovery home page (Tools > Recovery in default navigation bar) and click on the "Share cipher keys" link as below:
The cipher key management page is displayed. You can now share the cipher key with any user who has the recovery_data attribute:
Congratulations! The user can now create a data recovery request for any vault user.
Administration application
The vault administration application allow administrators to have a global view of the Vault uses in your enterprise. Some settings are available to fit your requirements.
To add an access to this application, the Trustelem administrator have to add access permission to this application to desired users.
The application has four sections :
- Indicators dashboard
- Users list
- Shared vault list
- Parameters
Indicators dashboard
The dashboard indicators allow you to have an overview of the use of WALLIX Enterprise Vault in your company.
Each user who creates their account has a personal vault.
You also have an overview of the number of created Shared vault.
For each of them, you can see the number of items and the number of attachments.
You can see which client are used by your users.
Users list
Only users who have created their vault account are list in this screen. To create his vault account, a user have to connect to the vault and create his master password.
If a Trustelem administrator delete users or remove authorizations to access the Vault application, corresponding users are highlighted.
Administrators can force users to reset their master password or change their encryption key at the next connection. If the administrator delete the vault account by clicking the trash, user data cannot be recovered.
In this list you can check the status of the users. In the lifecycle of Trustelem users, users with a Vault account can be unauthorized to access to the vault application or can be deactivated.
Shared vault list
The Shared vault list give you an overview of the Shared vault usage. You have a list of shared and for each the list of administrator and regular users.
When in the lifecycle of your users you have shared vault without active administrators or without any active user, a warning is displayed.
Settings
The settings page allows you to personalize of your enterprise vault according to your choices and security policies.
You have options to configure :
- Security and confidentiality
- Logs : choose logs to activate for your enterprise vault.
- Recovery : you can activate and configure recovery.
Manage Shared Vaults
Create shared vaults to to exchange your items securely.
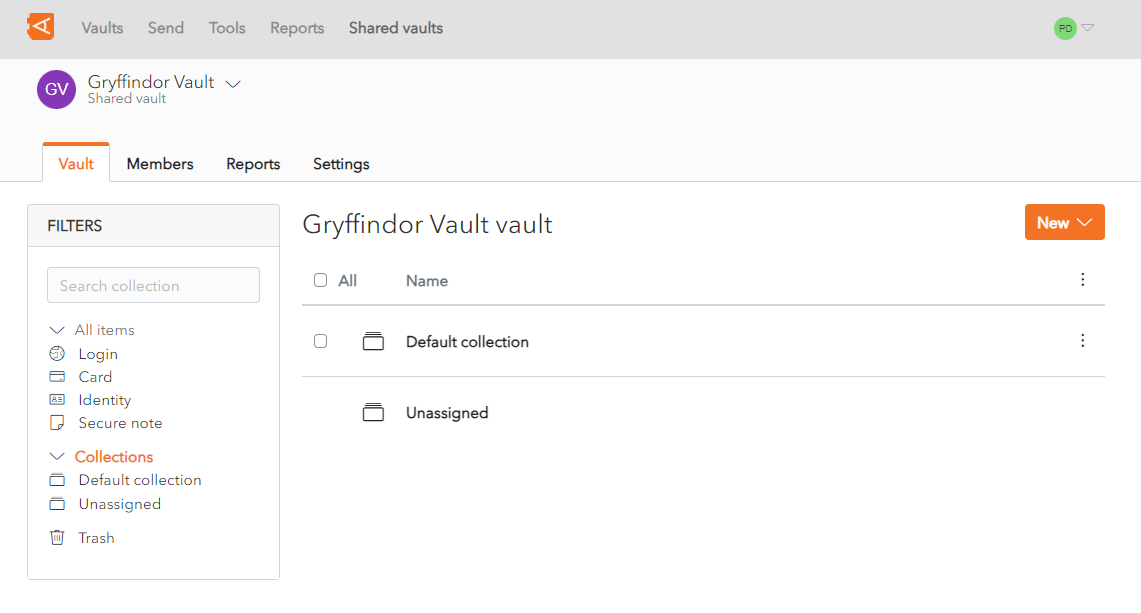
Shared Vaults Overview
It can be renamed after creation.
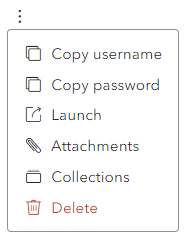
A number of options are available from the Context Menu of a Shared Vault Item, depending on the Item Type, such as:
- Copy username: Copies the Username to the clipboard (for Login Items)
- Copy password: Copies the Password to the clipboard (for Login Items)
- Launch : Launches the URI associated with the Item (for Login Items)
- Attachments: Displays the Attachment Screen
- Collections: Displays the Collections Screen
- Delete: Deletes the Item (after Confirmation)
It can contain one or more Collections. It can contain one or more Items that can be shared with Members via Collections.
Members can be added with different Roles within the Shared Vault and given access to Collections.
Temporary access to a Shared Vault can be revoked or restored. Members can also be removed permanently or they can leave the Shared Vault.
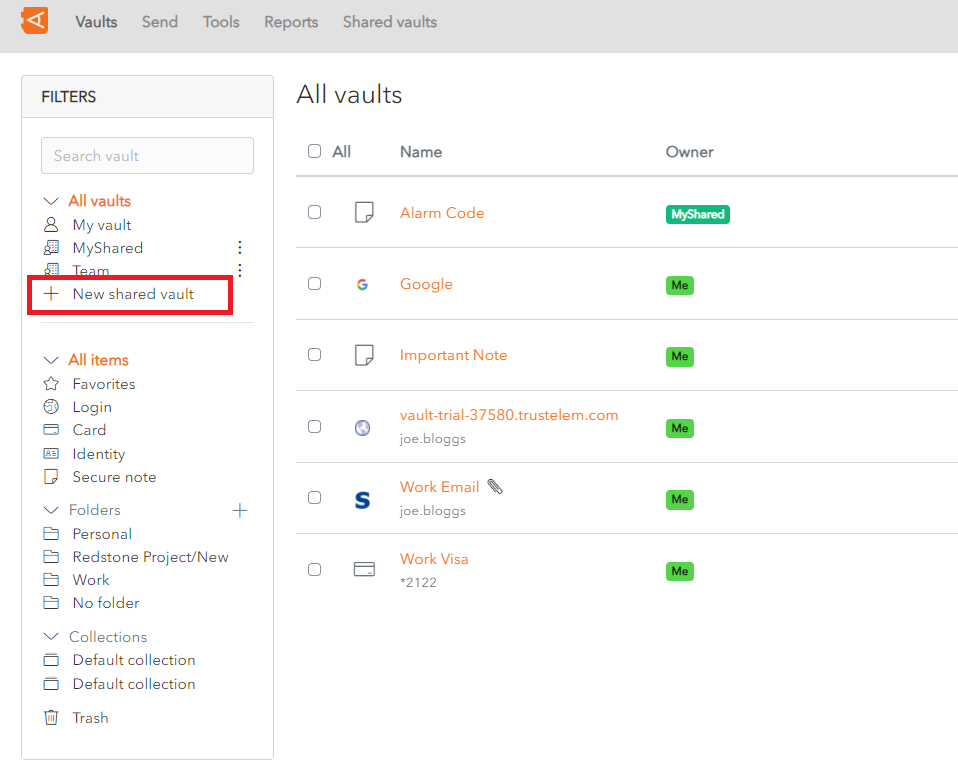
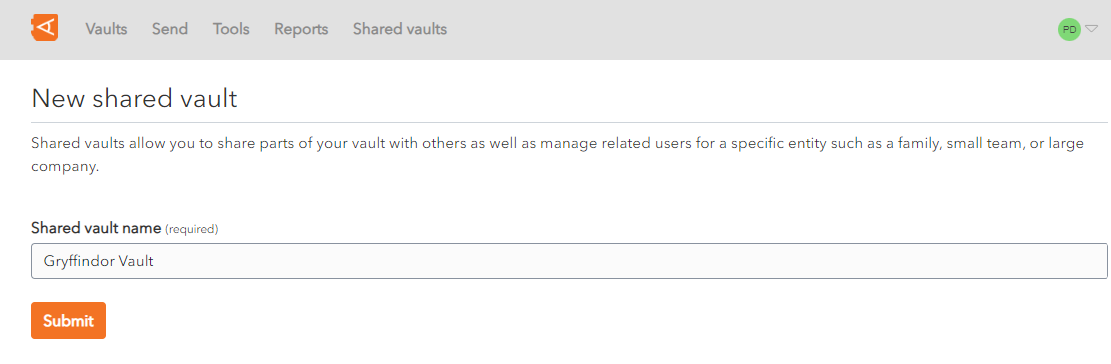
Create a Shared Vault
From the Home screen, click on the + New Shared Vault link.
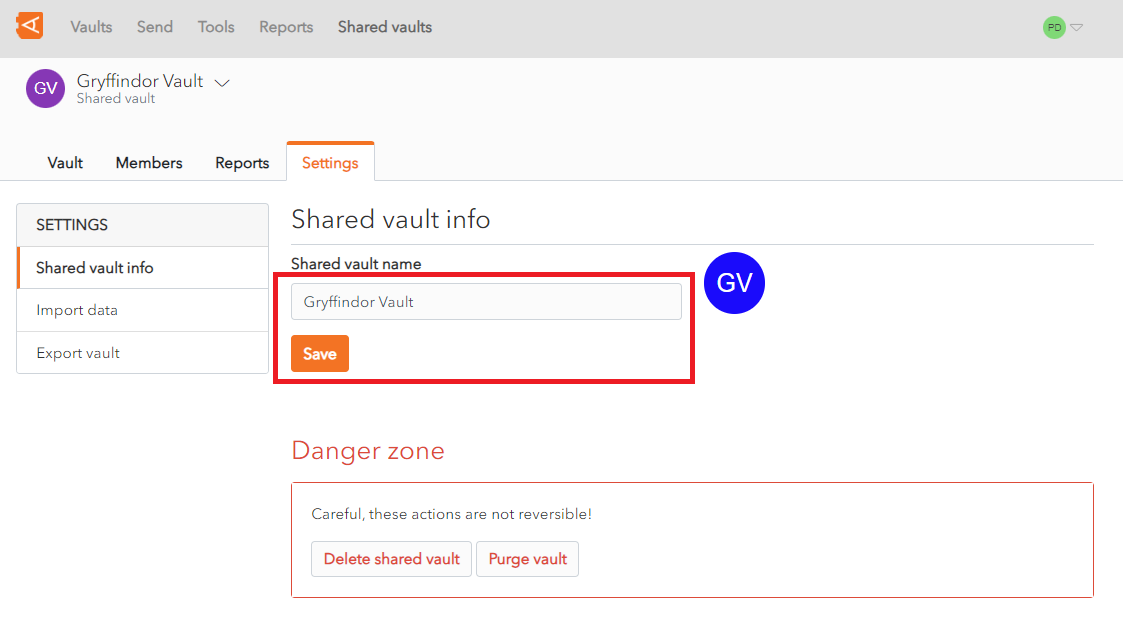
Rename Shared Vault
Click Save to save changes. The Shared Vault is renamed.
Shared Vault Items Context Menu
From the Item List click the ![]() More Button of a Shared Vault Item.
More Button of a Shared Vault Item.
A number of options are available (depending on the Item Type):
- Copy username: Copies the Username to the clipboard (for Login Items)
- Copy password: Copies the Password to the clipboard (for Login Items)
- Launch : Launches the URI associated with the Item (for Login Items)
- Attachments: Displays the Attachment Screen
- Collections: Displays the Collections Screen
- Delete: Deletes the Item (after Confirmation)
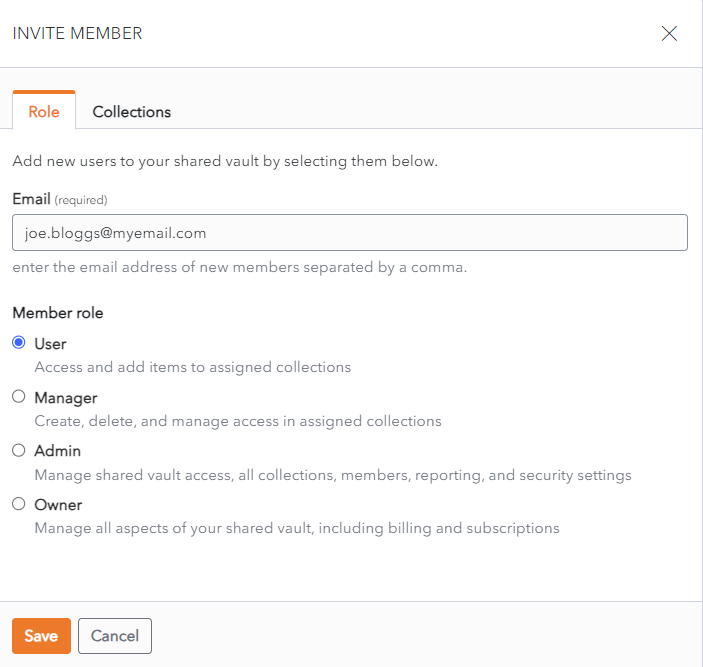
Invite Member to Shared Vault
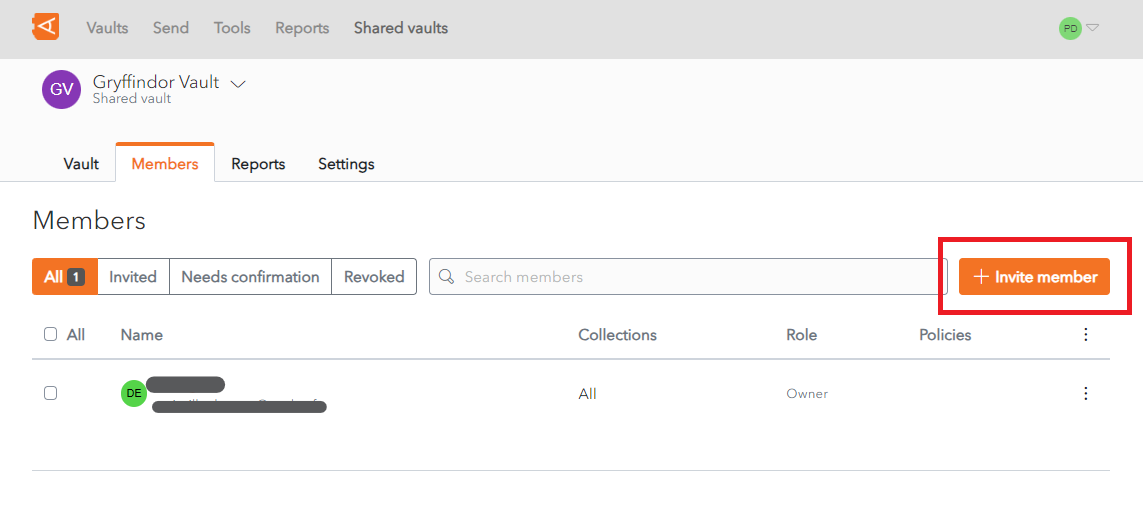
The Invite Members screen is displayed. The Role Tab is selected by default.
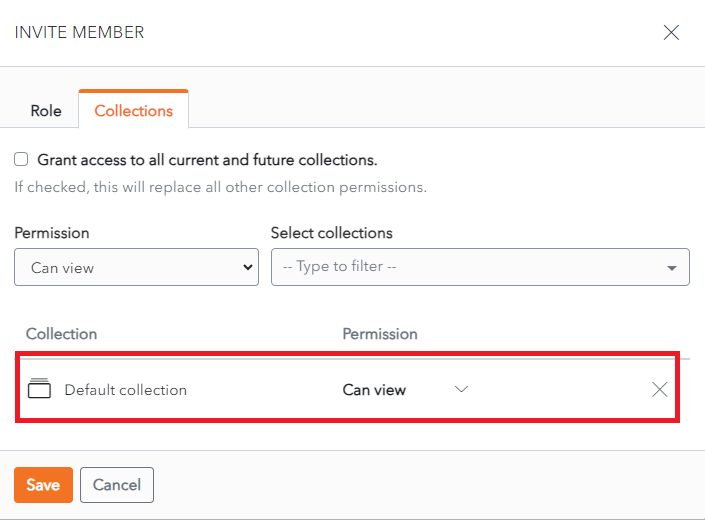
Grant Permissions to a Collection
Before granting a user access to a Shared Vault, you must grant permissions to at least one collection in the Shared Vault.
Click on the Collections tab.
Choose the Permission from the Permission dropdown.
Choose the Collection from the Select Collections dropdown.
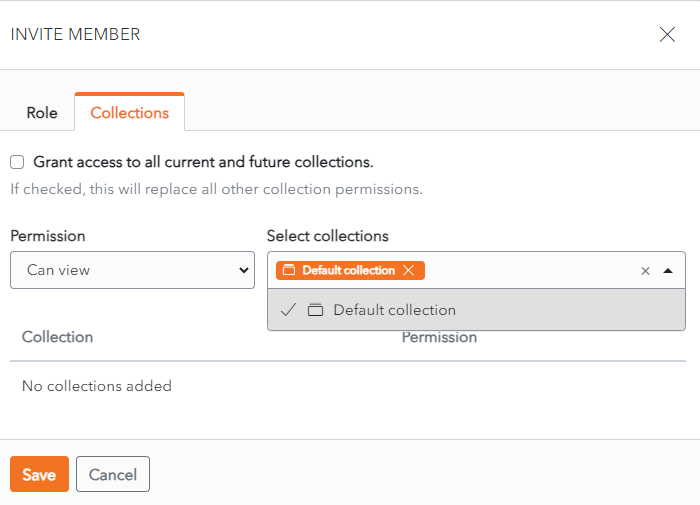
Click Enter. The Pemissions assigned to the Collection is displayed.
Select Member to Invite
Once at least one Collection in the Shared Vault has Permissions assigned, Members can be invited to the Shared Vault.
The Role Tab is selected by default.
Select a Member to invite from the Select New Members dropdown.
Select the Member Role. User is checked by default.
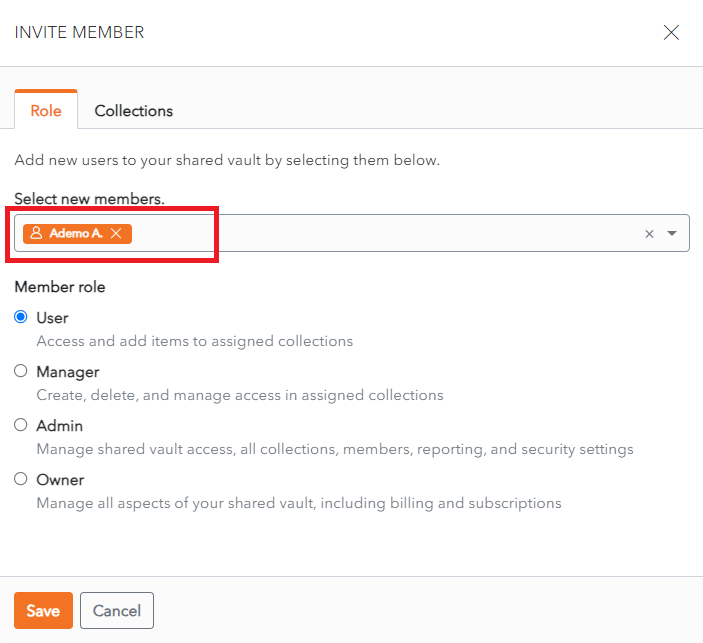
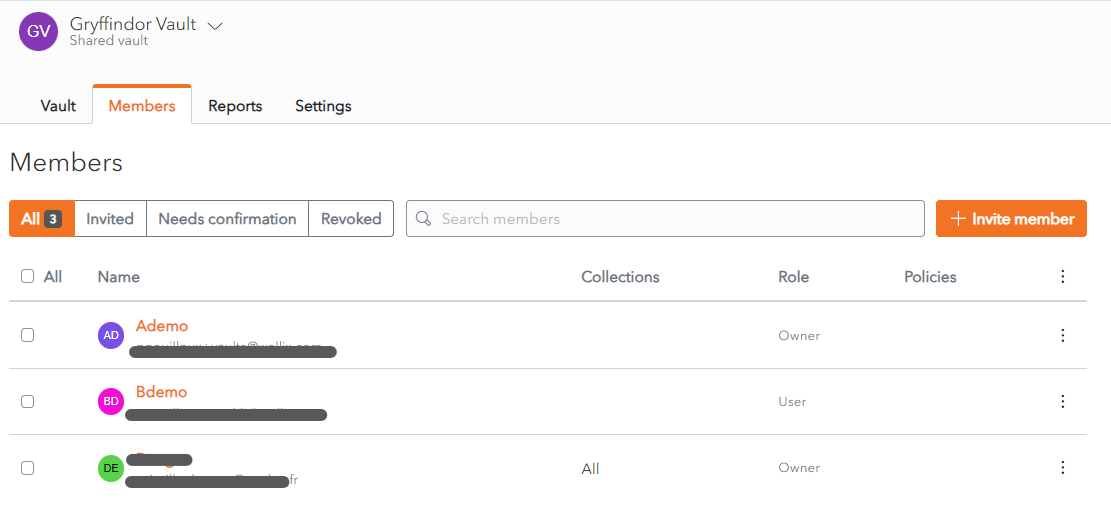
Click Save to invite the member to the Shared Vault. The Member is displayed in the Member List for the Shared Vault.
Alternatively, click Cancel to cancel the operation.
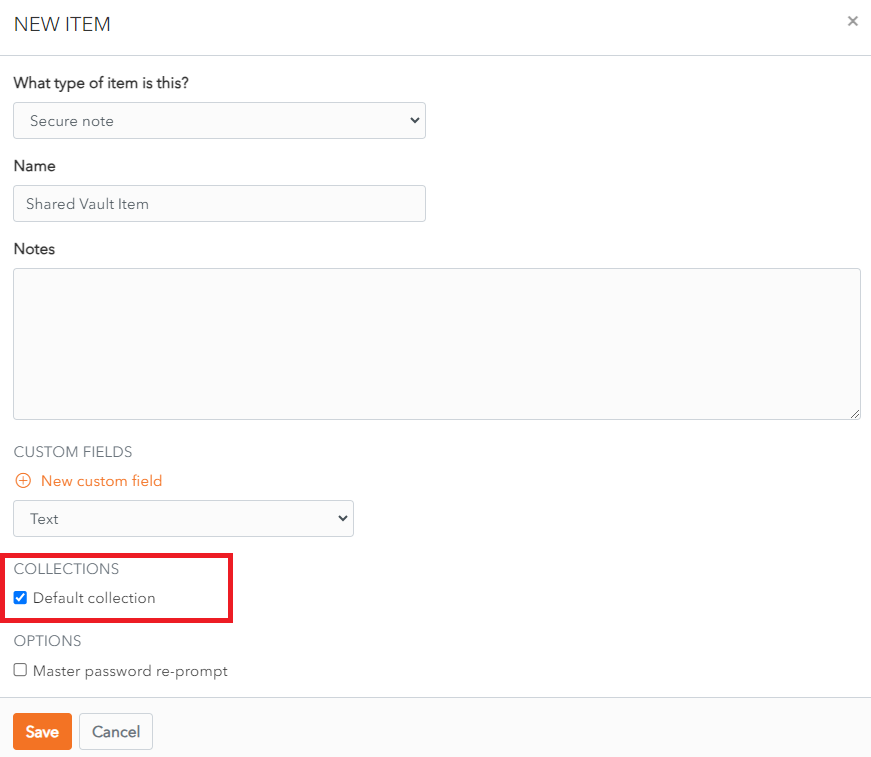
Add, Edit or Delete Items
Create a Shared Vault Item
Follow the normal procedure for creating an Item, with one additional step.
Items created in a Shared Vault have one extra field - the Collections Field, which is mandatory. A Shared Vault Item must be added to at least one Collection.
In the Collections Section of the New Item Screen, check the checkbox beside a Collection that you wish to add the Item to.
Then Click Save to create the Item.
Manage Shared Vault Items
The procedure to Edit an Item and Delete an Item are the same as for personal Vaults as are the Item Types.
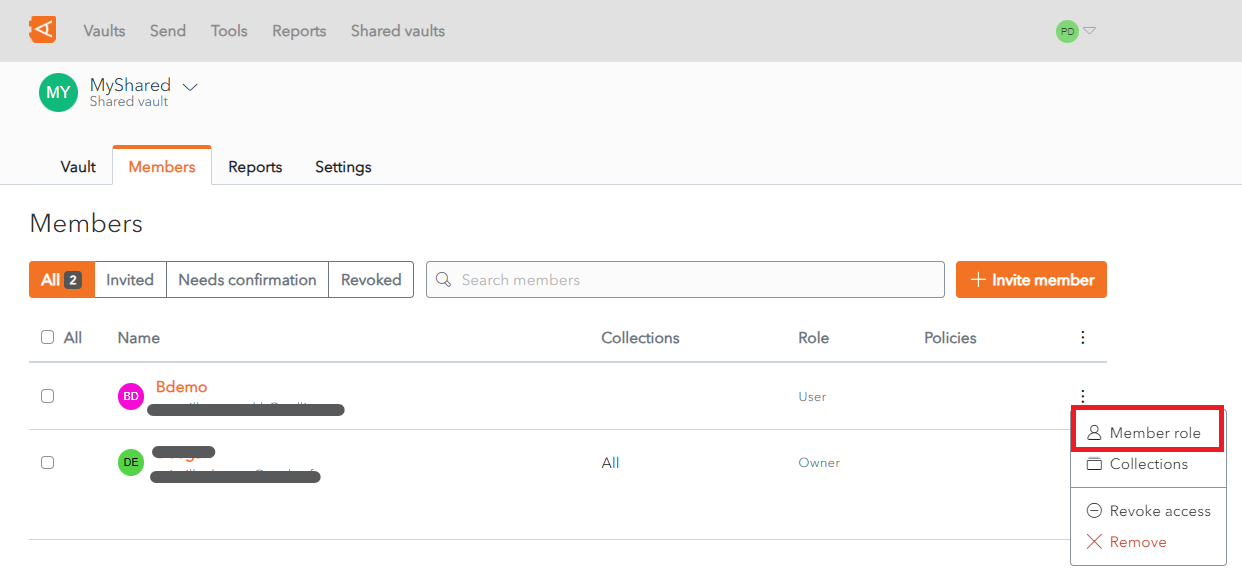
Edit Member Roles
From the Member List in the Shared Vault, click the ![]() More button beside the Member in question.
More button beside the Member in question.
Click the Member Role link.
The Edit Member screen displays with the Role Tab open.
Change the member role using the Member Role radio buttons.
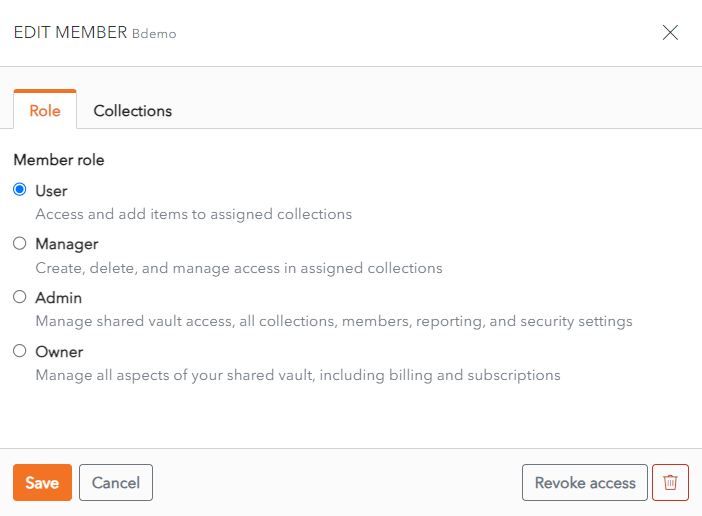
Click Save to save changes.
Alternatively, click Cancel to cancel the operation.
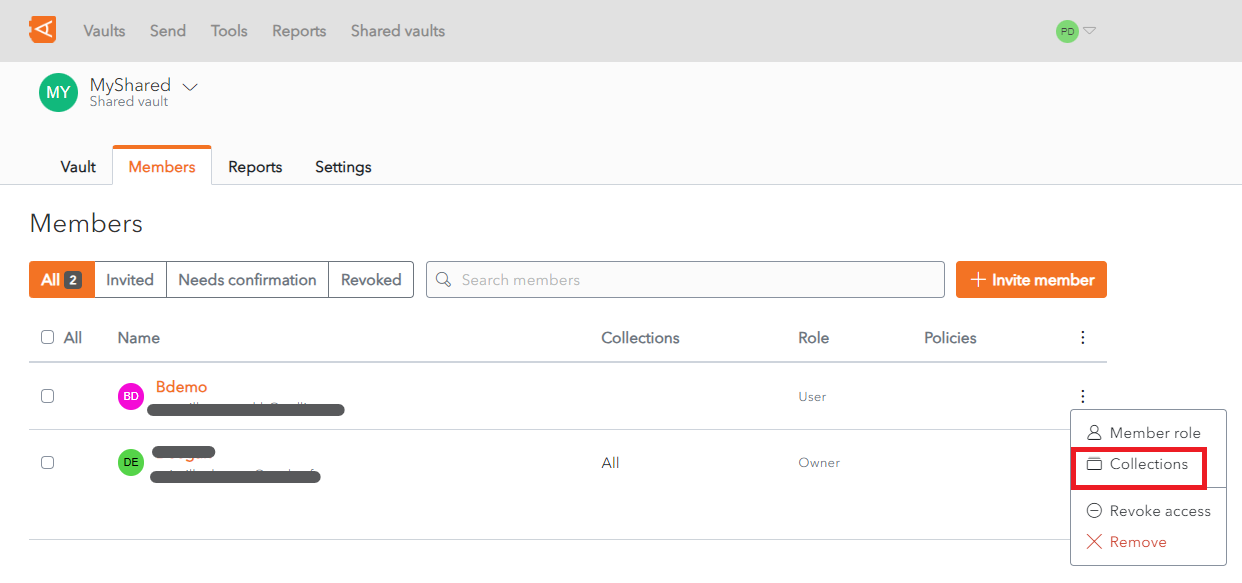
Manage Member Access to Collections
From the Member List in the Shared Vault, click the ![]() More button beside the Member in question.
More button beside the Member in question.
Click the Collections link.
The Edit Member screen displays with the Collections Tab open.
To remove access to a Collection, click the X button beside the Collection in the Collection List.
To add a new Permission to a Collection, select the Permission and Collection and click the Enter button. This is the same procedure as from the Add Members screen.

Click Save to save changes. The Member is now added to this collection.
Alternatively, click Cancel to cancel the operation.
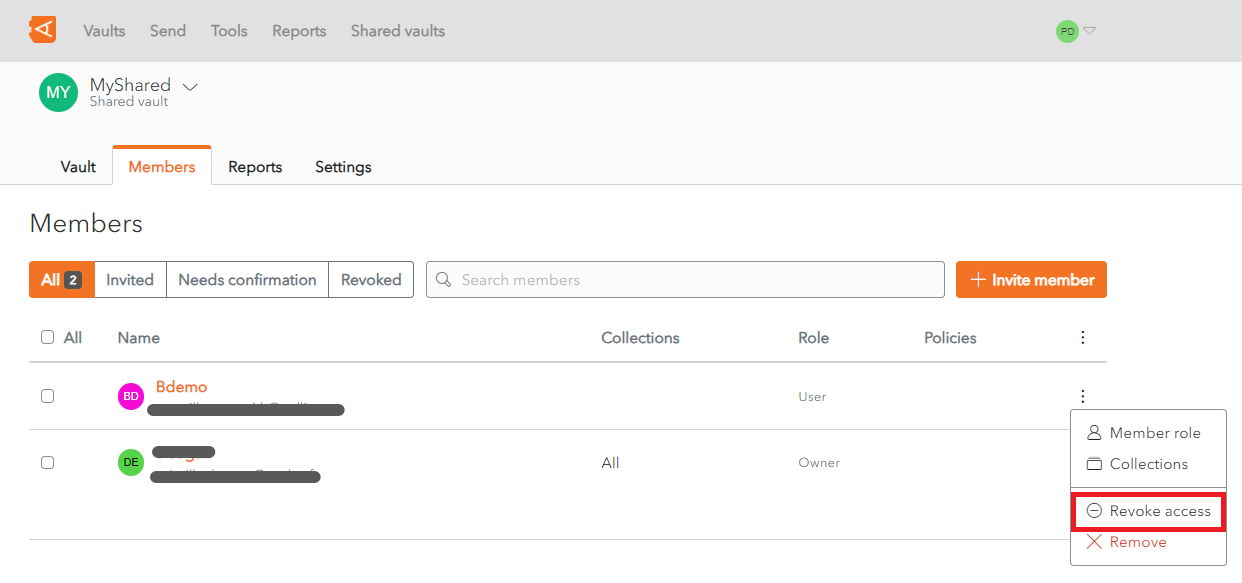
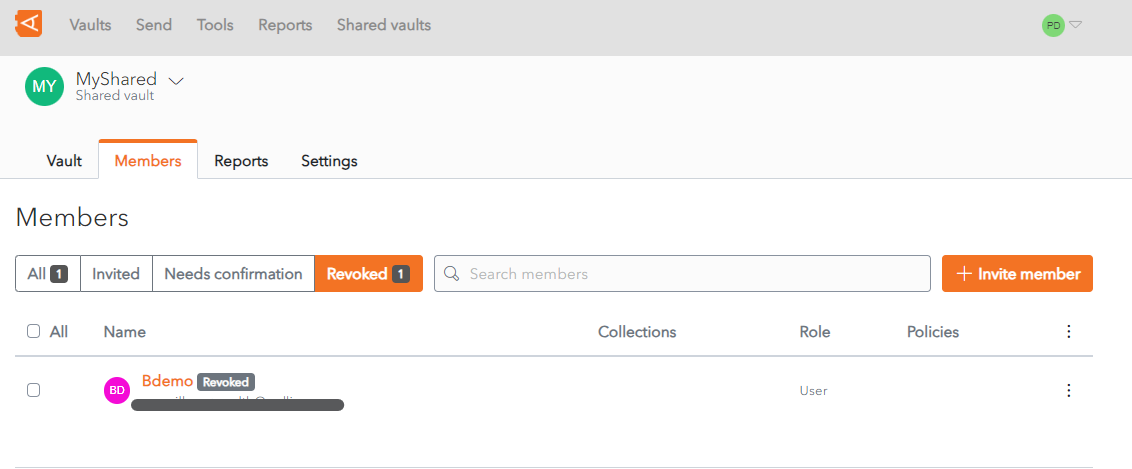
Revoke Access to Shared Vault
From the Member List in the Shared Vault, click the ![]() More button beside the Member in question.
More button beside the Member in question.
Click the Revoke Access link.
A Revoke Access Confirmation screen displays.
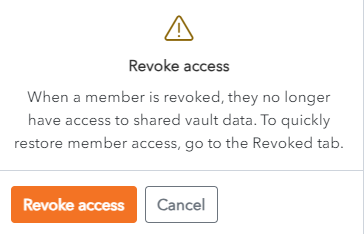
Click Revoke Access to Revoke Access. The Member will be displayed in the Revoked Tab of the Member List.
Alternatively, click Cancel to cancel the operation.
Restore Access to Shared Vault
From the Member List in the Shared Vault, click the ![]() More button beside the Member in question.
More button beside the Member in question.
Click the Restore Access link.
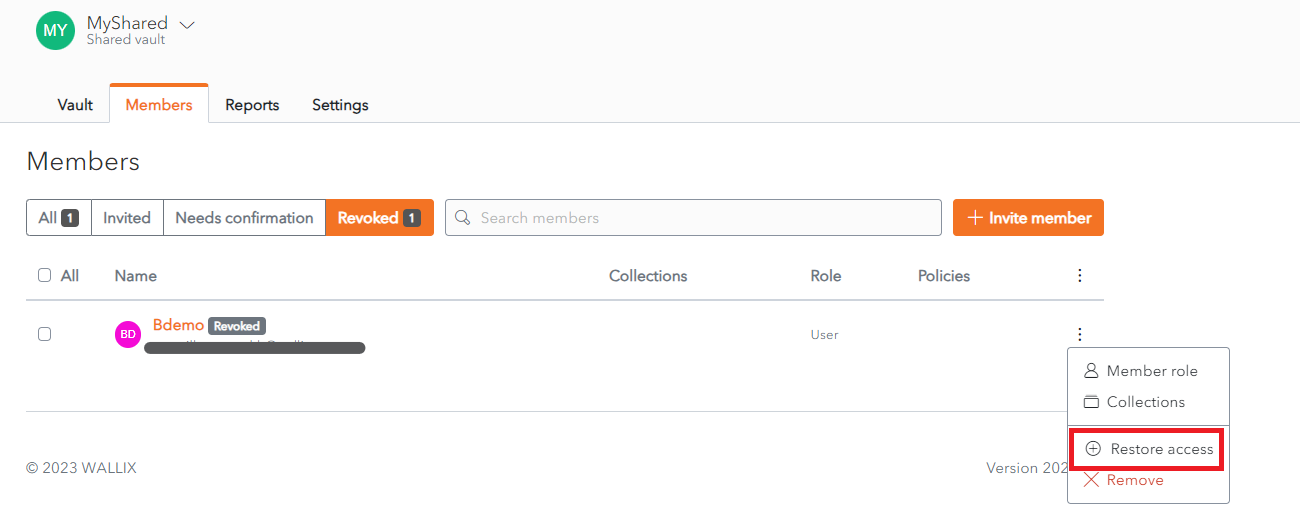
The Member's access to the Shared Vault is restored.
The Member will be displayed in the All Tab of the Member List.
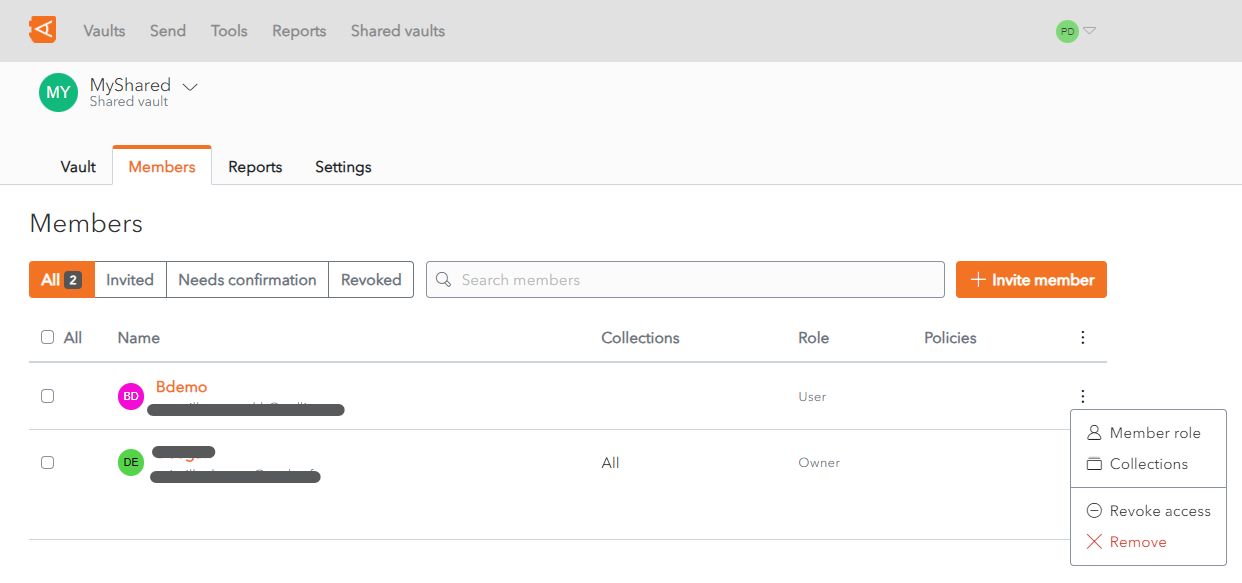
Remove Member
From the Member List in the Shared Vault, click the ![]() More button beside the Member in question.
More button beside the Member in question.
Click the Remove link.
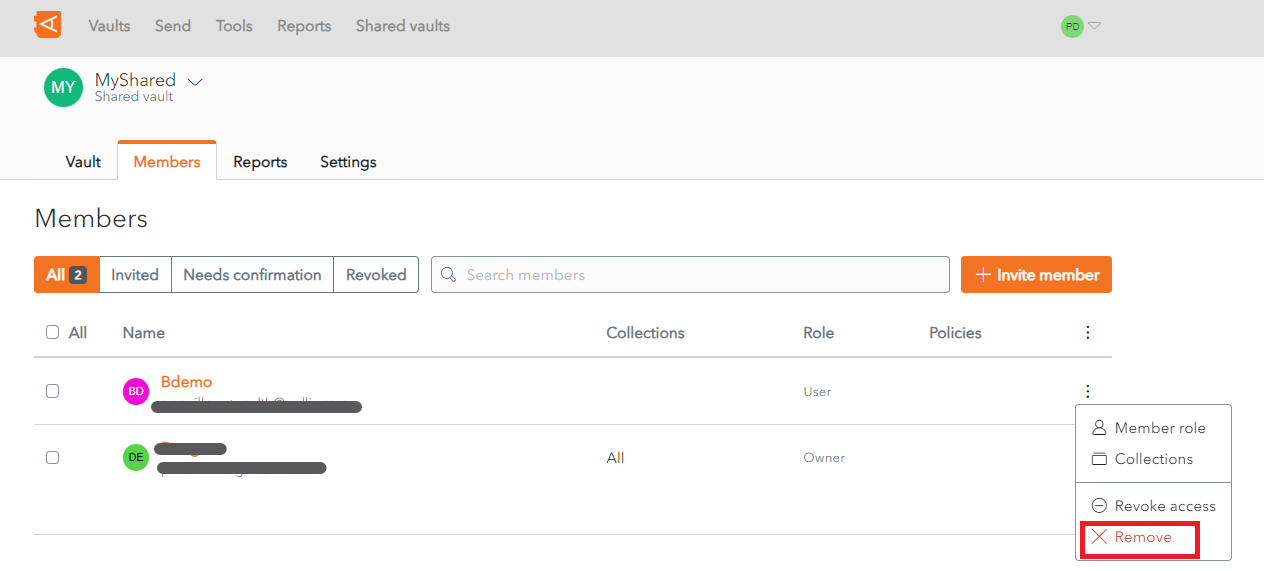
A Remove Member Access screen is displayed.
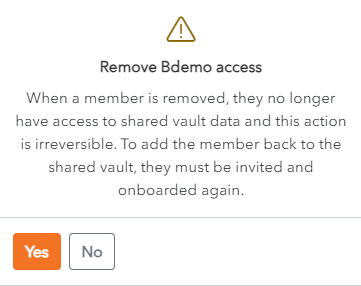
Click Yes to Remove the Member from the Shared Vault. The member is removed from the Shared Vault.
Alternatively, click No to cancel the operation.
Note: similarly to the Leave Shared Vault function, this is only possible if the Member is not the last remaining member with Owner access.
Leave a Shared Vault
To leave a Shared Vault, click on the ![]() More button beside the Shared Vault.
More button beside the Shared Vault.
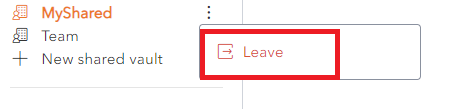
Click the Leave link. A Confirmation pop up screen is displayed.
Click Yes to leave the Shared Vault.
Click No to cancel the operation.
Note: If you are the last remaining Vault Owner, you are not permitted to leave the Shared Vault. In this case the following message is displayed.

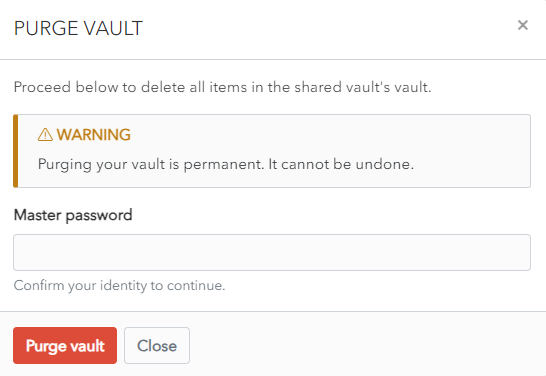
Purge Shared Vault
Click the Purge Vault button to purge all data from the Vault.
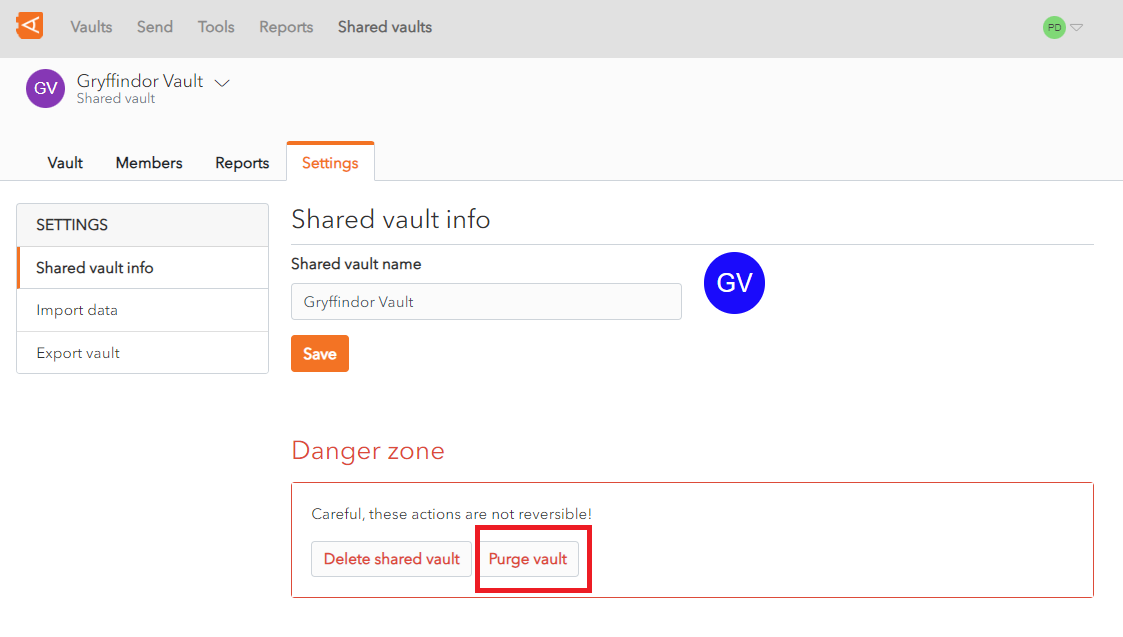
A Confirmation Screen appears.
Enter your Master Password and click the Purge Vault button to purge the Vault.
Alternatively, click Close to cancel the operation.
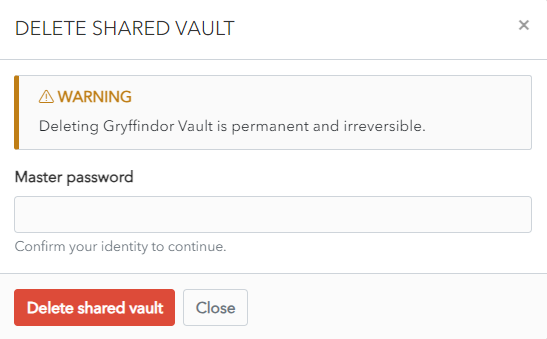
Delete Shared Vault
Click the Delete Shared Vault button to delete the Shared Vault.
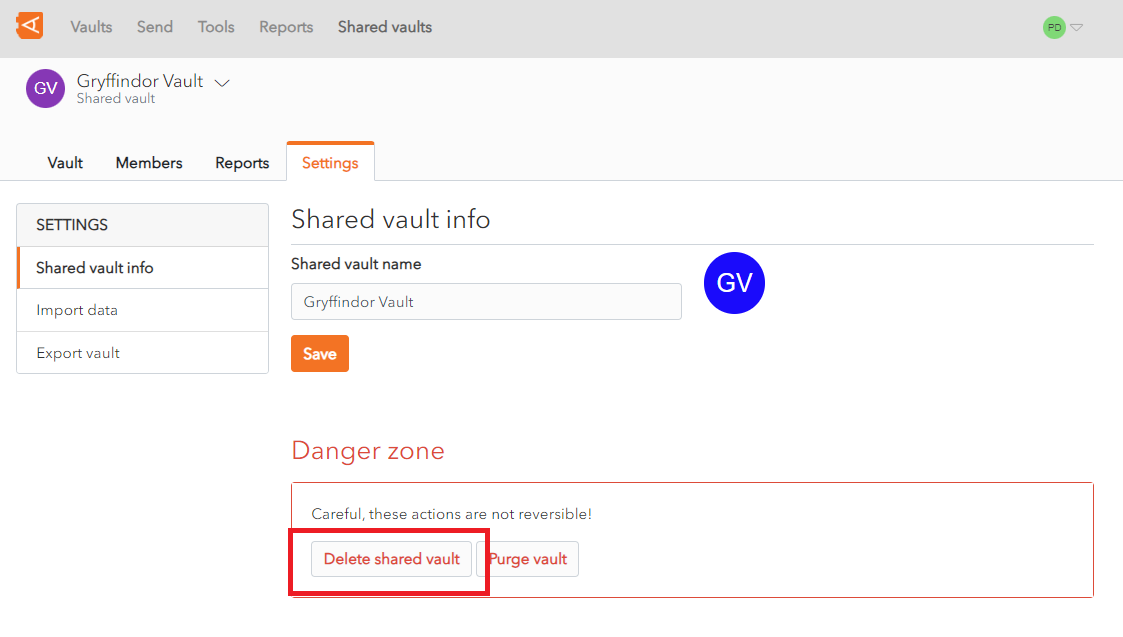
A Confirmation Screen appears.
Enter your Master password and click the Delete shared vault button to delete the Vault and all of it's data.
Alternatively, click Close to cancel the operation.
Manage Account Recovery
This is only available for users who have been granted the recovery option by a Trustelem Administrator.
Creation of Recovery Keys
The first user with Recovery Permissions who unlocks his vault creates the recovery keys. The Unlock screen displays a message indicating that the recovery keys have been created.
Recovery keys are created only once. The user who create the keys can share them with the procedure Activate Account Recovery Rights for a User.
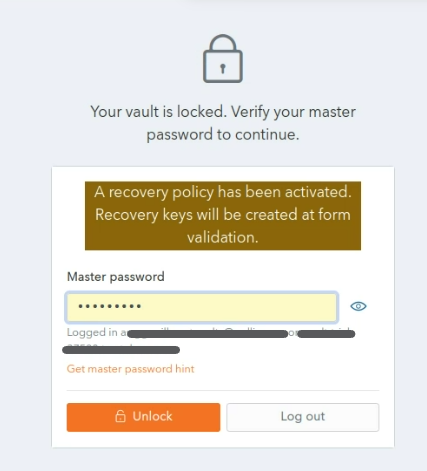
Where a new account is created with this option, the message will also be displayed on the Account Creation Screen.
Activate Account Recovery Rights for a User
This procedure details the steps to be followed by a User with Recovery Permissions to Activate Account Recovery Rights for another User.
This is the the second step in the process. The first step is carried out by the Vault Administrator, who adds the recovery_account attribute to the user account.
Click Tools and then Recovery. The Master Password Confirmation prompt is displayed.
Enter your Master Password and click Ok. The Recovery Screen is displayed.
Alternatively, click Cancel to cancel the operation.
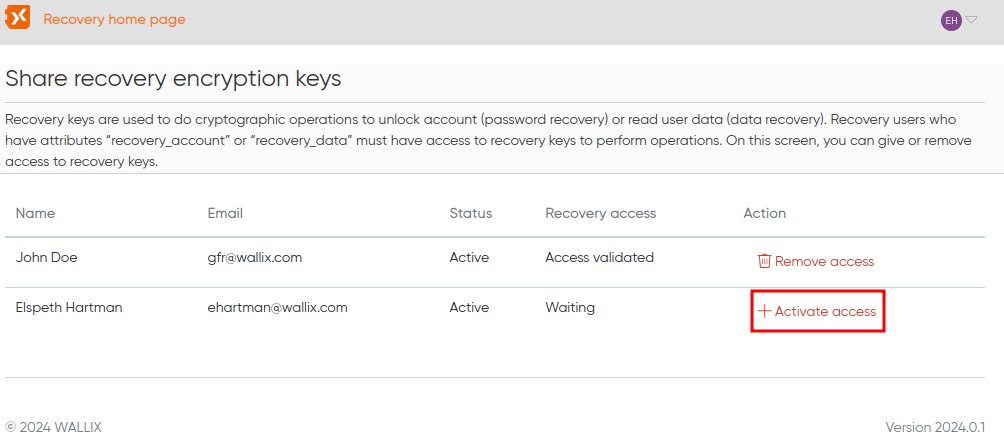
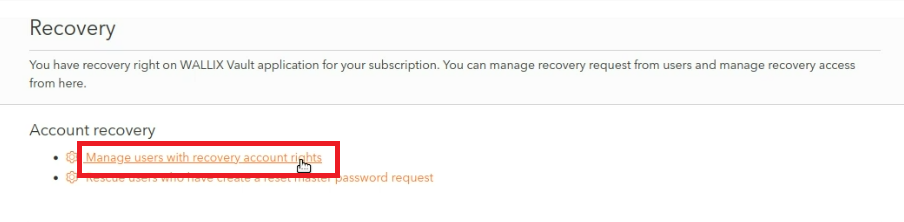 Click the Manage users with recovery account rights link.
The Account Recovery Screen is displayed.
A list of users who have been given Recovery Account Rights by the Vault Administrator is displayed.
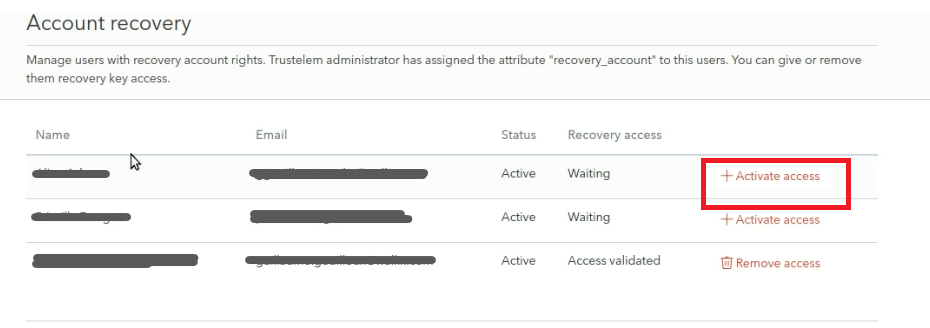
Users waiting for their access to be validated have a Status of Waiting.
Click the Activate access link beside a User to activate their Account Recovery Rights within the Vault.
The user's Status is changed to Access Validated. They have a Remove Access link beside their name.
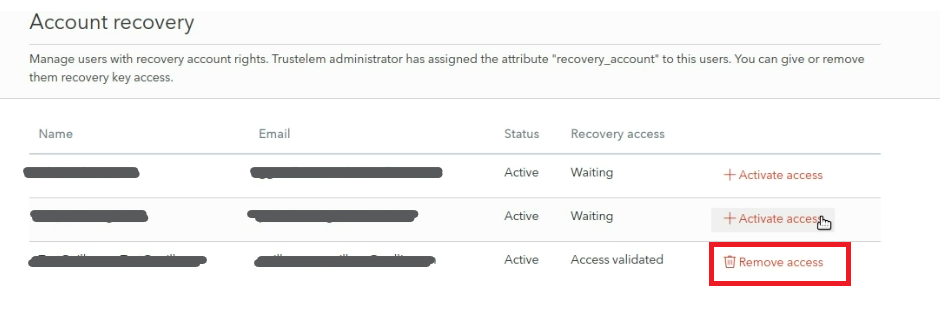
Deactivate Account Recovery Rights for a User
To deactivate Account Recovery Access for a User, click the Remove Access link beside their name.
Manage collections
Create collections to organize your shared items.
Collections Overview
A Collection is a way of managing access to items in a Shared Vault. Collections are only available in Shared Vaults.
Create a Collection within your Shared Vault to share items with members of the vault. You can Edit Collection Information after creation.
Add Member Access to the Collection and assign them permissions to limit what they can and cannot do. Edit Member Access or Remove Member Access from a collection.
Add Items to a Collection that you wish to share with other members of the collection.
Remove Items from a Collection if you no longer wish to share them with other members of the collection.
Use Nested Collections to organize your Collections.
Delete a Collection if it is no longer needed. Items within the Collection will not be deleted.
If an item is no longer assigned to any Collections, it is added to the Unassigned Collection.
Create Collection
Click on the Collection link.
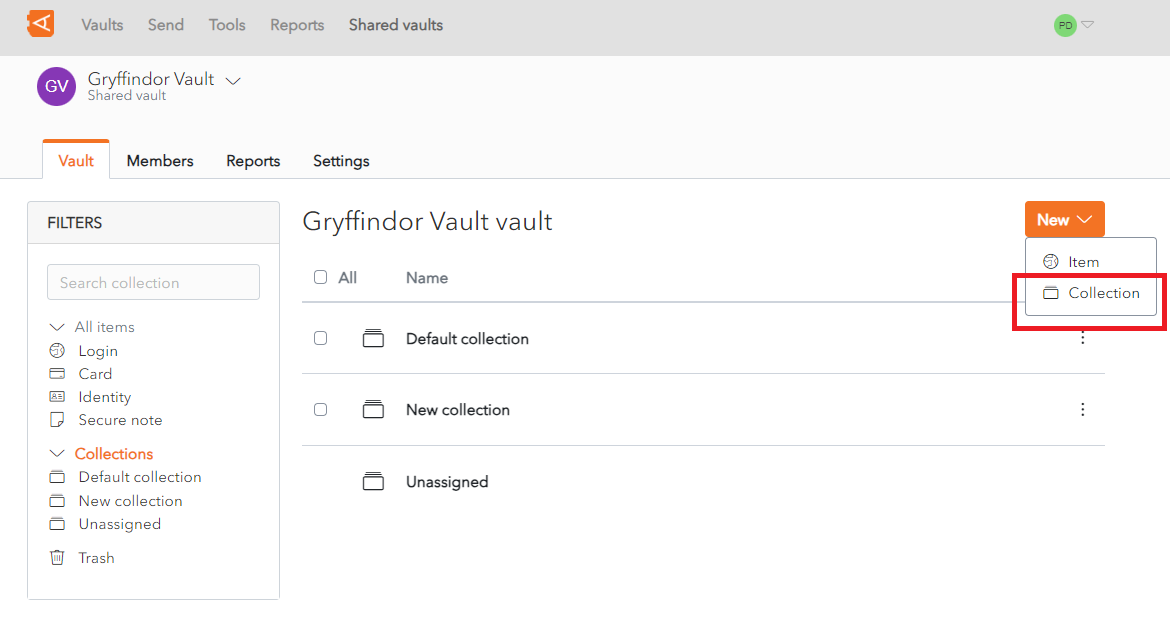
A New Collection Screen appears.
Enter a Collection Name in the Name Field.
If you wish to nest this Collection under an existing Collection, choose the Collection from the Nest collection under dropdown.
Click Save to create the Collection.
Alternatively, click Cancel to cancel the operation.
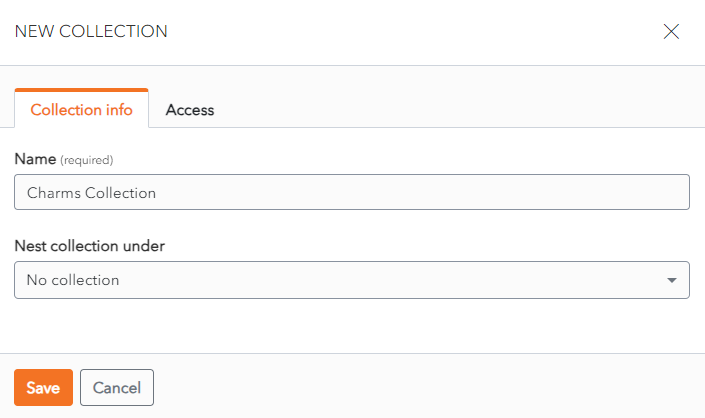
Edit Collection Information
Click the ![]() More button beside a Collection. A context menu is displayed.
More button beside a Collection. A context menu is displayed.
Click the Edit info link.
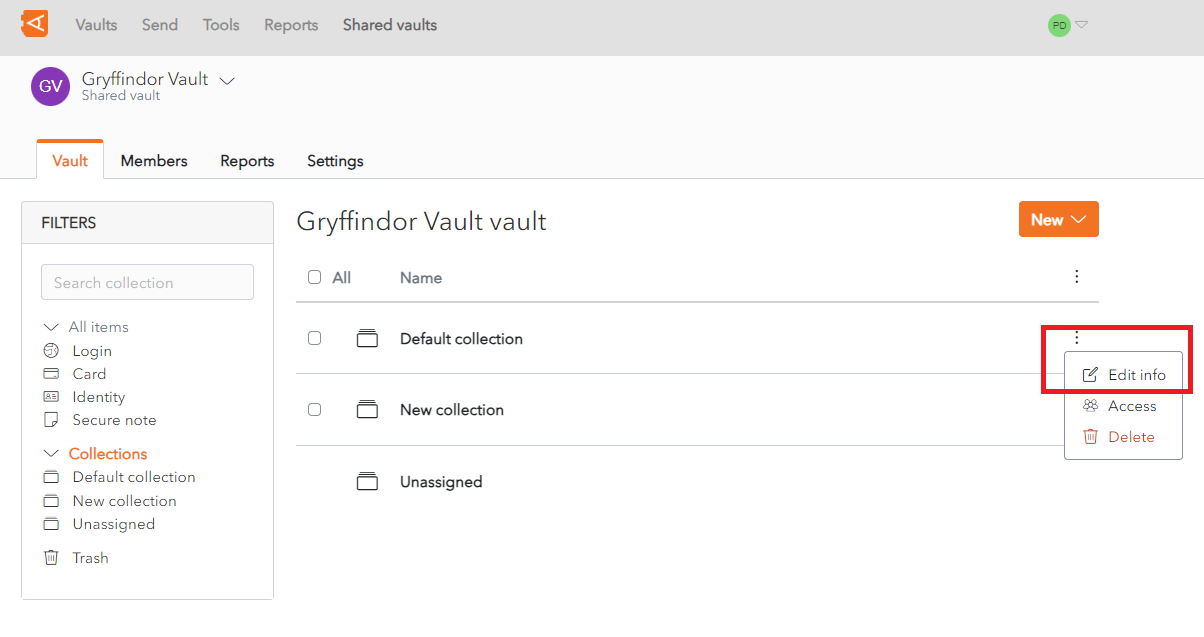
Alternatively, the Edit Collection Screen can also be accessed from the Collection Screen.
Click on a Collection in Collection List.
Click on the ![]() More button beside the Collection Name. A context menu displays.
More button beside the Collection Name. A context menu displays.
Click Edit info.
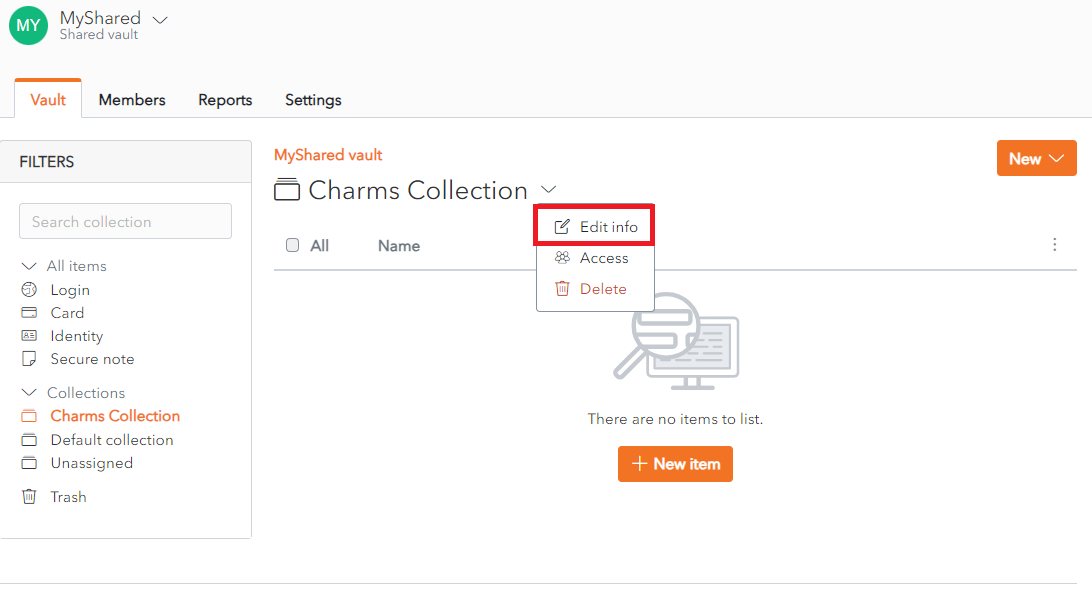
The Edit Collection Screen displays.
From the Collection Info Tab, change the Name and the Nest collection under fields.
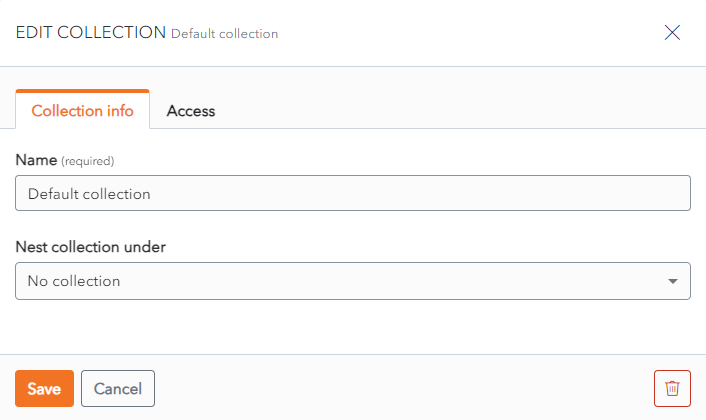
Click Save to save changes.
Alternatively, click Cancel to cancel the operation.
Manage Member Access to Collection
Click the ![]() More button beside a Collection. A context menu is displayed.
More button beside a Collection. A context menu is displayed.
Click the Access link.
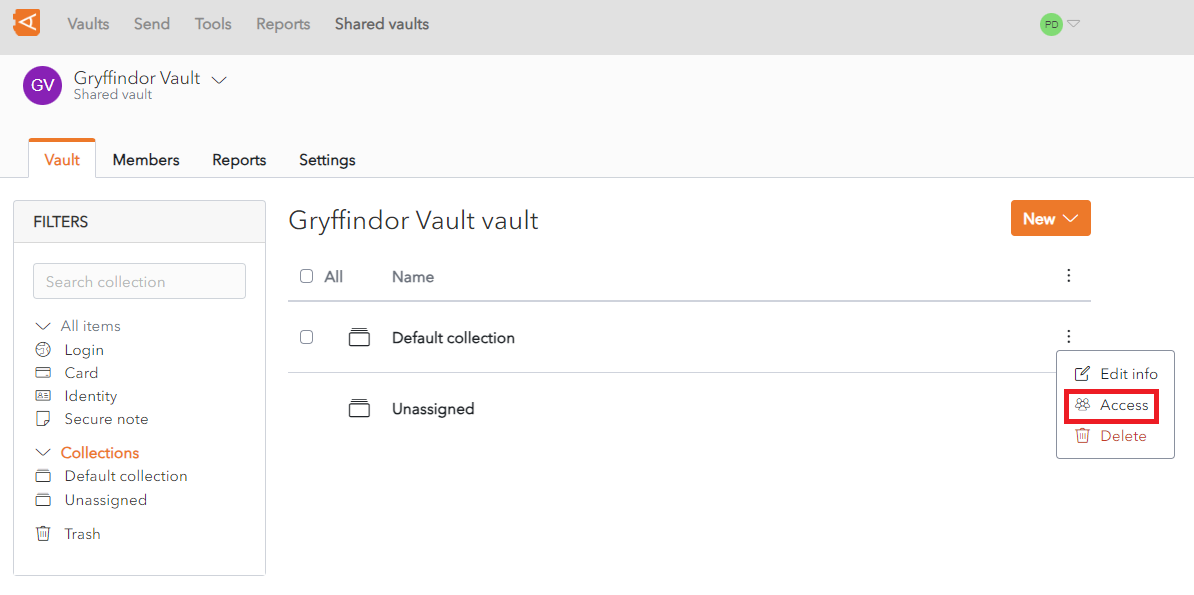
Alternatively, the Edit Collection Screen can also be accessed from the Collection Screen by clicking the ![]() More button beside the Collection Name, then clicking the Access link in the context menu.
More button beside the Collection Name, then clicking the Access link in the context menu.
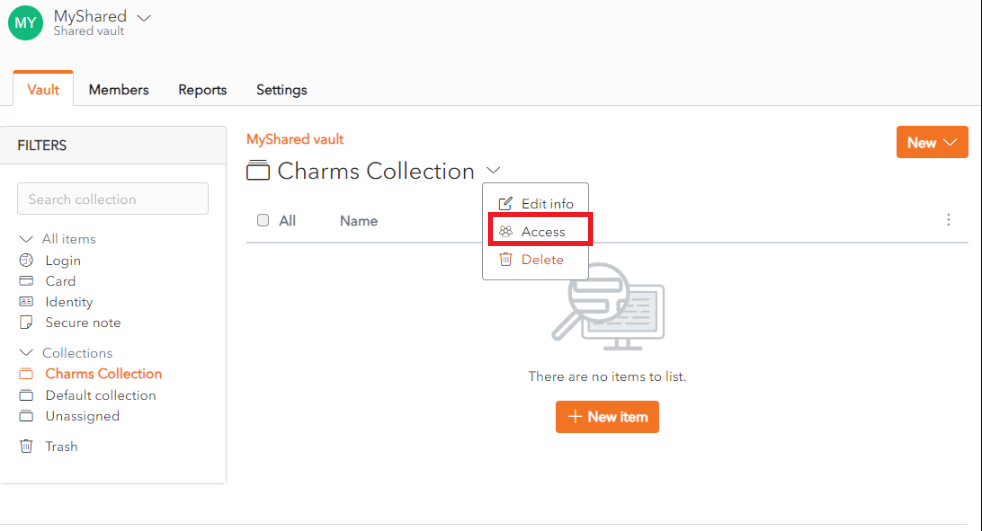
The Edit Collection Screen displays with the Access tab open.
Grant Member Access
To Grant a Shared Vault Member Access to a Collection, select the Permission and Select members.
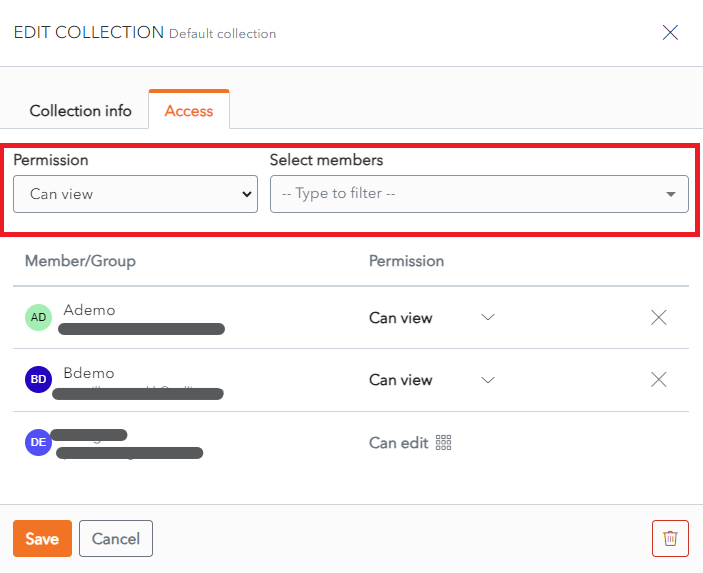
Click the Enter button. The Member is added with the permission selected.
Click Save to save changes.
Alternatively, click Cancel to cancel the operation.
Remove Member Access
To remove access to a Collection, click the X button beside the Member in the Member List.
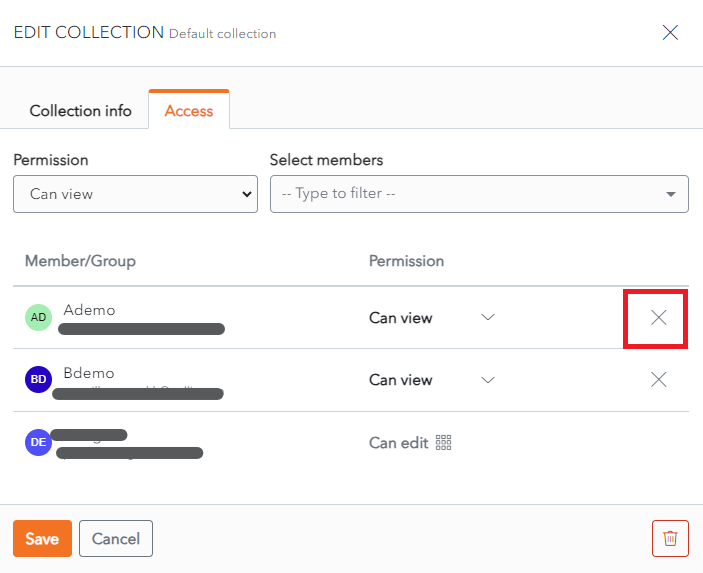
The Member is removed from the Collection.
Click Save to save changes.
Alternatively, click Cancel to cancel the operation.
Edit Member Access
To Edit a Member Access to a Collection, change the Permission in the Permission dropdown.
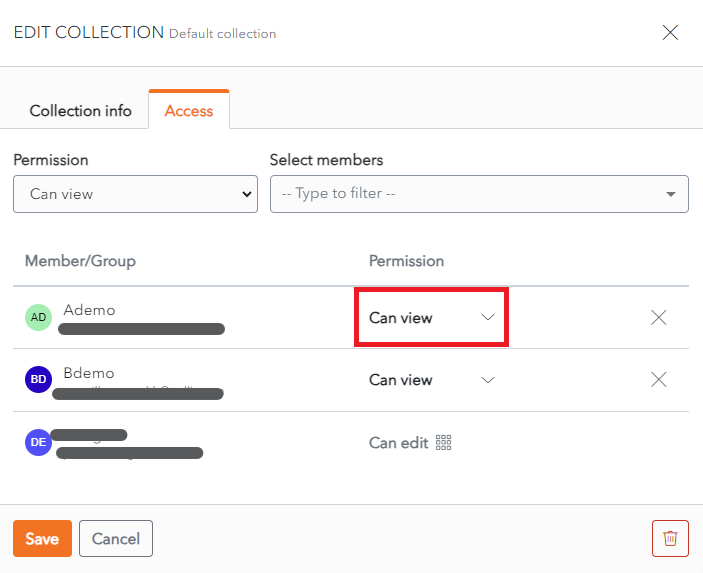
Click Save to save changes.
Alternatively, click Cancel to cancel the operation.
Delete Collection
A Collection can be deleted from the Collection List Screen or from the Collection Screen. Items within the Collection will not be deleted. If an item is no longer assigned to any Collections, it is marked as an Unassigned Item.
From the Collection List Screen, click the ![]() More button. A context menu is displayed.
More button. A context menu is displayed.
Click the ![]() Delete link.
Delete link.
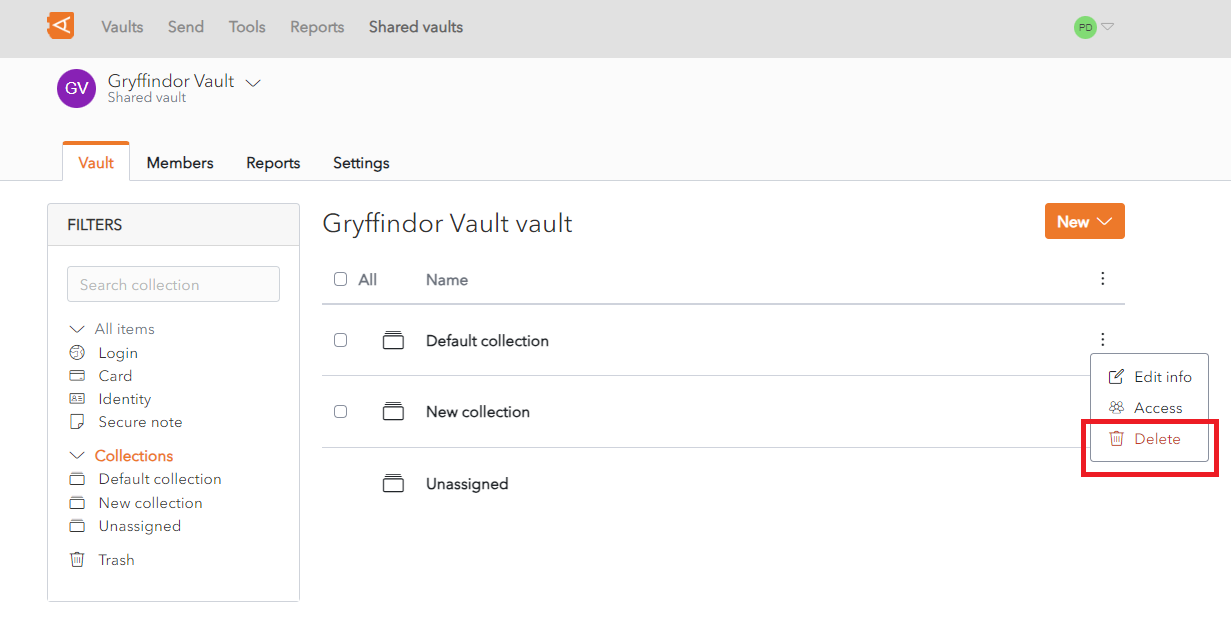
Alternatively, the Delete link can be accessed from the Collection Screen, click the ![]() More button. A context menu is displayed.
More button. A context menu is displayed.
Click the ![]() Delete link.
Delete link.
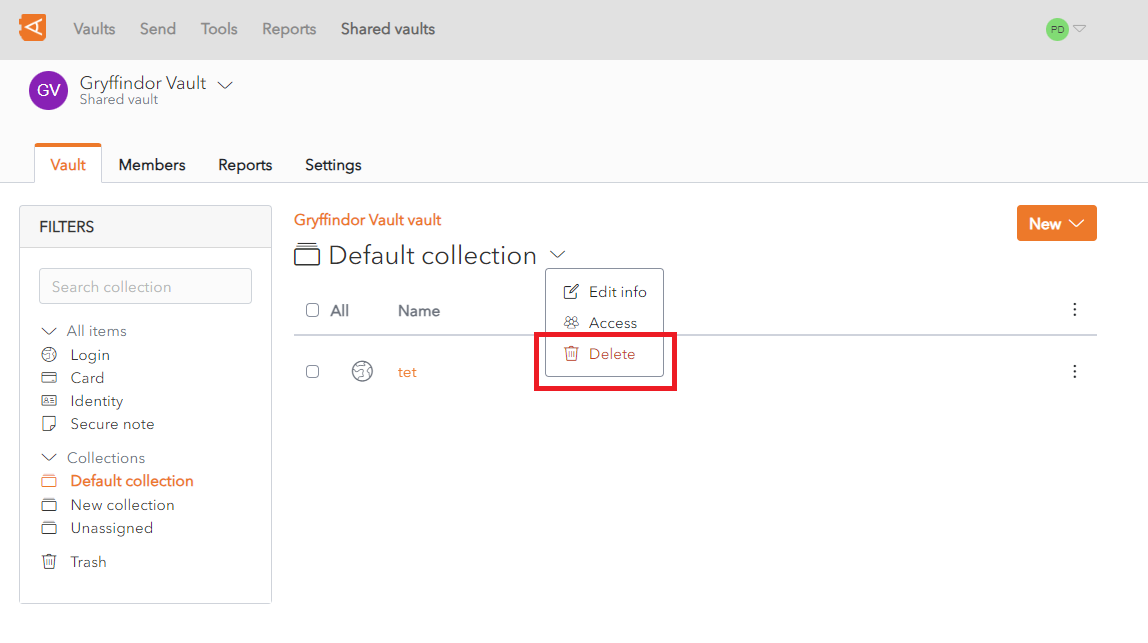
A Delete Collection Confirmation Popup is displayed.
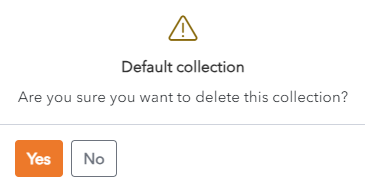
Nested Collections
Collections can be nested inside one another. This can be done when you Create a Collection or when you Edit a Collection.
For example, there are currently two Collections, Default Collection and New Collection which are at the same level.
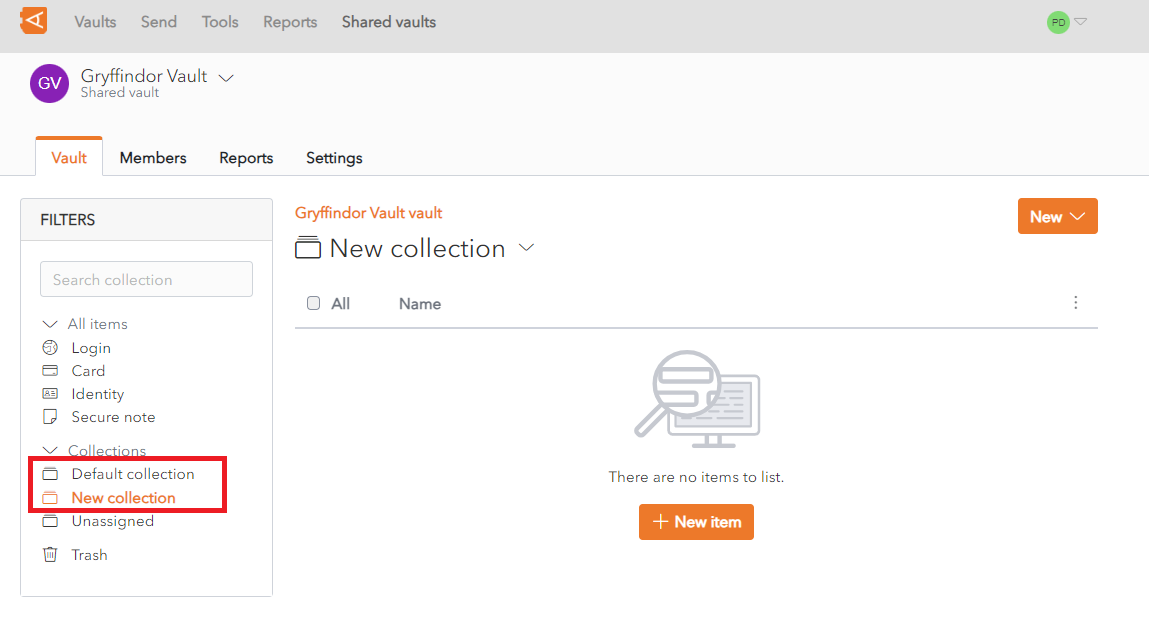
From the Edit Collection Screen for the New Collection, select Default Collection from the Nest collection under field.
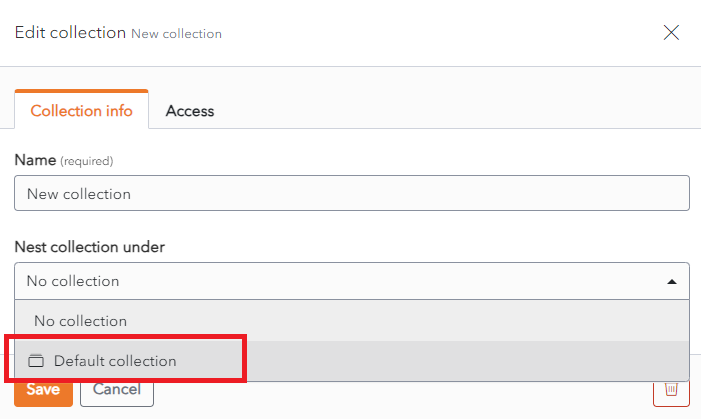
Click Save to save the changes. New Collection is now at a level below Default Collection.

Add, Edit or Delete Items
Create a Shared Vault Item
Follow the normal procedure for creating an Item, with one additional step.
Items created in a Shared Vault have one extra field - the Collections Field, which is mandatory. A Shared Vault Item must be added to at least one Collection.
In the Collections Section of the New Item Screen, check the checkbox beside a Collection that you wish to add the Item to.
Then Click Save to create the Item.
Manage Shared Vault Items
The procedure to Edit an Item and Delete an Item are the same as for personal Vaults as are the Item Types.
Assign or Remove Items
The Item List for the Shared Vault is displayed.
Assign Item to Collections
Click the ![]() More button beside an Item. A context menu is displayed.
More button beside an Item. A context menu is displayed.
Click the Collections link to modify the List of Collections to which the Item is assigned.
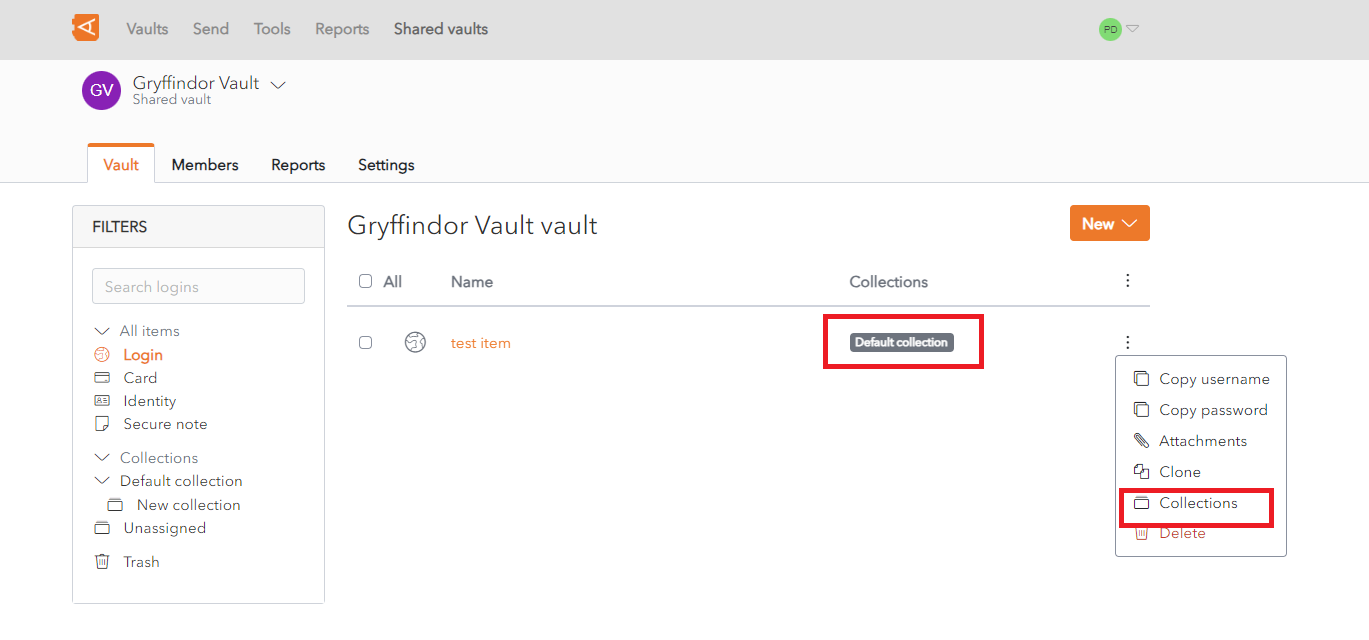
The Collections Screen for the Item is displayed.
Check one or more Collections.
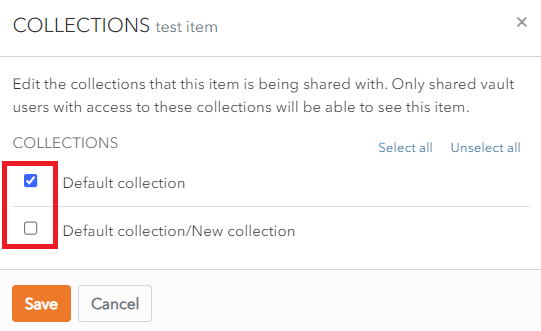
Click Save to save changes. The Item List for the Shared Vault is displayed.
The Item is assigned the Collections chosen.
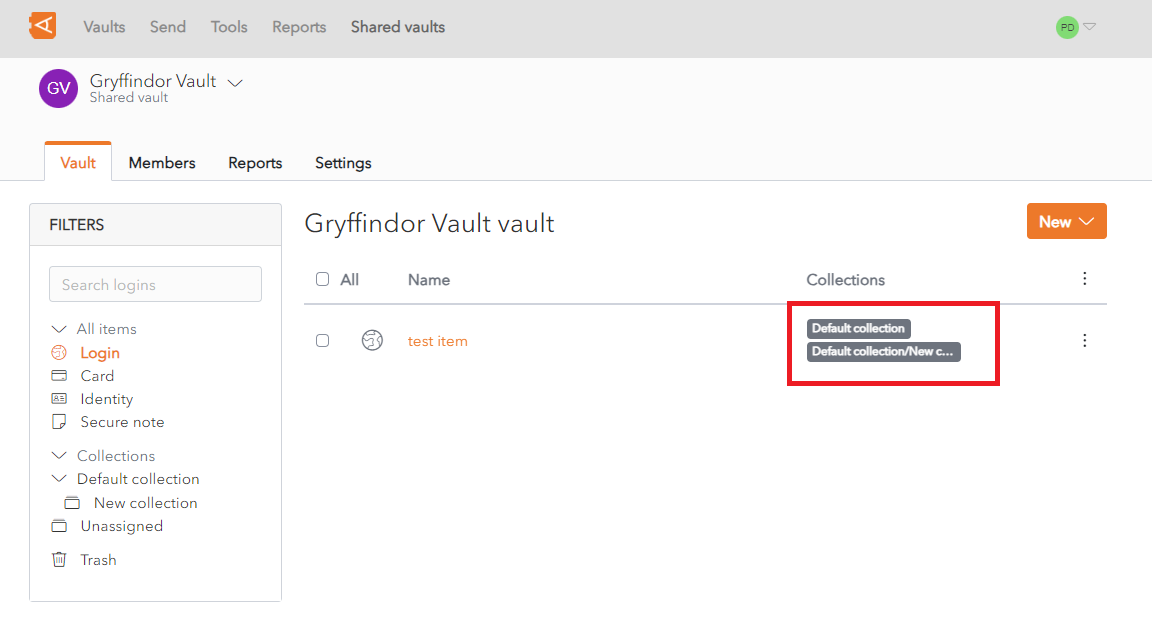
Remove Item from Collections
From the Collections Screen for an Item, click Unselect all.
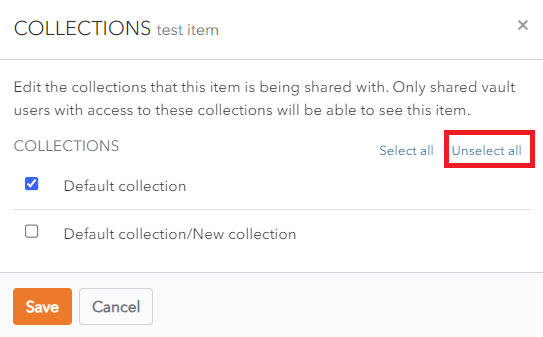
Click Save. The Item is now unassigned to collections.
Unassigned Items
The Collection field is mandatory to create an Item in a Shared Vault. However, an Item can be removed from a Collection after it is created.
If an item is no longer assigned to any Collections, it is marked as an Unassigned Item. This will happen if all collections, that an item is assigned to, are unselected or deleted.
This will happen if an Item is Removed from all Collections or if the Collections to which it is assigned are deleted.
Only members with owner or admin roles can see Unassigned Items, and can decide how to treat them.
Send data
Share sensitive data with someone who does not have Entreprise Vault access.
Send Overview
Using Send is a way to share sensitive Vault data with someone who does not have Vault Access using End-to-End Encryption.
The Send Encryption Process describes how a Send Link is constructed, the Encryption and Decryption process and Send Security Options.
A Send can be Created to send either Plain Text or a File to another person. A Send can also be modified or deleted manually after creation.
A Link can be Copied to the Clipboard and provided to the person to Access the Send. The link can be
Sends are by definition ephemeral and have Limited Lifespan.
- They are Automatically Deleted after a certain time.
- An Expiration Date and Maximum Access Count can also be set for Sends.
A number of Privacy Options are available for a Send.
- A Send can also be Password Protected. In this case the Recipient is required to enter the Password to access the Send.
- The text in Text Sends can be hidden by default to prevent unintended access to a Send.
- The Email Address of the sender can be hidden. In this case it is advisable that the Sender inform the Recipient that a Send link will be sent, and that the recipient contacts the Sender to verify the link before accessing it.
- A Private Note can be added to a Send. This is not sent with the Send.
Create Send
Click on the Send Menu link to access the Send Screen. A List of Sends are displayed.

Click the New Send button to create a New Send. The New Send Screen is displayed.
There are 2 types of Sends that can be created - a File Send and Text Send.
Create a File Send
In the Name field, enter a Name for the Send. This should describe the Send.
Choose File from the What type of send is this? radio buttons.
Upload the File to send.
The maximum file size is 100MB.
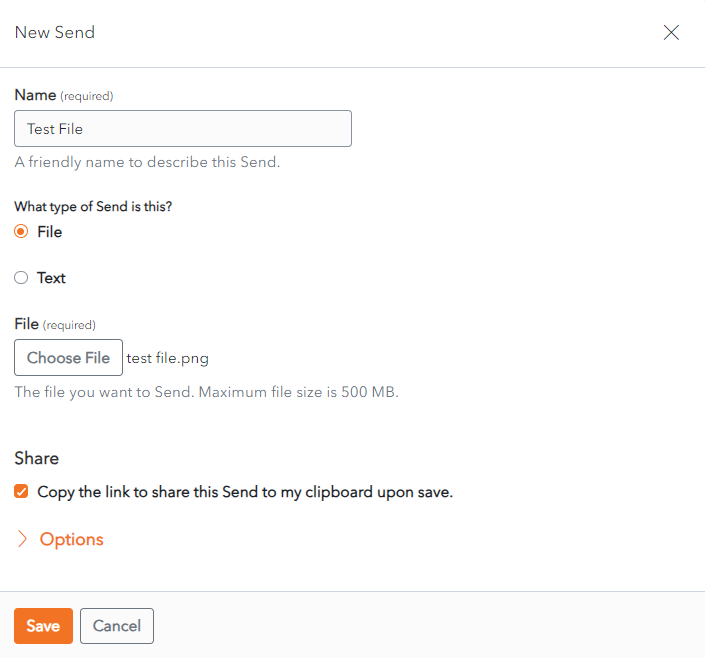
Click Save to Save the send. The Send List Screen displays with the new send in the list.
Alternatively, click Cancel to cancel the operation.
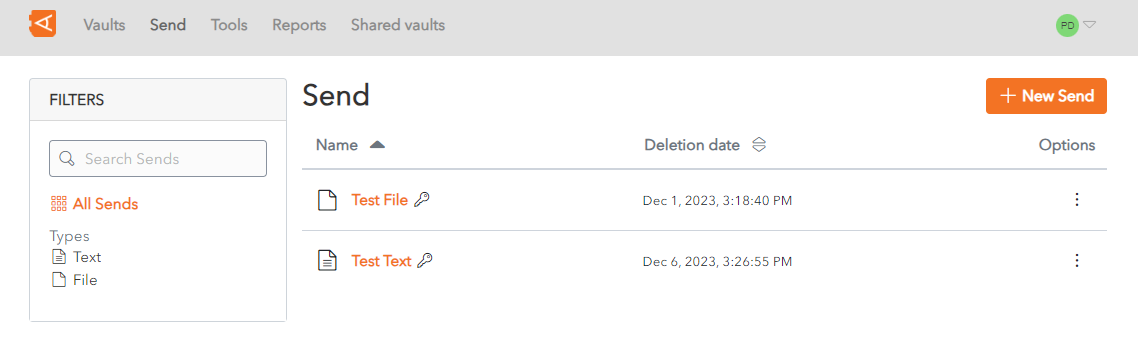
Create a Text Send
In the Name field, enter a Name for the Send. This should describe the Send.
Choose Text from the What type of send is this? radio buttons.
In the Text field, add the text to be sent.
Check the When accessing the Send, hide the text by default. This field is optional. If you check this box, the person accessing the send will need to unhide the text in order to view it, in order to protect the privacy of the text.
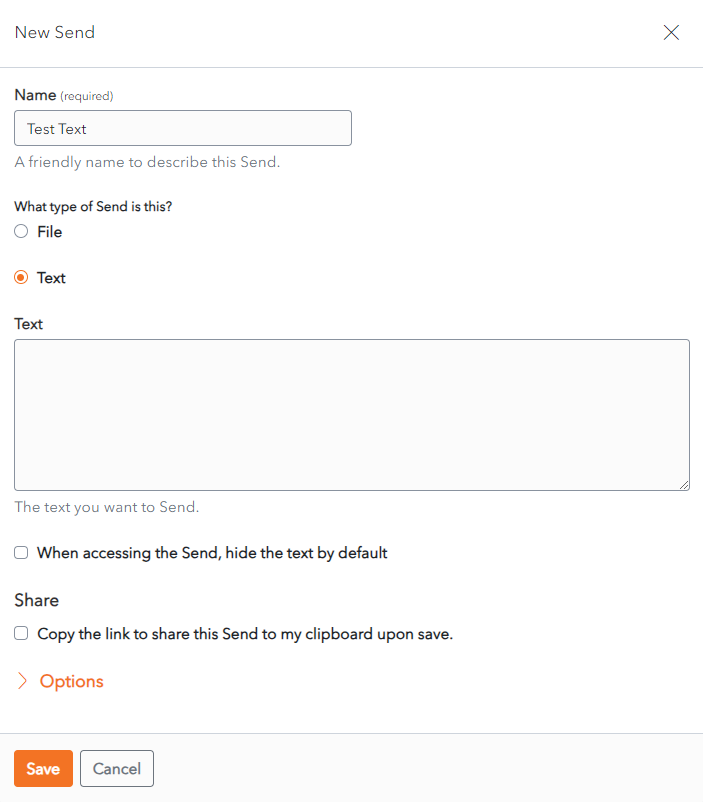
Click Save to Save the send. The Send List Screen displays with the new send in the list.
Alternatively, click Cancel to cancel the operation.
Access a Send
Copy the Send Link provided by the Send owner into your Browser window.

If the Send is Password Protected, enter the Password provided by the Send owner to access the Send.
The Send is displayed.
Send a File
If the Send is a File, the a link to Download the File is provided.
Click the Download file link to download the file to your computer.
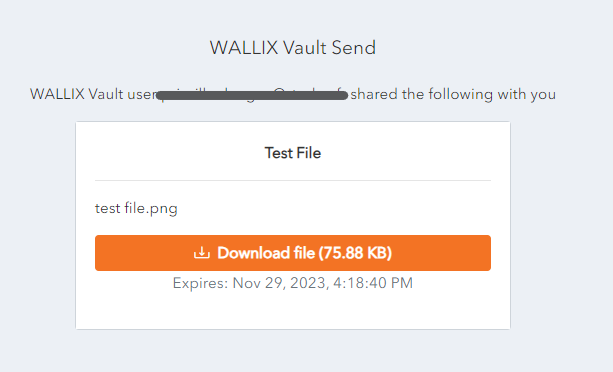
If the Send has an Expiration Date, the link is no longer available after the Expiration Date. The following message is displayed.

Send Text
If the Send is a Text, the Text is displayed.
Click on the Copy value link to copy the link to the clipboard.
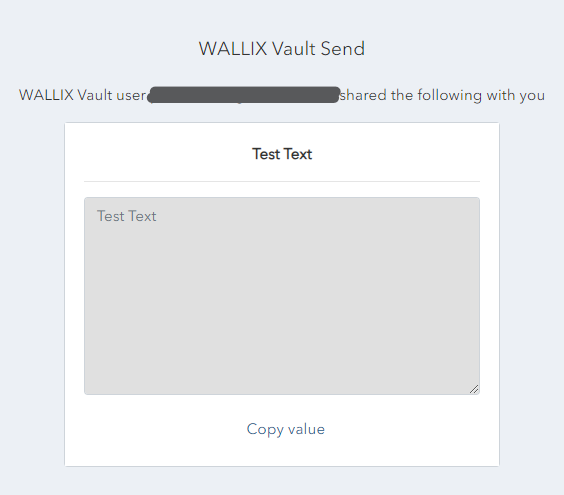
If the text is set to Hidden (by the Send owner), toggle the visibility to display the text.
Send Privacy
There are a number of possible Privacy Options for Sends.
Password Protection
A Password can be added to a Send to prevent unwanted access to the Send. When a member tries to access the Send, they will need to enter the Password to gain access.
Password Protect a Send
When creating or editing a Send, click on the Options link.
A list of Send Options displays.
Enter the Password to be used by the receiver to access the Send.
This can be left blank if password protection is not needed.
Once set, the password cannot be viewed, but it can be modified or deleted.
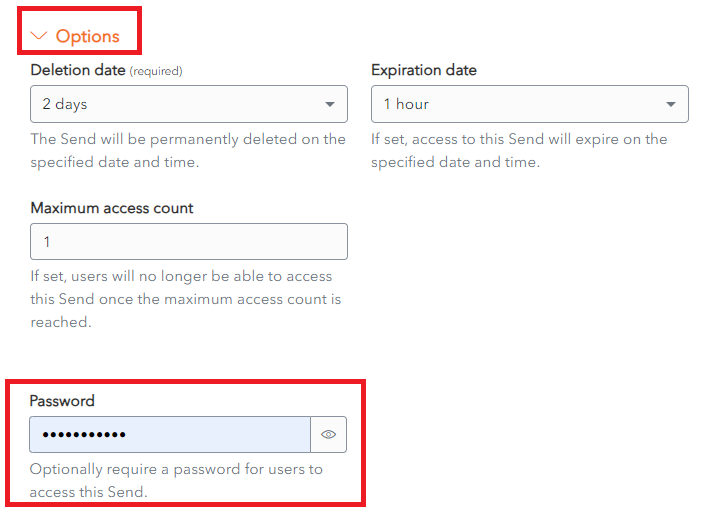
Change or Delete a Send Password
Click on a Send to open the Send Screen. The Send is displayed.
To Change the Password used to protect the Send, overwrite the Password in the Password Field with a New Password. Click Save. The Password is changed.
To Remove Password Protection from the Send, delete the password from the Password Field. Click Save. The Password Protection is removed.
Access a Password Protected Send
If the Send is password protected, enter the Password provided by the Send Owner.
Click Continue.
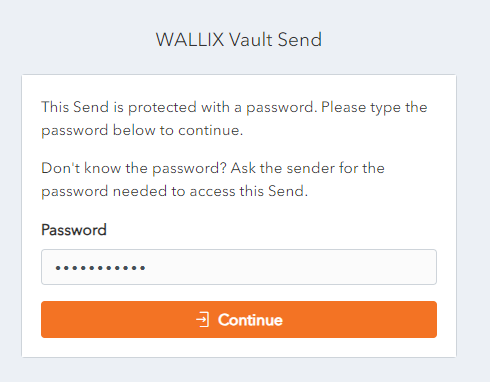
The Send is displayed.
Hide Text
The Text in a Send can be hidden, in order to protect the privacy of the text. When a member accesses it, they will need to unhide the text in order to view it.
Hide Text in Send
When creating or editing a Send, click on the Options link.
A list of Send Options displays.
Check the checkbox When accessing the Send, hide the text by default. Click Save to save changes.
This field is optional.

View Hidden Text in Sends
If the text is set to Hidden (by the Send owner), it is not displayed when the Send is opened.
Click Toggle visibility to display the text.
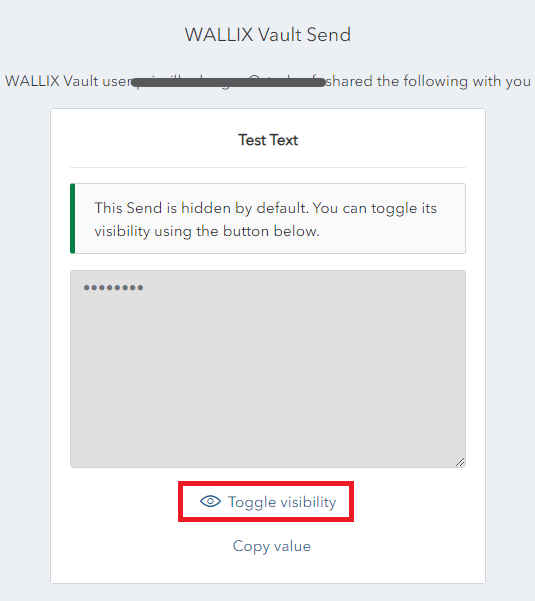
The Text is displayed.
Hide Email
By default the Sender Email address of a Send is displayed to recipients. This can be hidden if required.
Hide Email in Send
When creating or editing a Send, click on the Options link.
A list of Send Options displays.
Check the checkbox beside Hide my email address from recipients.

Click Save to save this option.
When a member accesses this Send, the sender's email address is hidden. The following message is displayed.
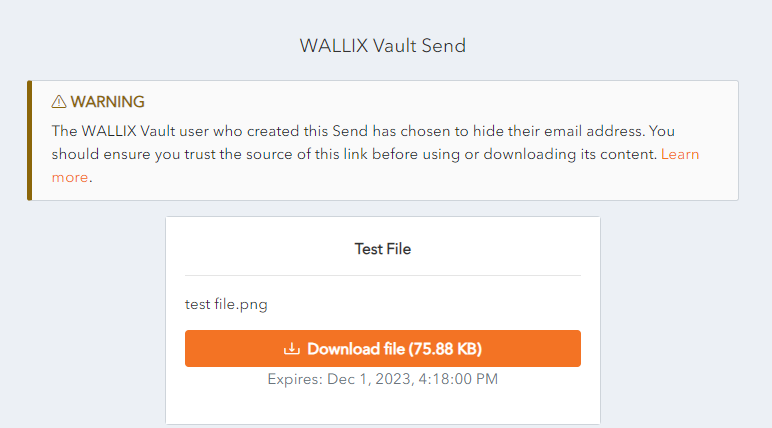
Other Send Options
When creating a Send, there are a number of options that are hidden by default. Click the Options Link to unhide the Send Options:
Copy Send Link to Clipboard
Check the checkbox Copy the link to share this Send to my clipboard upon save.
This field is optional.

If you check this box, the link will be copied to your clipboard to facilitate providing it to person you wish to Grant Access to the Send.
The Copy Send Link can also be used to Copy the Send Link to the clipboard.
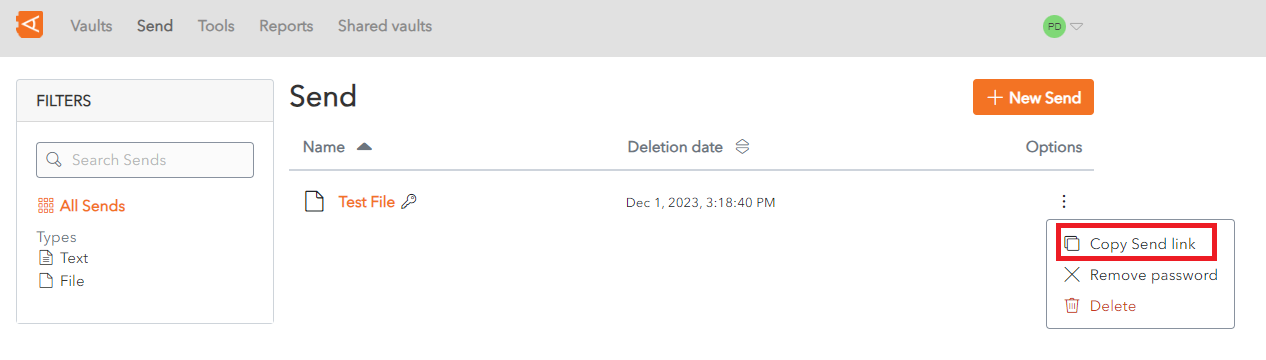
Add Private Notes
From the Send Screen, click on the Options Link.
In the Notes field, enter any privates notes you wish to make about the send.
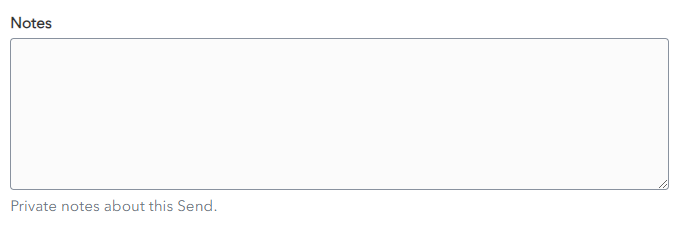
These notes are not sent with the Send.
Send Lifespan
Sends have a limited lifespan. A number of options can be set for each send.
The Options for a send can be set when the Send is created. They can also be modified at a later time.
Click the Options link on the Send Screen.
The Options are displayed for that send.
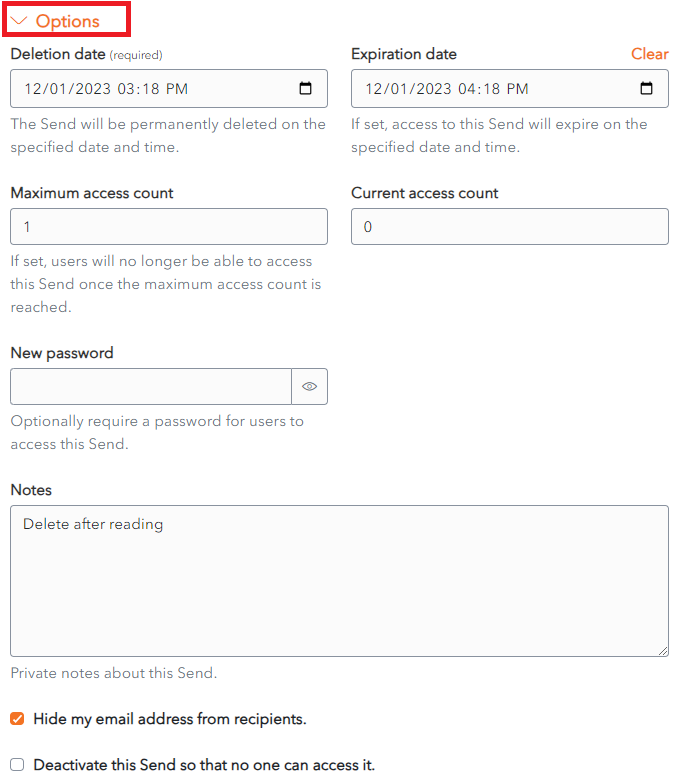
Deletion Date
Choose the period of time to keep the Send from the Deletion Date dropdown.
The options range from 1 hour to 30 days.
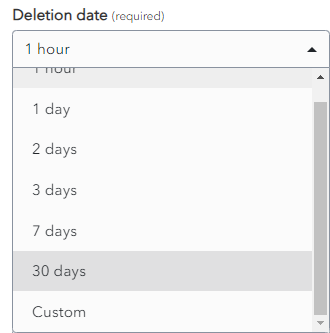
Alternatively, choose Custom, then choose the Expiration Date and Time.
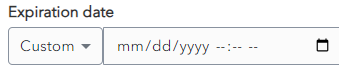
Set Deletion Date
The Send will be permanently deleted on the specified date and time. After this time it will be no longer accessible.
This is a Required field. By default, a Send Lifespan is set at 7 days.
Automatic Deletion of Sends
When the Deletion Date is reached, the Send is Marked for Deletion. A Delete icon appears beside the Send for a few minutes before it is permanently deleted.
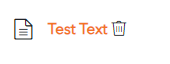
Deleted Items are not stored in the Trash. They are permanently removed from the Vault.
Manual Deletion of Sends
From the New Send Screen or the Edit Send Screen, click the ![]() Delete button.
Delete button.
The Delete Send Confirmation Screen appears.

Click Yes to delete the Send.
Click No to cancel the operation.
Access Deleted Send
When a Recipient tries to access a Deleted Send, the following Error Message is displayed.
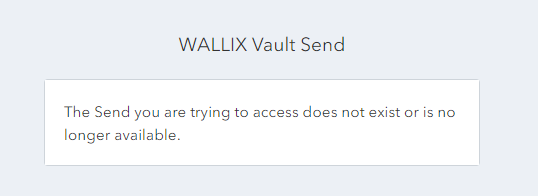
Expiration Date
A Send can be set to expire a fixed period of time after creation or on a specific date.
Set Expiration Date
Choose the period of time to keep the Send from the Expiration Date dropdown.
The options range from 1 hour to 30 days.
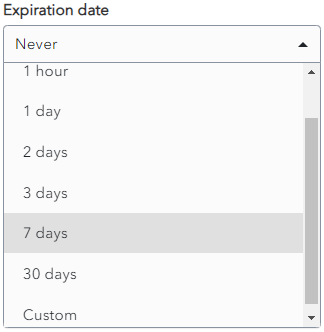
Alternatively, choose Custom, then choose the Expiration Date and Time.
By default, a Expiraton Date is set at Never. Unless you specify an Expiration Date, your Send will never expire.
Expired Sends are no longer accessible to Recipients but they are still accessible by the Sender until their Deletion Date.
Access Expired Send
Like for Deleted Sends, when a Recipient tries to access a Expired Send, the following Error Message is displayed.
Maximum Access Count
A Send can be set to have a Maximum Access Count. This means the number of times that it can be accessed by the Recipient before it becomes unavailable.
Set Maximum Access Count
Choose the number of times that the Recipient can access the Send. It can be left blank.
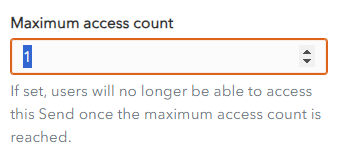
By default, it is blank, which means the Send can be accessed an unlimited number of times before it is deleted.
A Maximum Access Count Reached Icon is displayed beside the Send in the Sender's Inbox.
![]()
Access Send whose Maximum Access Count has been reached
When a Recipient tries to access a Send whose Maximum Access Count has been reached, the following Error Message is displayed.
Deactivate Send
Deactivate a Send
A send can be deactivated so that Recipients can no longer access it.
Check the checkbox Deactivate this Send so that no one can access it.
By default, this field is unchecked.

Deactivated Sends are still available to the Sender until they are deleted.
A Deactivated Icon is displayed beside the Send in the Sender's Inbox.
![]()
Access a Deactivated Send
When a Recipient tries to access a Deactivated Send, the following Error Message is displayed.
Edit Send
From the Send List, click on a Send to open it the Edit Screen.
Modify the Send.
All fields can be modified except the Send Contents (File or Text being sent).
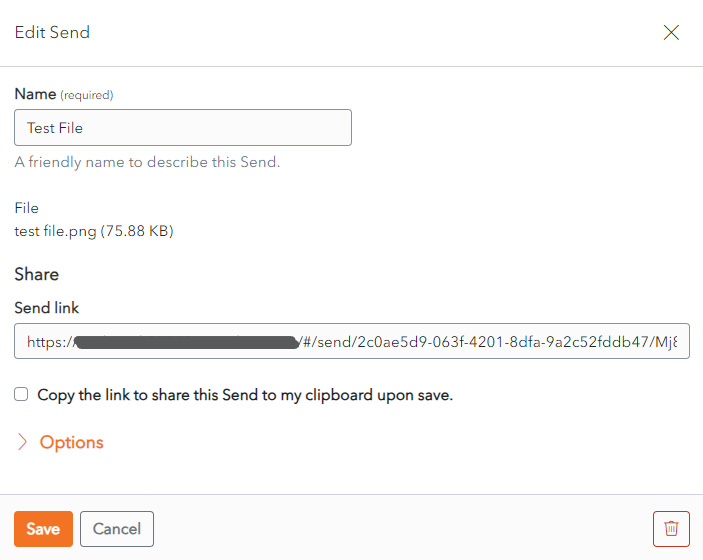
Click Save to save changes.
Alternatively, click Cancel to cancel the operation.
Delete a Send
A Send can be deleted manually at any time from the Create Send or Edit Send Screen, by clicking on the ![]() Delete button.
Delete button.
It can also be deleted from the Context menu of the Send.
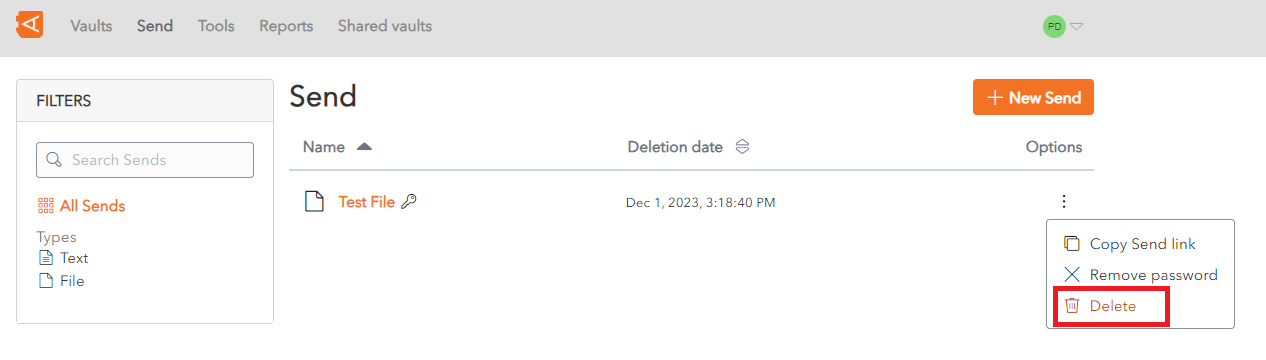
The Automatic Deletion of Sends is set in the Options menu of the Send Screen. This is set at Send Creation or can be modified from the Edit Screen.
Send Encryption Process
All Sends are automatically end-to-end encrypted, which means that WALLIX Enterprise Vault encrypts the data in the Send Link and the client-browser uses the encryption key to decrypt the data once received.
Send Link Anatomy
The Send Link is comprised of 3 elements:
https://<WALLIX Vault URL>/#/send/<send_id>/<encryption_key>
- Secure HTTP Protocol: https//:
- Vault URL: <WALLIX Vault URL>
- URL Fragment: /#/send/<send_id>/<encryption_key> which contains the <send_id> and the <encryption_key>
Send Encryption
Here is how it works:
- When a Send is created a 128-bit secret key is generated for that Send.
- A 512-bit encryption key is derived from the 128-bit secret key.
- The Send is AES-256 encrypted using the derived 512-bit encryption. Data (plain text or file) and the Metadata (Name, Filenme, Notes, etc.) are included in the encryption.
- The Encrypted Send is uploaded to WALLIX Servers. The Send ID (used to identify the Send for decryption) is included in upload. The Encryption Key is not included in the upload.
Send Decryption
Here is how it works:
- When a Send Link is accessed, the Web Browser requests the Send Access Page from WALLIX Servers.
- The Send Access Page is returned from WALLIX Servers as a Web Vault Client.
- The URL Fragment (containing Send ID and Encryption Key) is parsed locally by the Web Vault Client.
- Using the parsed Send ID, the Data is requested from WALLIX Servers by the Web Vault Client.
- The Encryption Key is never included in Network Requests.
- The Encrypted Send is returned from WALLIX Servers to the Web Vault Client.
- Using the Encryption Key, the Encrypted Send is Decrypted locally by the Web Vault Client.
Send Security
In order to improve Send Security, two additional steps can also be taken when transmitting a Send. These steps are optional.
1. Use Password Authentication
- When creating a Send, set a Password.
- Provide the Password to the Recipient via a separate channel.
- When the Recipient clicks the Send Link, they are obliged to successfully enter this password before accessing the Send.
- The Encrypted Send is then accessed and decrypted.
The Password is not included in Send Encryption or Decryption. It is only used for Authentication before the Encrypted Send can be accessed and decrypted.
2. Provide Encryption Key Separately
- Provide the Send Link without the Encryption key.
- Provide the Encryption Key via a separate channel.
- The URL should be reassembled to include the Encryption Key, as per the Send Link Anatomy.
The fully Reassembled Send Link is Required to Access the Send.
Manage browser plugins and mobile apps
Use new ways to access your Entreprise Vault data.
Browser Extension Overview
Various options are available within the Browser Extension software.
Open Browser Extension
Click the Browser Extension Icon on the top right hand side of the browser. The following screenshot shows the icon for Chrome.
Click the Browser Extension icon.
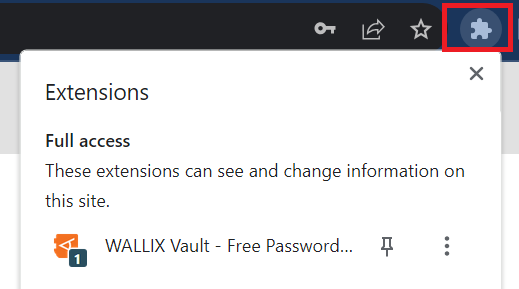
The WALLIX Vault Browser Extension opens in the Tab Screen.
Tab Screen
This screen shows the items saved in the Vault for the currently displayed webpage.
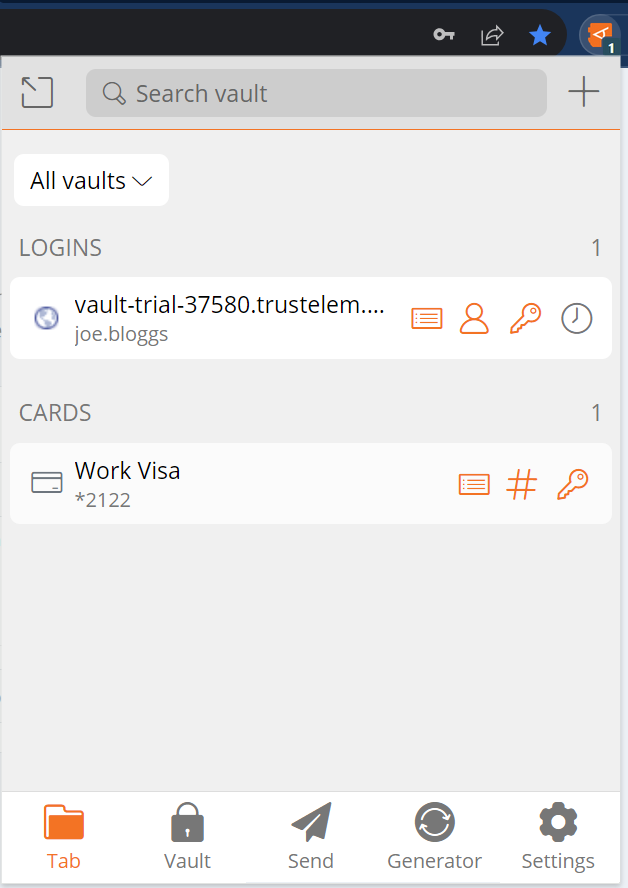
Vault Screen
This screen displays the list of Vaults and their Items.
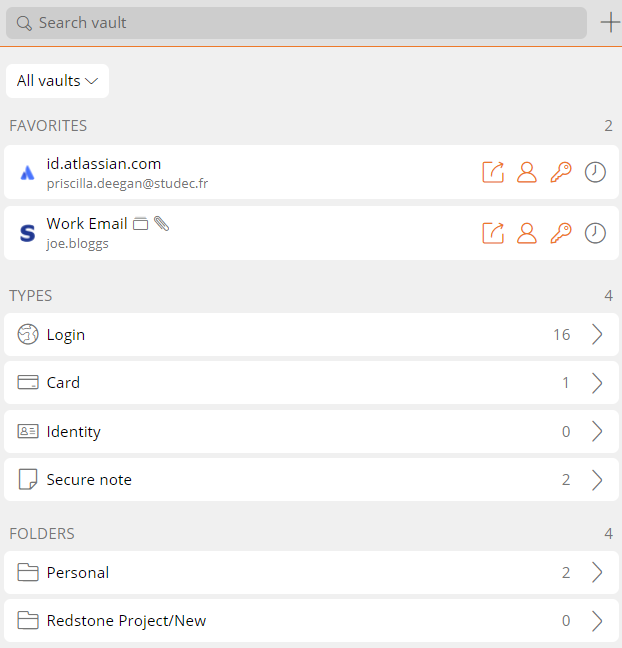
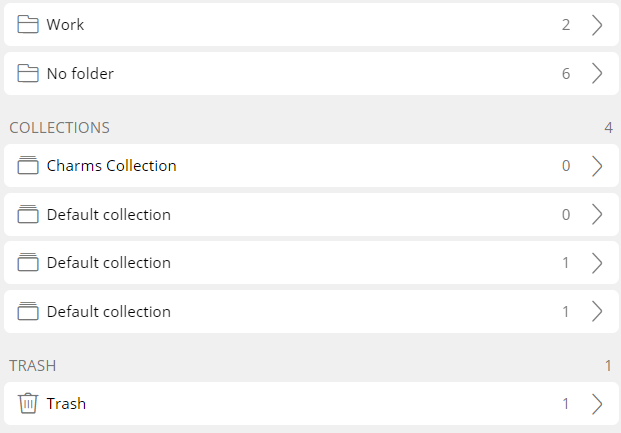
Send Screen
This screen displays Sends and allows users to add, edit or delete a send.
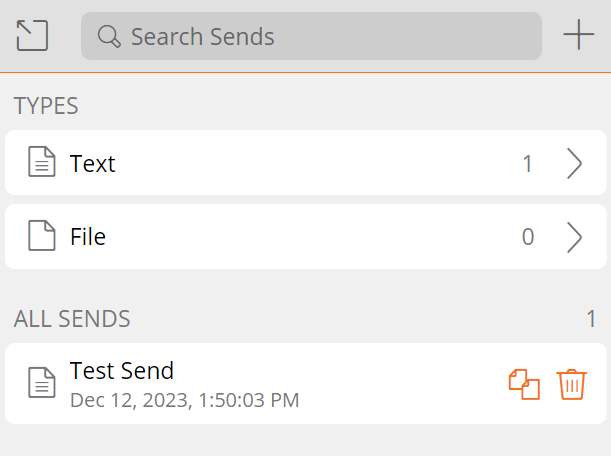
Generator Screen
This screen allows users to generate a password for an Item.
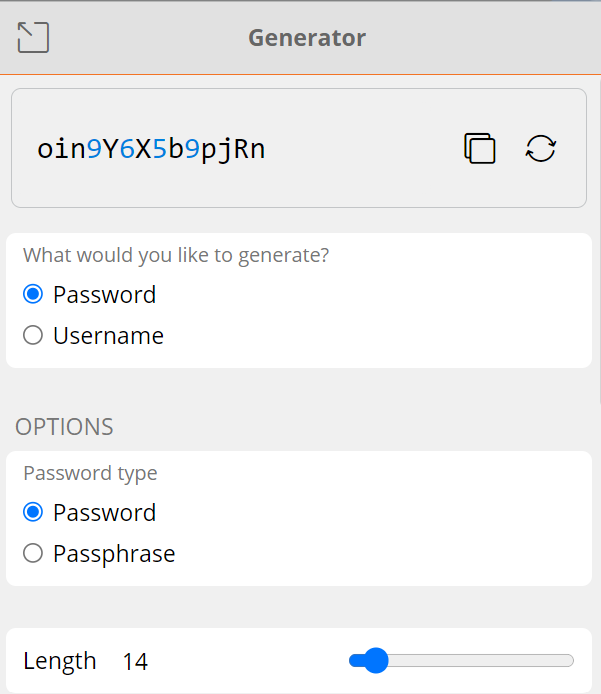
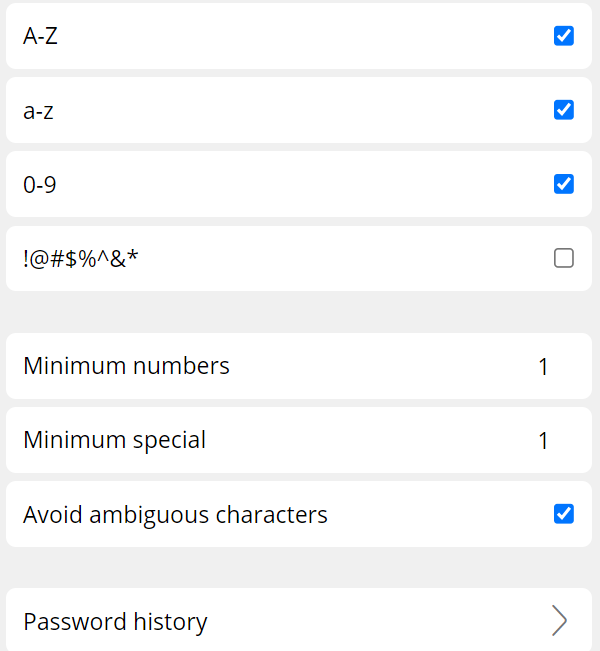
Settings Screen
This screen displays the various settings and options available for the Browser Extension.
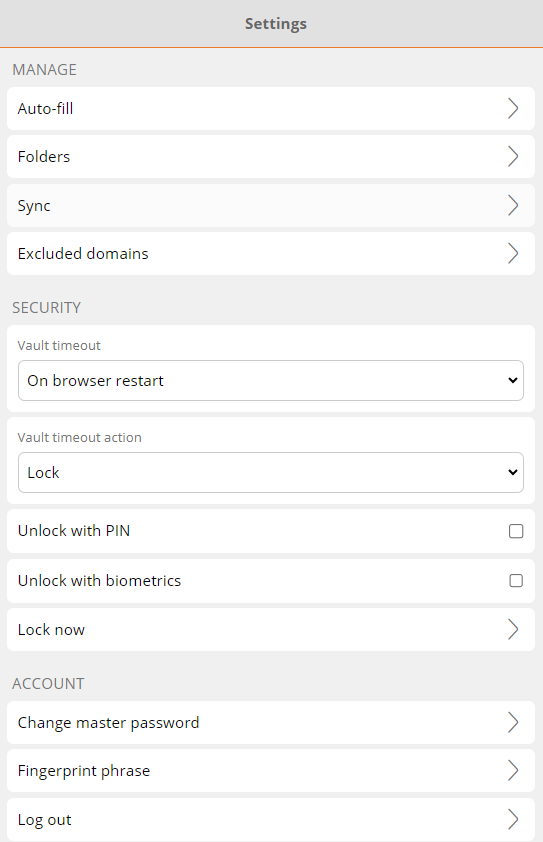
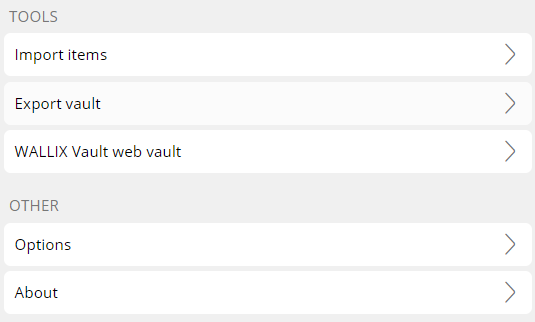
Install Browser Extension
WALLIX Enterprise Vault uses browser extensions for Chrome and Firefox. These must be installed before using WALLIX Enterprise Vault.
Click on the Browser Extension link from the User Menu.

Alternatively, click on the Browser extension setup link on the top right-hand side of your web browser.
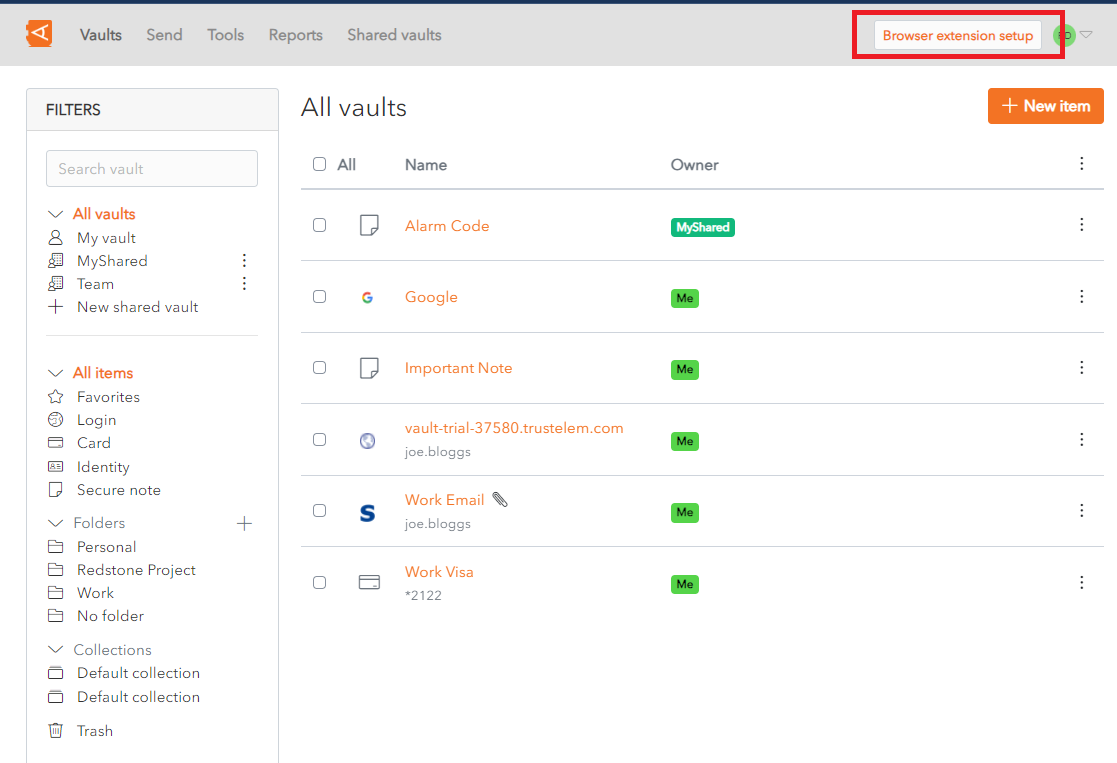
This will display the Browser Extension Configuration Screen.
Click on the Install and configure button to install the WALLIX Enterprise Vault Extension for the browser you use to access your WALLIX-Vault.
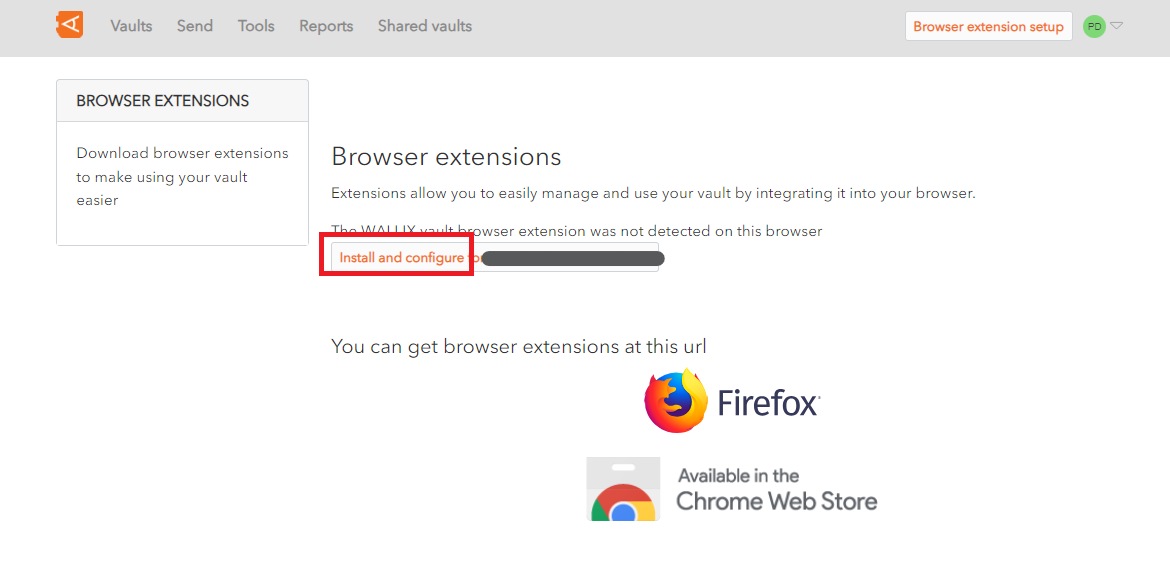
Click the Add to Chrome button to install the browser extension (this process is similar for Firefox).
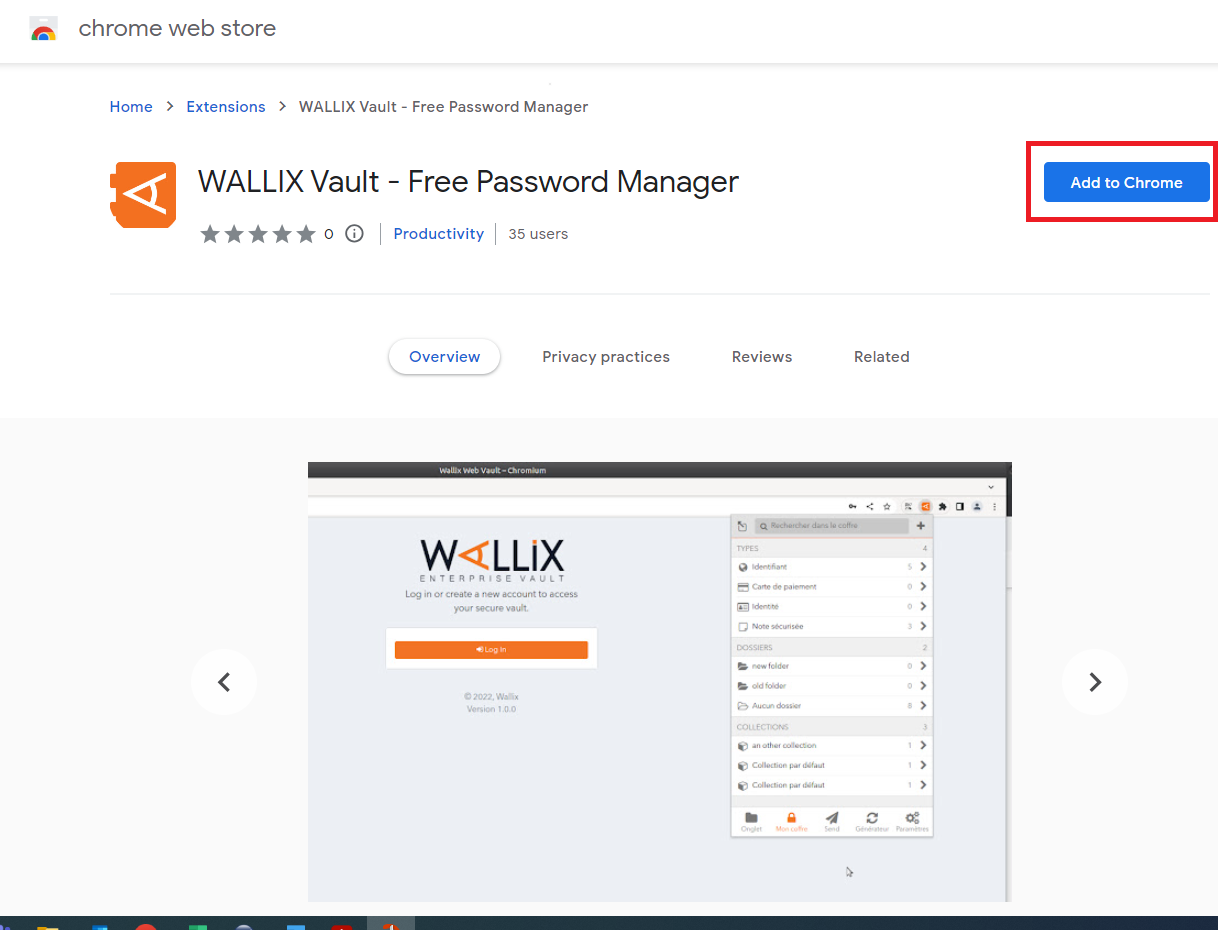
You can now use the browser extension.
Install Mobile Application
The WALLIX-Vault mobile application is available on Google Play for Android devices and App Store for Apple devices.
Select Get the apps in your Account Menu to display the Mobile Apps page.
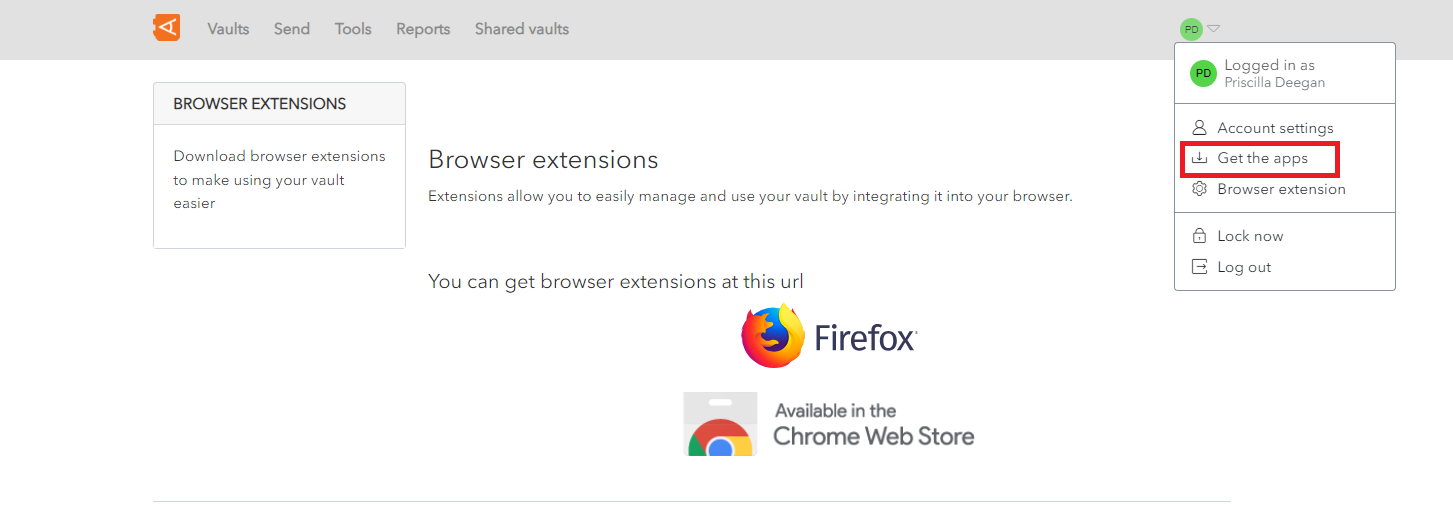
Scan the QR code with your device to set up your account on the WALLIX Enterprise Vault mobile app.
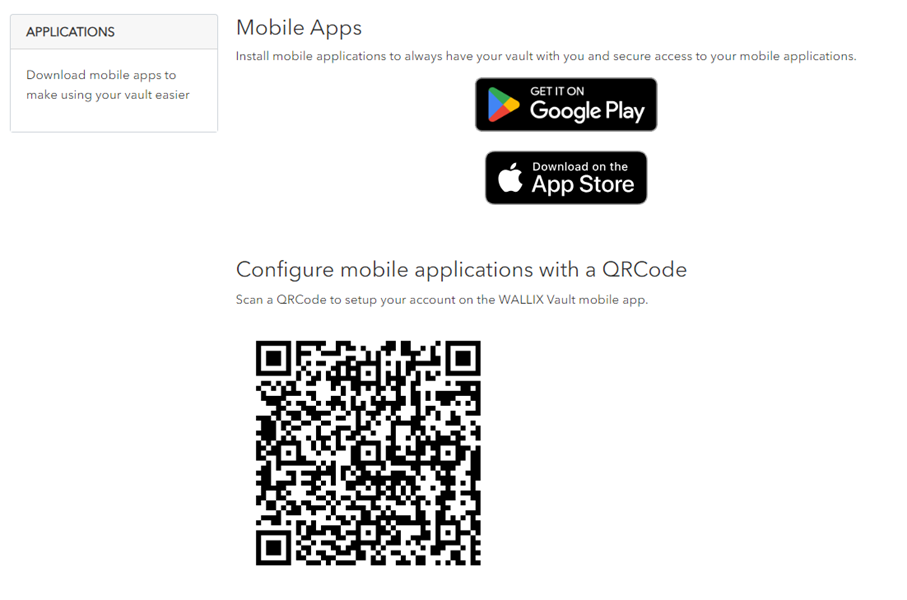
This downloads and installs the app with your user account details.
Auto-fill data
Auto-fill your Entreprise Vault data into web pages and mobile apps.
Auto-fill Overview
Once Installed, the WALLIX Browser extension facilitates Auto-fill to webpage pages and mobile apps. The Browser Extension is currently available for Chrome and Firefox.
Browser Password Managers are generally considered less secure than dedicated solutions like WALLIX Enterprise Vault. Before using the Browser Extension it is advisable to Disable Browser Password Manager & Export Saved Passwords.
Items can be added to the Vault from a webpage using the Browser Extension on Desktop or mobile devices.
Logins, Card and Identities, and Custom Fields can be auto-filled to a Webpage using the Browser Extension from a Desktop computer. There are various options for Using URIs in Auto-fills.
A number of options are available for auto-filling webpages and mobile apps on Android Devices and iOS Devices.
Other options are available in the Browser Extension such as Badge Counter, TOTP Copy after Auto-fill or Auto-fill for iframes.
Disable Browser Password Manager & Export Saved Passwords
Chrome Browser
Type chrome://password-manager/passwords into the address bar.
![]()
Click Enter. The Passwords Screen opens.
Click the Settings Link in the Password Manager menu. The Settings Screen opens.
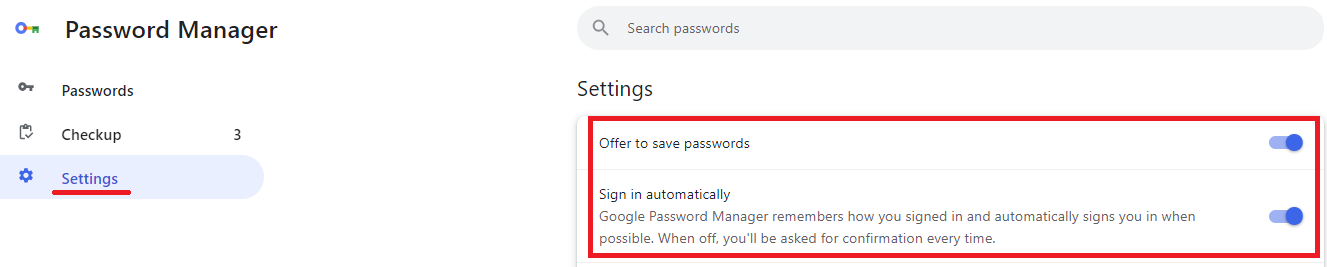
Disable Password Manager
Toggle off the following options:
- Offer to save passwords
- Sign in automatically
The Browser no longer offers to save password or sign in automatically to websites.
Export Saved Passwords
Click Download file beside the Export passwords option.

The Passwords are exported in CSV format.
Firefox Browser
Type about:preferences#privacy into the address bar.

Click Enter. The Passwords Screen opens.
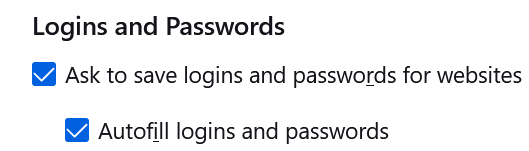
Disable Password Manager
Toggle off the following options:
- Ask to save logins and passwords for websites
- Autofill logins and passwords
The Browser no longer offers to save password or sign in automatically to websites.
Export Saved Passwords
Click the Saved Logins button beside the Logins and Passwords options.
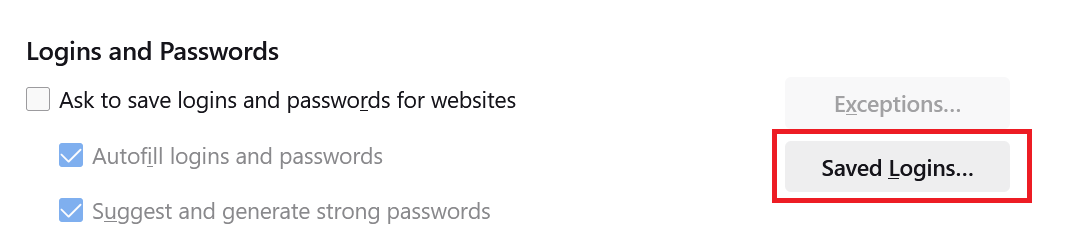
The Saved Passwords List is displayed.
Click the three dots link beside the Account name. The Context Menu is displayed.
Click the Export Logins Link.
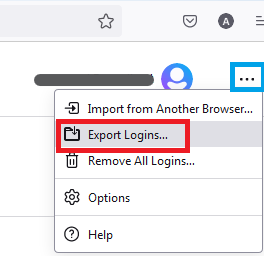
The Passwords are exported in CSV format.
Browser Extension Options
Badge Counter
The Tab Screen of the Browser Extension automatically detects the URI of the currently displayed page.
It finds any Vault Items that have the same URI.
It displays the number of items found for that page on the Badge Counter icon.
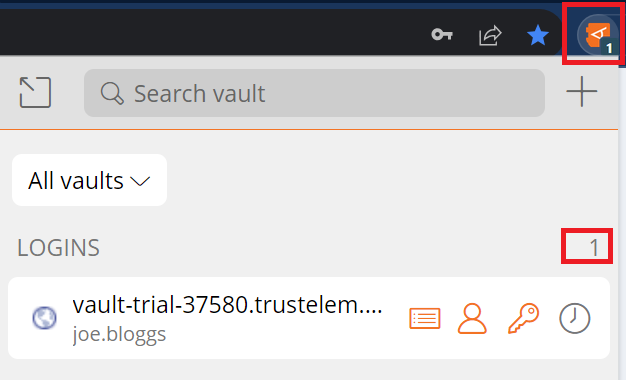
It is turned on by default.
It can be turned off by unchecking the Show Badge Counter checkbox in Settings > Options.
TOTP Copy after Auto-fill
If the Login uses WALLIX Authenticator for TOTPs, the shortcut also copies the TOTP to the clipboard after auto-filling the web page with any of the above methods.
Auto-fill for iframes
Auto-fill does not work for untrusted iframes.
An untrusted iframe is defined as one where the src value is not the same as the URI for the Login item, as required in the rules set for Match Detection Behavior.
When the browser extension detects an iframe it responds based on the type of auto-fill being used:
- Auto-fill on Page Load: the browser extension disables the auto-fill on page load and does not warn the user
- Auto-fill using Context menu, Keyboard Shortcut or from Browser Extension: the browser extension warns the user about the iframe.
Auto-fill Logins
Prerequisite: The Browser Extension needs to be installed before the Auto-fill feature becomes available.
Auto-fill from Context Menu
Right click on the Login Screen of a website. The Context Menu is displayed.
Choose WALLIX Vault > Auto-fill.
If the Login is stored in the Vault, an Auto-fill option is proposed.
Click Auto-fill to retrieve the Login for this website to WALLIX Enterprise Vault.
If you are not signed in to WALLIX Enterprise Vault, you will be prompted to sign in before retrieving the Login.
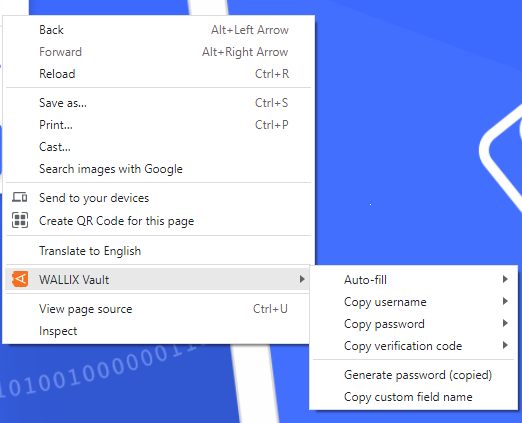
- Copy username: copies the username of the login to the clipboard.
- Copy password: copies the password of the login to the clipboard.
- Copy verification code: copies the verification code of the login to the clipboard.
- Generate password: generates a new more secure password from the copied password.
- Copy custom field name: copies the name of the custom field of the login.
Auto-fill on Page Load
Auto-fill on Page load is a function that automatically populates a Login on a Page when the URI of the page being displayed corresponds to an Item in the Vault.
This is pertinent for Logins, Cards or Identities.
Untrusted iframes: Auto-fill on page load does not work for untrusted iframes.
HTTPS/HTTP: If the Vault Item expects an HTTPS site and a HTTP version of the site is displayed, the user is warned before auto-filling on page load.
Enable Auto-fill on page load
For security reasons, it is automatically disabled and needs to be enabled to work.
To enable Auto-fill on Page Load, from the Browser extension, navigate to Settings> Autofill. The Auto-fill screen opens.
Click the Auto-fill on page load checkbox. This enables the option to auto-fill logins on page load.

From the Default autofill setting for Login items dropdown, choose the default option:
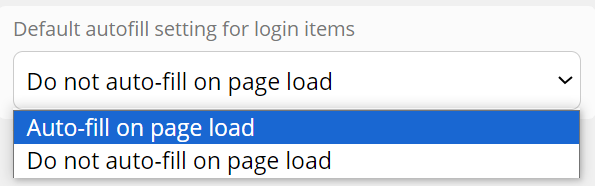
This can be overwritten for each item from the Items Screen. This allows specific auto-fill options to be set for specific items.
From the Default URI match detection dropdown, choose how to match the URL of the webpage with the Login already in the Vault.

Auto-fill Item to Vault on Page Load
If this login is not already saved in WALLIX Enterprise Vault, a prompt displays which offers to save the Login details for this Website.
Choose a Folder to add the Login to this Folder in the Vault. This field is optional.
Items are added to the User's Individual Vault and not a Shared Vault.
Click the Save button.
The Add Item Screen displays with the fields pre populated with the Login details.
Modify fields, if required.
Click Save to Save Item to Vault.
Alternatively, click Cancel to cancel the operation.
Auto-fill Manually
You can manually add a Login that is not already in the Vault.
From the Vault Screen of the Browser Extension, click Add a login.
The Add Item Screen opens.
The elements that the Browser Extension could recuperate from the browser are prepopulated.
Enter the remaining fields. Click Save to create Login.
Alternatively, click Cancel to cancel the operation.
Auto-fill using Keyboard Shortcuts
Use the following default keyboard shortcuts (also known as hot keys) to auto-fill a login.
-
Use Ctrl + Shift + L if running Windows of Linux
- Use Cmd + Shift + L if running for macOS
If multiple logins are found for the URI, the last-used login is used for auto-fill.
Keyboard shortcuts can be useful to populating multiple logins in rapid succession.
Configure shortcuts: If the keyboard shortcut doesn't work, it may be because another app is already using it. Either remove the shortcut from the other app or configure WALLIX to use a different shortcut.
TOTP Copy
If the Login uses WALLIX Authenticator for TOTPs, the shortcut also copies the TOTP to the clipboard after auto-filling the web page with any of the above methods.
Auto-fill for iframes
Auto-fill does not work for untrusted iframes.
An untrusted iframe is defined as one where the src value is not the same as the URI for the Login item, as required in the rules set for Match Detection Behavior.
When the browser extension detects an iframe it responds based on the type of auto-fill being used:
- Auto-fill on Page Load: the browser extension disables the auto-fill on page load and does not warn the user
- Auto-fill using Context menu, Keyboard Shortcut or from Browser Extension: the browser extension warns the user about the iframe.
Auto-fill for Cards and Identities
Add to Vault
As for Manually Adding Logins to the Vault, Cards and Identities can be auto-filled directly to the Vault from the browser extension.
Click the Add Item button in the Tab Screen of the Browser extension.
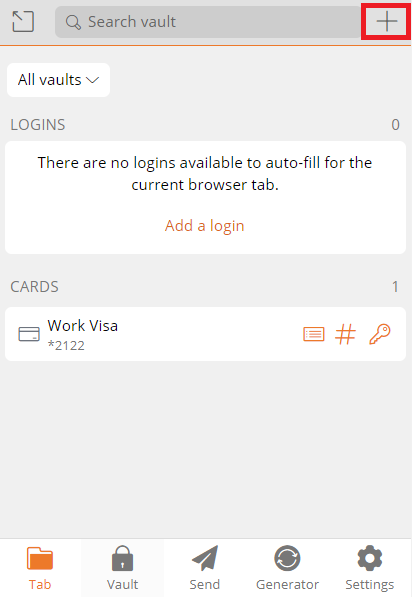
The Add Item Screen is displayed.
Choose Type (Card or Identity).
Add rest of item details.
click Save to add item to Vault.
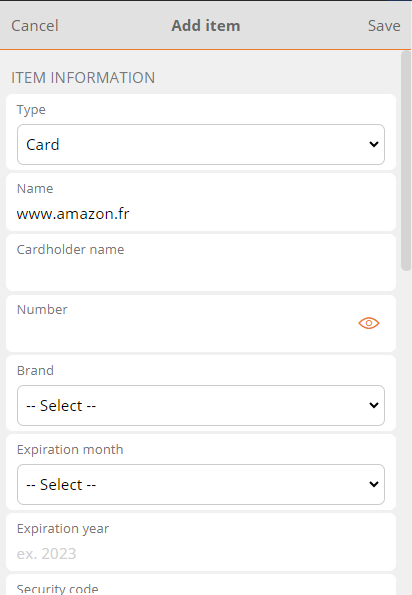
Alternatively, click Cancel to cancel the operation.
Auto-fill Manually
From an ecommerce website, navigate to the add new card page.
Open the Browser Extension.
The Cards saved in the Vault are displayed.
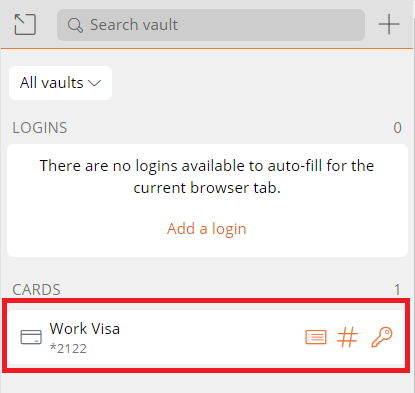
Click a Card. It will automatically populate the webpage.
The procedure is the same for populating an identity on a webpage.
Auto-fill using Context Menu
Cards and identities can be auto-filled to the Vault from the Context menu on the webpage.
This works the same as for Logins.
Hide Cards and Identities Option
Cards and Identities are displayed by default in the Tab Screen of the Browser Extension.
Uncheck the following options in Settings > Options > Display in the Browser Extension to hide these from view:
- Show cards on Tab Page checkbox
- Show identities on Tab page checkbox
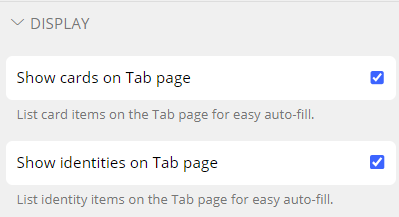
Auto-fill for Custom Fields
The Browser Extension can be used to auto-fill a web page with custom fields that have been added to Items. A typical application of this is for PINs and Security Questions that are often required in addition to a Username and Password to login to a website.
Auto-field Custom fields can be created for the <form> or <input> elements. A special scenario is possible for <span> elements.
Auto-Fill Custom Fields
Open the Browser Extension on the Webpage that you wish to auto-fill.
The Tab Screen displays.
It automatically detects the URI of the webpage and displays any logins stored in the Vault that correspond with this URI.
Select the Vault Item that contains the custom field to be auto-filled to the webpage.
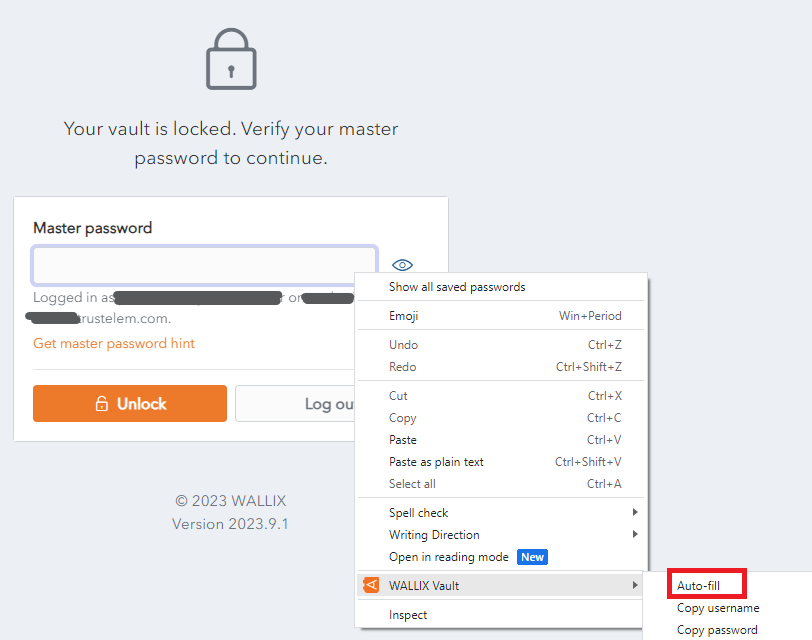
The Browser Extension finds any fields that match the Custom field Name and auto-fill that field's value.
For this reason it is important to correctly name custom fields.
Linked Custom Fields
Sometimes the Browser Extension is unable to auto-fill usernames and passwords for a webpage. In these cases, Custom fields can be created for the username and password and these can be used instead for auto-fill.
From the Edit Item Screen, add a New Custom Field of type Linked.
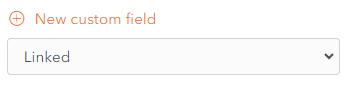
In the Name field, give it the same name as the HTML form element (id, name, aria-label, or placeholder) for the field in question.
This can be found by clicking the Copy custom field name link in the Context Menu of the field in question.
For example, to find the HTML form element for the Master Password in WALLIX Enterprise Vault, click the Copy custom field name link.
The HTML form element for the Master Password is saved to the clipboard.
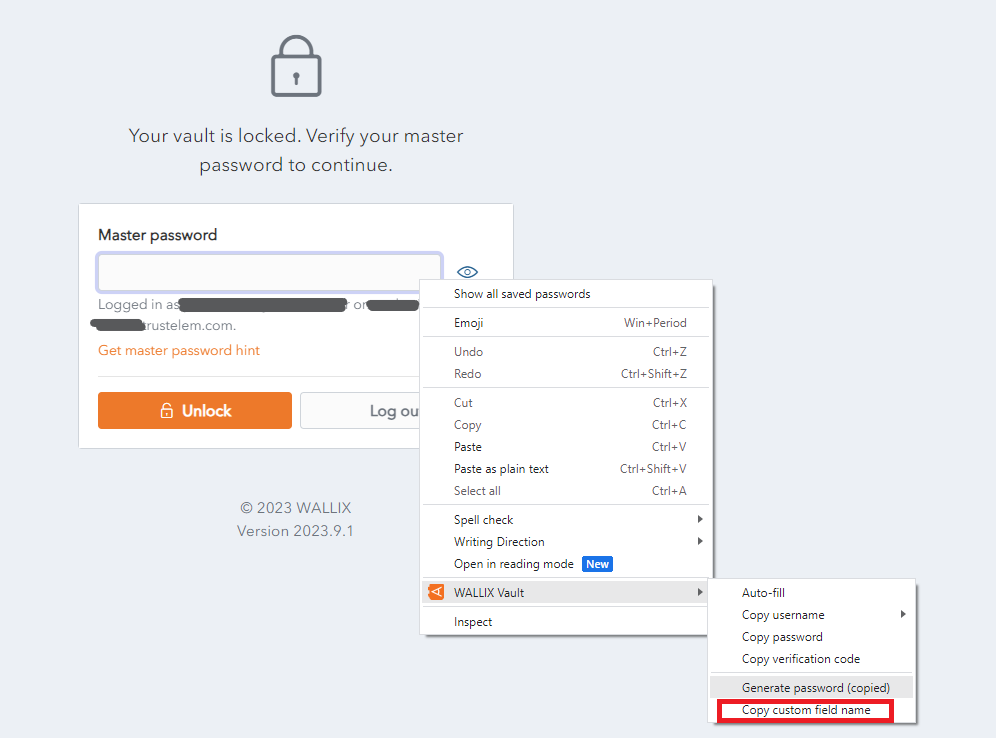
Paste the HTML Form element into the name field of the custom field that you are creating for Master Password.

From the Value dropdown, select Password in the case of a Custom field for password (as in the example above) or Username in the case of a Custom field for username.
This procedure is valid for Auto-field Custom fields can be created for the <form> and <input> elements.
Auto-Fill for Span Tags
A custom field can be created for the id attribute of <span> elements if the data-bwautofill attribute is present in the opening tag.
In the following example, you could create a Custom Field with the name of title. An auto-fill would replace the contents of title (currently "WALLIX Enterprise Vault" with the contents of the custom field.
<span data-bwautofill id="title">WALLIX Enterprise Vault</span>
Using URIs in Auto-fills
A Login Item can have one or more URIs. These are added from the Create Item or Edit Item Screen.

A URI is defined as a :
- Website address (URL)
- Server IP address
- Mobile App Package ID
- etc.
A URI is mandatory for a Login Item in order to auto-fill it into a web page.
URI Components
A URI is made up for a number of components.
https://www.google.com:8080/calendar/item?id=123&type=task
- Scheme https://
- Hostname www.google.com
- Subdomain www
- SLD (second level domain) google
- TLD (top level domain) com
- Port 8080
- Path calendar/item
- Query String ?id=123&type=task
URI Scheme
A URI Scheme should be specified as part of the URI. If it is not specified http:// is used by default.
However, if a Scheme is not specified by the user, the ![]() Launch button, to launch the website or app directly from the Vault, will not work.
Launch button, to launch the website or app directly from the Vault, will not work.

Examples of schemes are
- https:// or http:// are schemes that reference web pages, e.g. https://www.google.com
- androidapp::// is a scheme that references an Android app pacakge ID or name, e.g. androidapp://com.google.android
Mobile App URIs
Every mobile app has it's own URI. In order to save the login of an app into the Vault, it is necessary to save the URI of the app.
Locate App URI for iOS
From the App Login Screen on your iOS device, open the Browser Extension.
The New Item Screen displays and it is prepopulated with the URI of the App.
This only works if the App permits recuperating the URI.
The Item can be saved as a Login Item for this Mobile App.
Alternatively, the URI can be copied and pasted into another Login Item.
Locate App URI for Android
From the App page in the Google Play Store, locate the Share button.
Paste the link to an email or another file where it can be displayed.
The link will look something like this:
https://play.google.com/store/apps/details?id=com.twitter.android
The URI is the id value, in this example, com.twitter.android
URI Match Detection
Each URI associated with an Item in WALLIX Enterprise Vault has a number Match detection options in the that Match detection dropdown can be chosen.
The Match detection option chosen tells WALLIX how to match the URI of the Vault Item with the URI of the web page or mobile app for auto-filling.
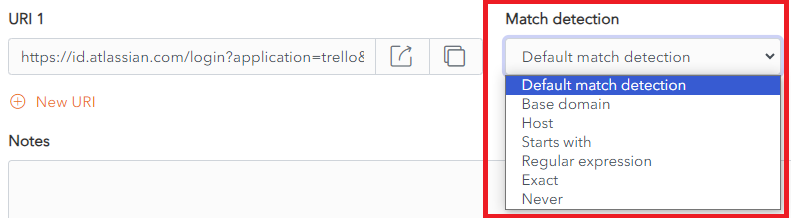
Defaut match detection
Base domain is the default option for URI match detection.
However, this can be changed in Settings > Auto-fill for all Items.
The Default match detection can be specified on a per item basis, in the Item Screen for each item. If not specified, the default option is used.
Base domain
If Base domain is chosen as the Default match detection for a URI, WALLIX will try to auto-fill all pages or apps where the top-level domain (TLD) or second-level domain (SLD) of the Page URI matches a the top-level domain or second-level domain of a Vault Item.
This works with country code top level domains only. Local TLDs, e.g. www.google.local do not work. Local TLDs work with Host matching.
For example,
https://google.com
Auto-fill works:
- www.google.com
- calendar.google.fr
Auto-fill does not work:
- www.google.net
Host
If Host is chosen as the Default match detection for a URI, WALLIX will try to auto-fill all pages or apps where the hostname (and port, if specified) of the Page URI matches a the hostname (and port, if specified) of a Vault Item.
For example,
https://calendar.google.com:8080
Auto-fill works:
- calendar.google.com:8080
- calendar.google.com:8080/home.html
Auto-fill does not work:
- www.google.com (different subdomain and missing port)
- www.google.com:8080 (different subdomain)
- calendar.google.com:8081 (different port)
Starts with
If Starts with is chosen as the Default match detection for a URI, WALLIX will try to auto-fill all pages or apps where the Page URI starts with the URI of a Vault Item.
For example,
https://www.google.com/home/
Auto-fill works:
- https://www.google.com/home/index.html
- https://www.google.com/home/
Auto-fill does not work:
- https://www.google.com
- https://www.google.com:8080/home/ (port number added)
- https://www.google.com/home (missing trailing slash)
Regular expression
If Starts with is chosen as the Default match detection for a URI, WALLIX will try to auto-fill all pages or apps where the Page URI matches a specified regular expression associated with the URI of a Vault Item.
Regular expressions are case insensitive.
For example,
^https://[a-z]+\.google\.com/index\.php
Auto-fill works:
- https://www.google.com/index.php
- https://fr.google.com/index.php
Auto-fill does not work:
- https://www.google.com/index/ (missing .php)
- https://malicious-site.com?q=google.com
For example,
^https://.*google\.com$
Auto-fill works:
- https://www.google.com
- https://fr.google.com/index.html
- https://malicious-site.com?q=google.com
URI matching with Regular Expressions is an advanced option and should only be used by those familiar with using Regular Expressions.
Periods (.) must be escaped (\) otherwise they will match on any character.
Auto-fill does not work:
- https://google.com/index/ (missing period (.))
Exact
If Exact is chosen as the Default match detection for a URI, WALLIX will try to auto-fill all pages or apps where the Page URI is an exact match for the URI of a Vault Item.
For example,
https://calendar.google.com/index.html
Auto-fill works:
- https://calendar.google.com/index.html
Auto-fill does not work:
- https://calendar.google.com/index.htm (index.htm instead of index.html)
- http://calendar.google.com/index.html (http instead of https)
- https://www.google.com/index.html (different subdomain)
For HTTPS, even if Exact matching is not used, the Browser Extension will warn before auto-filling a HTTP site if HTTPS is expected.
Never
If Never is chosen as the Default match detection for a URI, WALLIX will never try to auto-fill all pages or apps using that Vault Item.
Equivalent Domains
It is possible to link equivalent domains, or domains that use the same login.
For example, calendar.google.com can be linked with www.google.com.
This can be done in Settings > Domain Rules.
If Exact match detection is used an equivalent domain will not be allowed.
Auto-fill for iOS
Auto-fill is possible on an iOS device from your Browser Extension on Chrome or Firefox browsers.
Account Switching facilitates multiple logins at one time.
Auto-fill using Custom Fields is not supported on mobile devices.
Vault Timeout must be set to Lock (and not Log Out) if NFC is required for Two-factor Authentication.
Auto-fill using Keyboard
This is the recommended option.
Enable Auto-fill on Keyboard
From your iOS device, tap Settings > Passwords > Password Options.
The Autofill Passwords and Passkeys option is displayed.
Click AutoFill Passwords and Passkeys to toggle it on.
Click WALLIX Vault from the Use Passwords and Passkeys From List
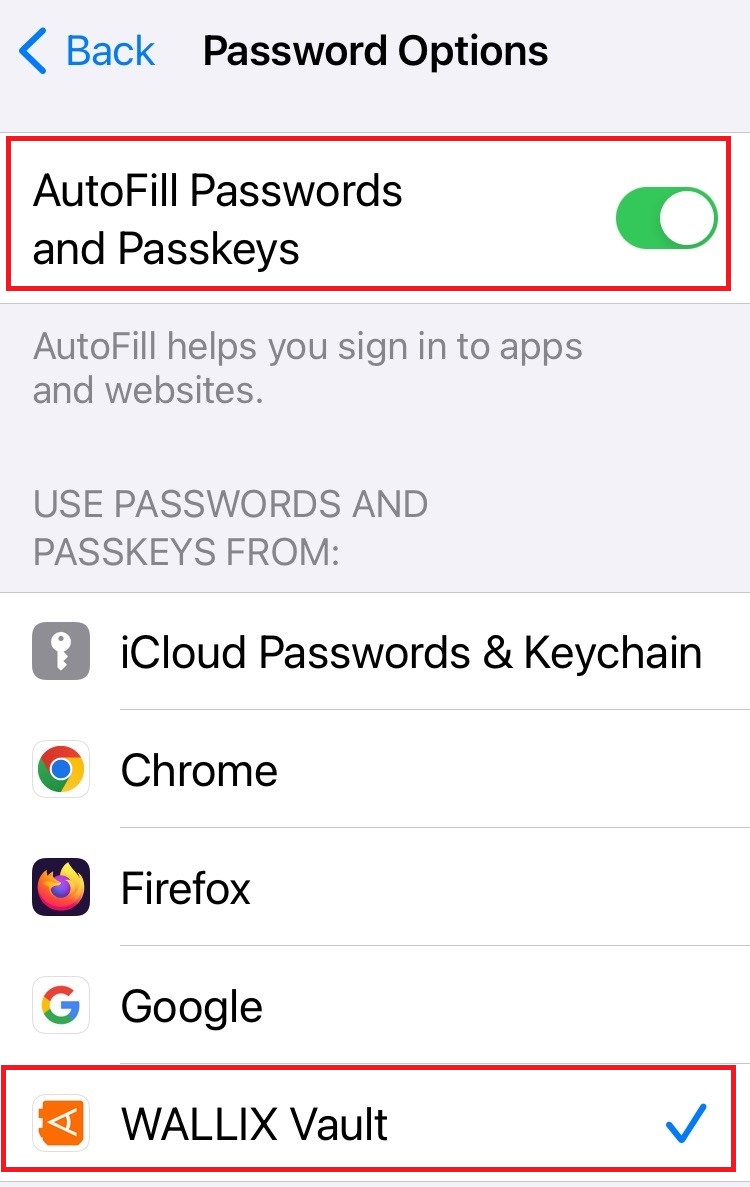
It is recommended that other Auto-fill services are disabled, like Chrome Password Manager or iCloud Passwords & Keychain.
Using Auto-fill on Keyboard
Open an app or website where you are not logged into.
Tap either the Username or Password Fields.
A Username or the Passwords button is displayed.
- If a Username is displayed, tap it. The Login is auto-filled.
- If the Passwords button is displayed, tap it. A list of Logins is displayed. Choose the Saved Login for this website. The Login is auto-filled.
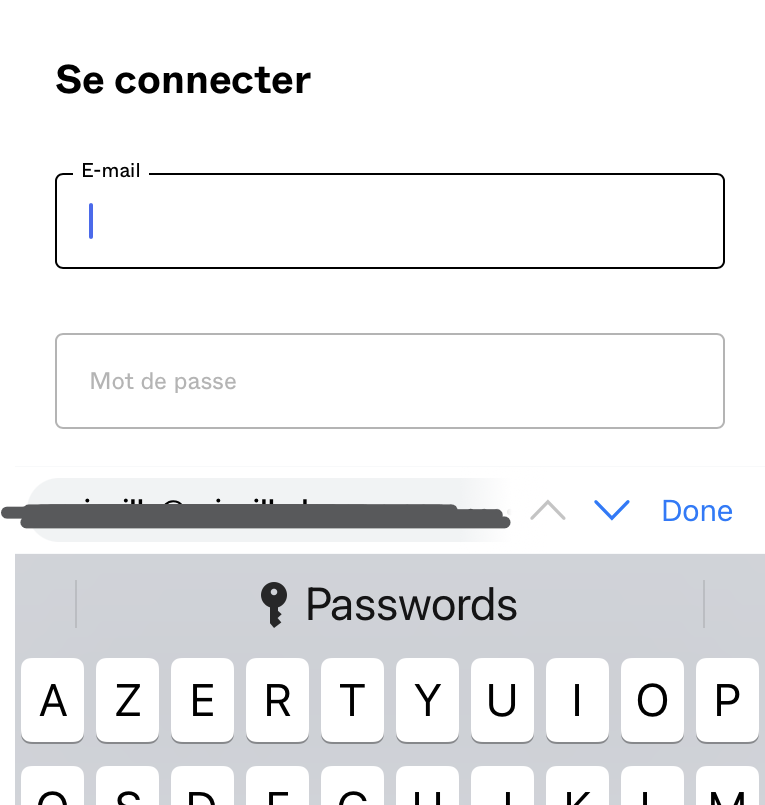
Where a Passwords button is displayed, it is likely because the website URI isn't an exact match on a URI associated with a Vault Item.
Auto-fill using Browser Extension
Enable Auto-fill in Browser Extension
From the WALLIX Browser Extension App, tap Settings > Autofill > App Extension
Tap Enable App Extension button.
Using Auto-fill in Browser Extension
Open an app or website where you are not logged into.
Tap the ![]() Share icon in the Address Bar.
Share icon in the Address Bar.
Click the WALLIX Vault icon. A list of matching Logins is displayed.

Choose the correct Login to auto-fill.
Auto-fill for Android
Auto-fill is possible on an Android device from your Browser Extension on Chrome or Firefox browsers.
Account Switching facilitates multiple logins at one time.
A number of auto-fill options are available, depending on the version of Android that your device is running.
- Auto-fill Service
- Inline Auto-fill
- Accessibility
- Draw-Over
Auto-fill using Custom Fields is not supported on mobile devices.
Vault Timeout must be set to Lock (and not Log Out) if NFC is required for Two-factor Authentication.
Auto-fill Service
This facilitates Auto-Fill from the Login Screen.
Auto-fill Service is available on Android 8+. It requires enabling of Auto-fill Services.
Enable Auto-fill Service
From WALLIX Android App, tap Settings > Auto-fill > Auto-fill Services
Tap WALLIX from the Auto-fill Services List.
Tap Confirm.
Using Auto-fill Service
Tap on Username or Password fields on a webpage or an app.
A pop up screen will display 2 options:
- The Matching Login Item from WALLX Vault. Tapping on this option auto-populates the Login.
- Auto-fill from WALLIX Vault. Tapping on this option opens the Vault if the Vault is unlocked to browse the available Login Items.
If WALLIX Vault is locked, you will be prompted to login to your Vault.
Inline Auto-fill
This facilitates Auto-Fill from the Keyboard Section.
Inline Auto-fill: Available on Android 11+. It requires enabling of Autofill Service and Input Method Editor (IME).
If it doesn't work, it is possible that your IME does not support inline.
Enable Inline Auto-fill
From WALLIX Android App, tap Settings > Auto-fill > Auto-fill Services
Tap the Use Inline Autofill option to toggle it on.
Using Inline Auto-fill
Tap on Username or Password fields on a webpage or an app.
Logins matching the URI are displayed in the keyboard section.
Choose the option required.
It is auto-filled into your webpage or app.
Accessibility
This facilitates Auto-Fill from the Login Screen.
Draw-Over is available in Android 6+. It requires Enabling of Accessibility and Drawover
Enable Accessibility
From WALLIX Android App, tap Settings > Auto-fill > Auto-fill Services
Tap the Use Accessibility option to toggle it on.
Using Accessibility
Tap on Username or Password fields on a webpage or an app.
A pop up screen displays an option to Auto-fill from WALLIX Vault.
Tap on this option.
If the Vault is unlocked, the Vault is opened.
If WALLIX Vault is locked, you will be prompted to login to your Vault.
Drawover
This facilitates Auto-Fill from the Login Screen.
Accessibility is available on all Android Versions. It requires Enabling of Accessibility.
Enable Drawover
From WALLIX Android App, tap Settings > Auto-fill > Auto-fill Services
Tap the Permit drawing over other apps option to toggle it on.
Using Drawover
Tap on Username or Password fields on a webpage or an app.
A pop up screen displays an option to Auto-fill from WALLIX Vault.
Tap on this option.
If the Vault is unlocked, the Vault is opened.
If WALLIX Vault is locked, you will be prompted to login to your Vault.
Import / Export data
Exchange data with another Vault product.
Import / Export Data Overview
Data can be imported into or exported from either an Individual Vault or a Shared Vault.
In this way, data can be exported from one vault and the data reimported into another Vault.
- Import Data: Data can be imported into a Vault using a variety of file formats. Data is encrypted locally before being sent to the server for storage.
- Data Import Errors : If the data does not conform with the WALLIX Enterprise Vault data requirements, a data import error message is displayed. The data can be corrected before being imported.
- Export Unencrypted Vault: A Vault can be exported and downloaded to your computer without first being encrypted. This is possible for Individual and Shared Vaults.
- Export Encrypted Vault: A Vault can be encrypted using one of two methods (Account restricted or Password protected) before being exported.
- Reimport Encrypted Export: When data is exported using the Account Restricted method, it can be reimported into the same vault.
Import Data
This procedure applies to Individual Vaults and Shared Vaults.
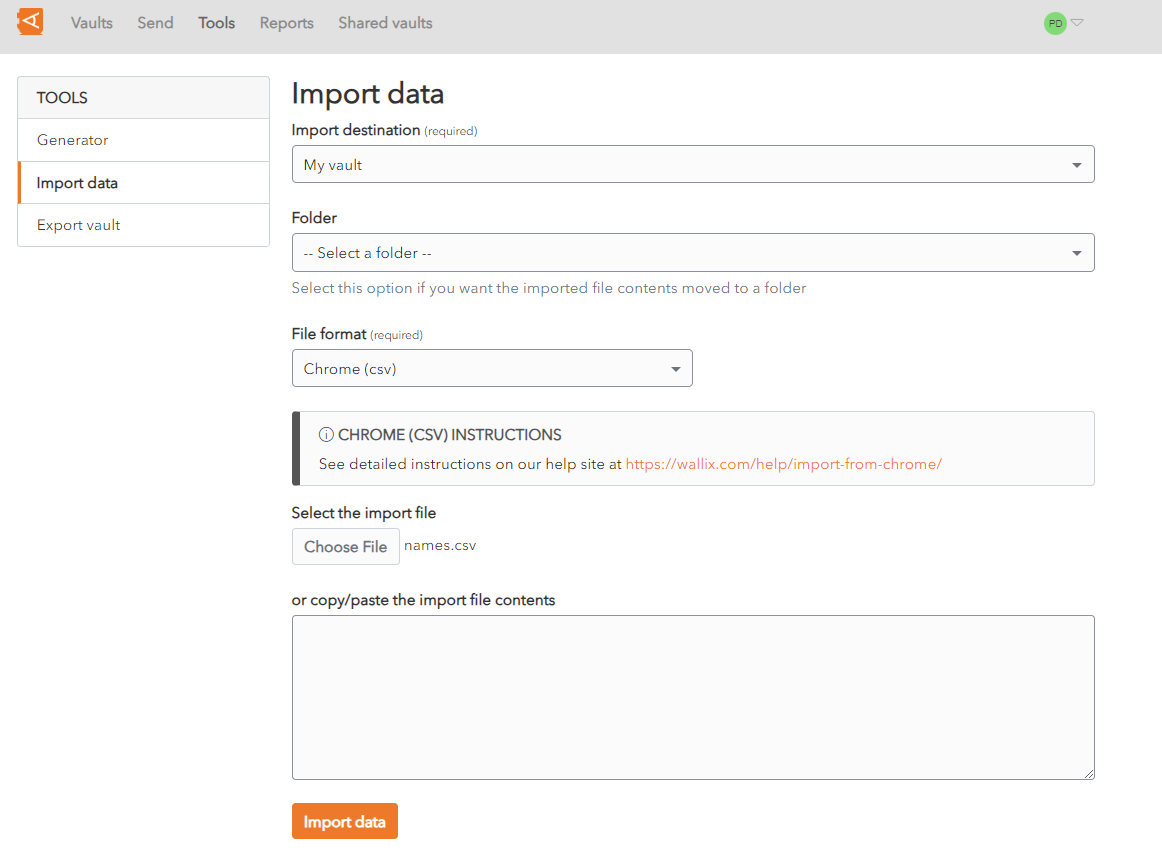
From the Import Destination dropdown, choose a Vault into which to import the data. This field is mandatory.
From the Folder dropdown, choose the folder into which to import the data. This field is optional.
From the File format dropdown, choose the file format of the file to import. Instructions are displayed relative to the file format chosen. This field is mandatory.
From the Select the import file field, locate and choose the file to import.
Alternatively, copy/paste the import file contents to the large text field provided.
Click Import data to start the import. The data is imported.
If the import file is password protected, you will be prompted to enter the Password before the import can start.
A Confirmation Screen is displayed, summarizing the data imported.
Click Ok to return to the Item List Screen.
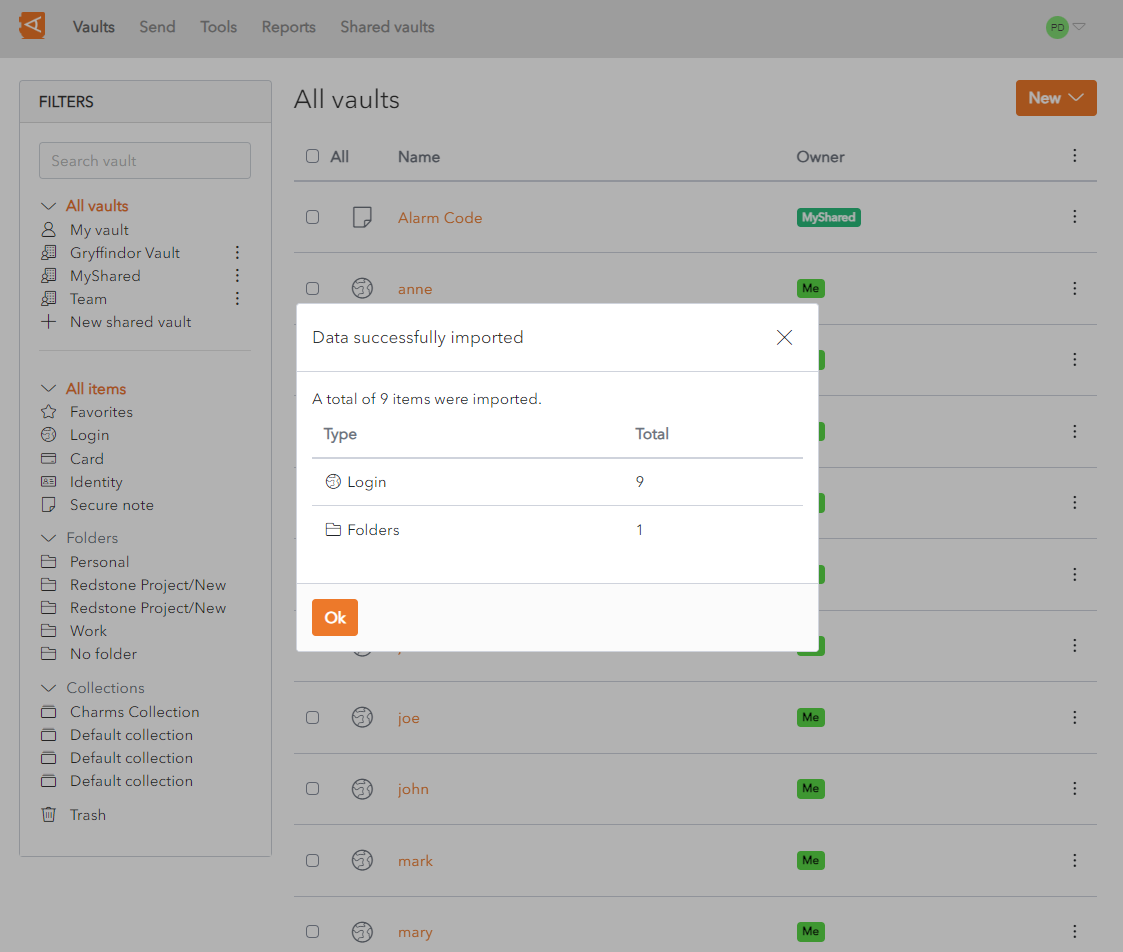
Attachments, Password History, Sends and Trash cannot be imported using this feature. They need to be entered manually.
The Data Import feature does not verify if items imported are already in your vault. If an Item is imported and already exists in the Vault, a duplicate item is created.
When the import has finished, it is recommended that you delete the import file from your computer, for security reasons.
Data Import Errors
WALLIX Enterprise Vault imposes character counts on different fields types. If an import file contains data that exceeds the encrypted character limit for the field type, the file will not be imported.
When the data is encrypted those character counts grow between 30-50%. Therefore, a field that was within the required character limit before the encryption may exceed the character limit after encryption.
The following is an example Import Error message that could be displayed when an import fails:
[1][Login] "BestBank": The fields Notes exceeds the maximum encrypted value length of 10000 characters.
-
[1] denotes the index number of the item in question. This would typically be the row number in a CSV file, for example.
-
[Login] indicates that the item type is Login.
-
"BestBank" denotes the name of the item in question.
-
Notes denotes the name of the field where the character limit is exceeded.
-
10000 denotes the allowed character limit for that field.
Export Unencrypted Vault
Export from Individual Vault
From the file format dropdown, choose the export file format.
Click Confirm format.
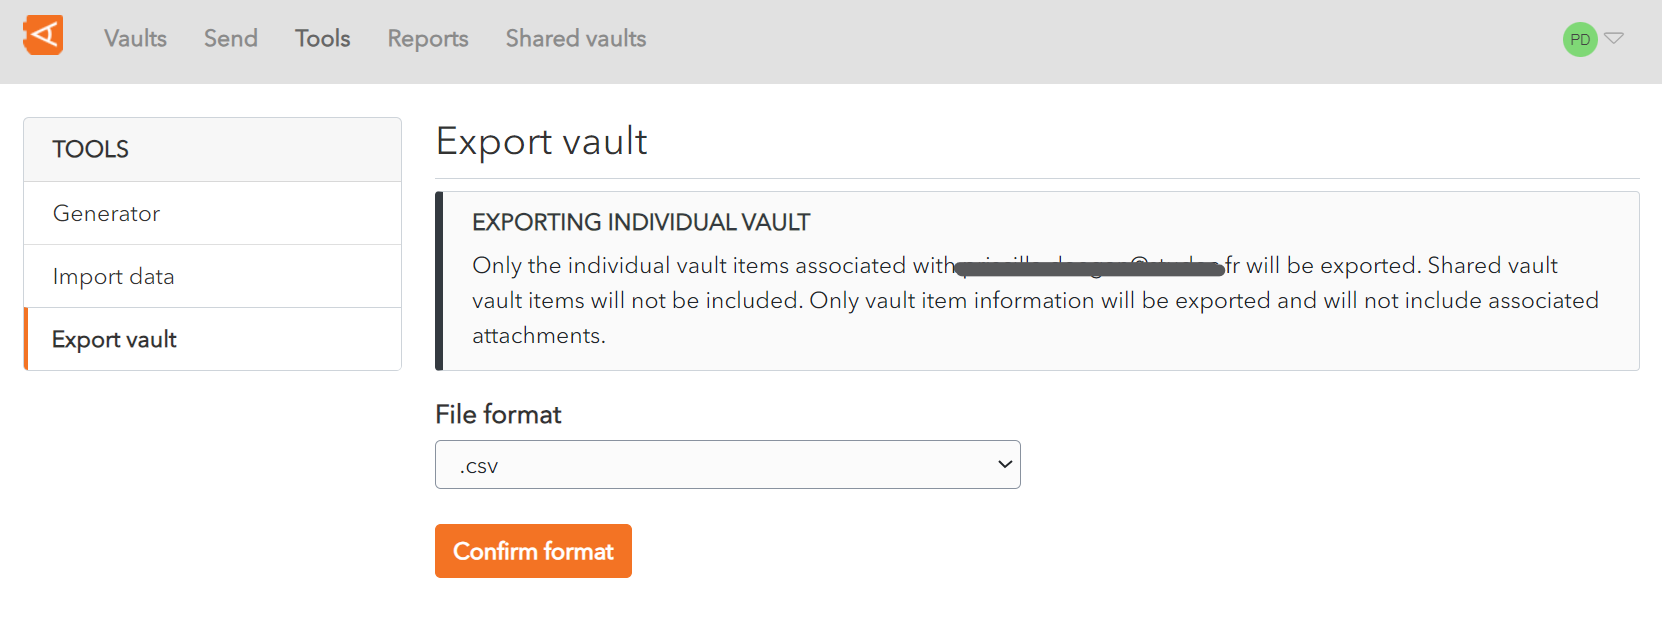
A Confirm vault export screen is displayed.
Enter your Master Password in the Master Password field.
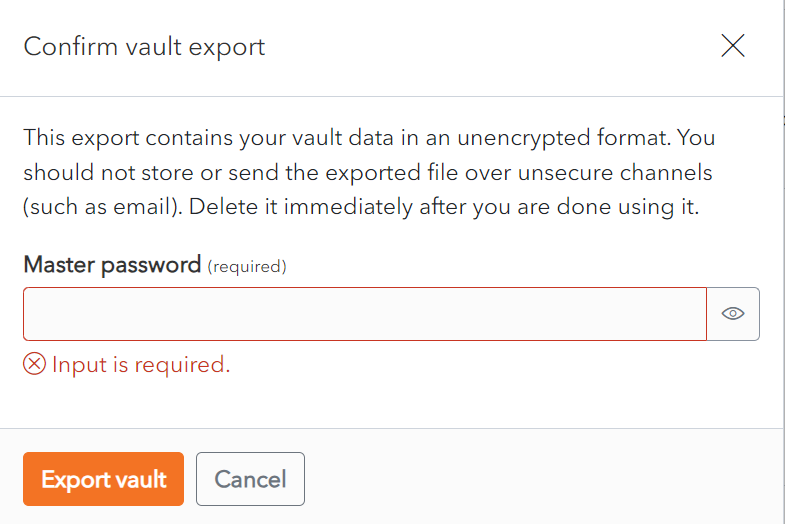
Click Export Vault to export the vault.The data is exported to the Downloads Folder on your computer.
Alternatively, click Cancel to cancel the operation.
Note on data included in export:
Only the individual vault items associated with your account are exported.
Only vault item information will be exported and will not include associated attachments.
Export from Shared Vault
From the Settings Screen of the Shared Vault chosen, click on the Export vault link. The Export Vault Screen is displayed.

From the file format dropdown, choose the export file format.
Click Confirm format.
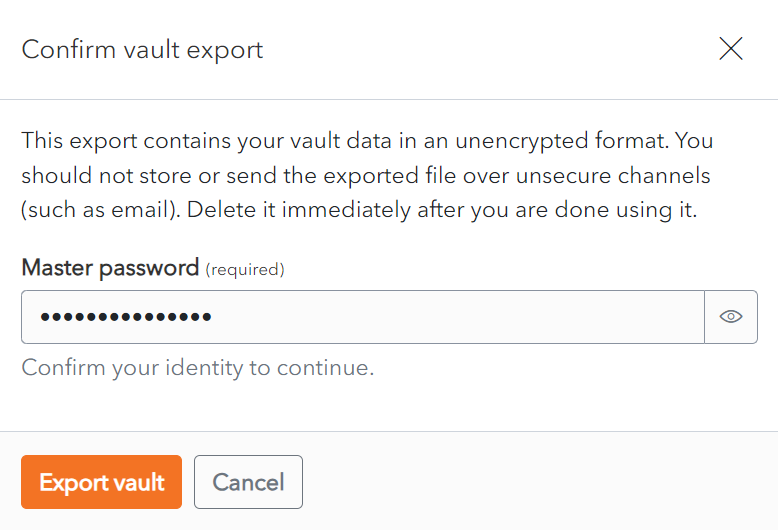
Click Export Vault to export the vault. The data is exported to the Downloads Folder on your computer.
Alternatively, click Cancel to cancel the operation.
Note on data included in export:
Only the items associated with the Shared Vault selected are exported.
Items in individual vaults or other shared vaults will not be included.
Export Encrypted Vault
Export from Individual Vault
From the file format dropdown, choose the .json (Encrypted).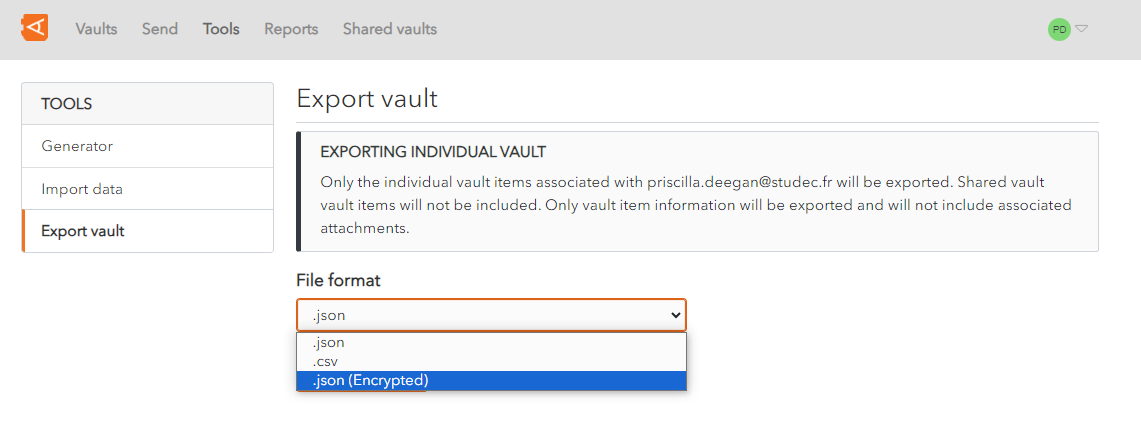
An Export type option appears, with 2 options to choose from:
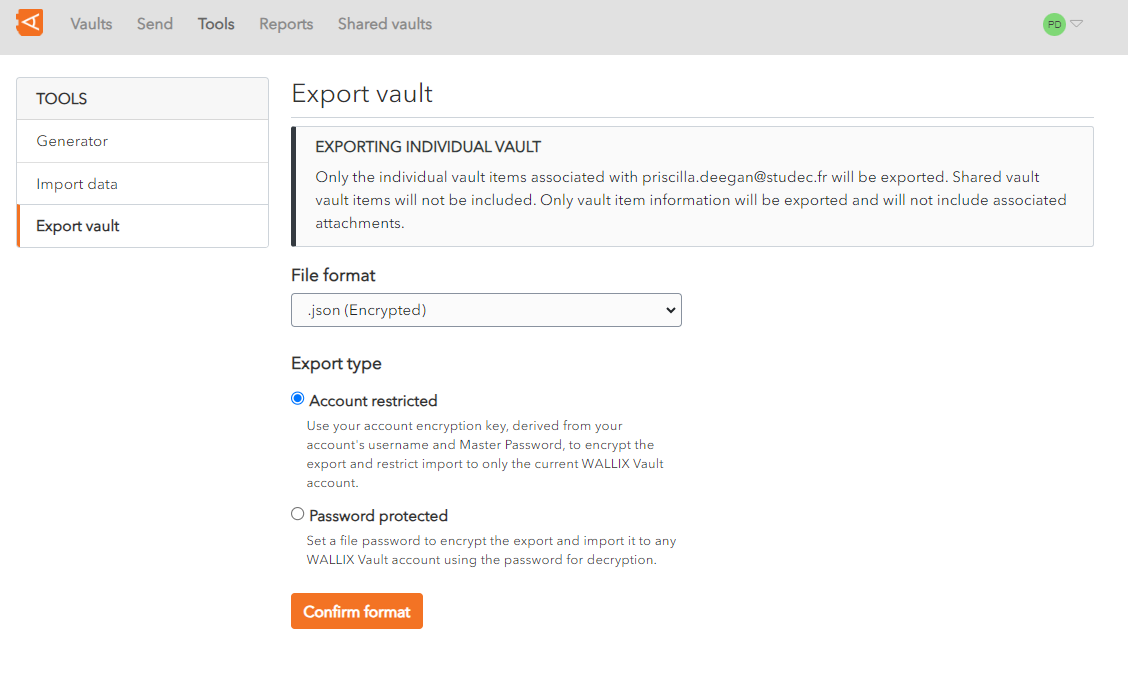
1. Export as Account restricted Vault
Use your account encryption key, derived from your account's username and Master Password, to encrypt the export.
The data can only be reimported into the same vault.
Choose the Account restricted option.
Click Confirm format.
A Confirm vault export screen is displayed.
Enter your Master Password in the Master Password field.
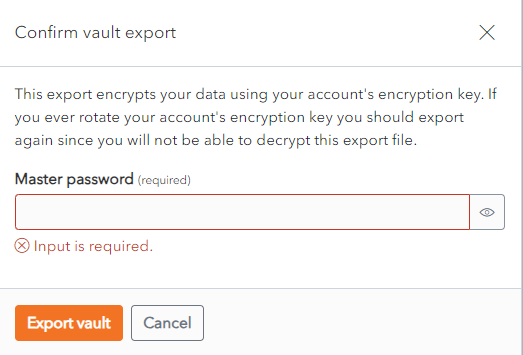
Click Export Vault to export the encrypted vault.The data is exported to the Downloads Folder on your computer in Wallix JSON format.
This data can only be reimported into the same vault.
Alternatively, click Cancel to cancel the operation.
2. Export as Password protected Vault
Password Protected: Use a password of your choosing to encrypt the export. The data can be imported into any WALLIX Enterprise Vault.
Choose the Password protected option.
2 new fields appear - File Password and Confirm file password.
Choose a password to encrypt your export with.
Enter your chosen password into these fields.
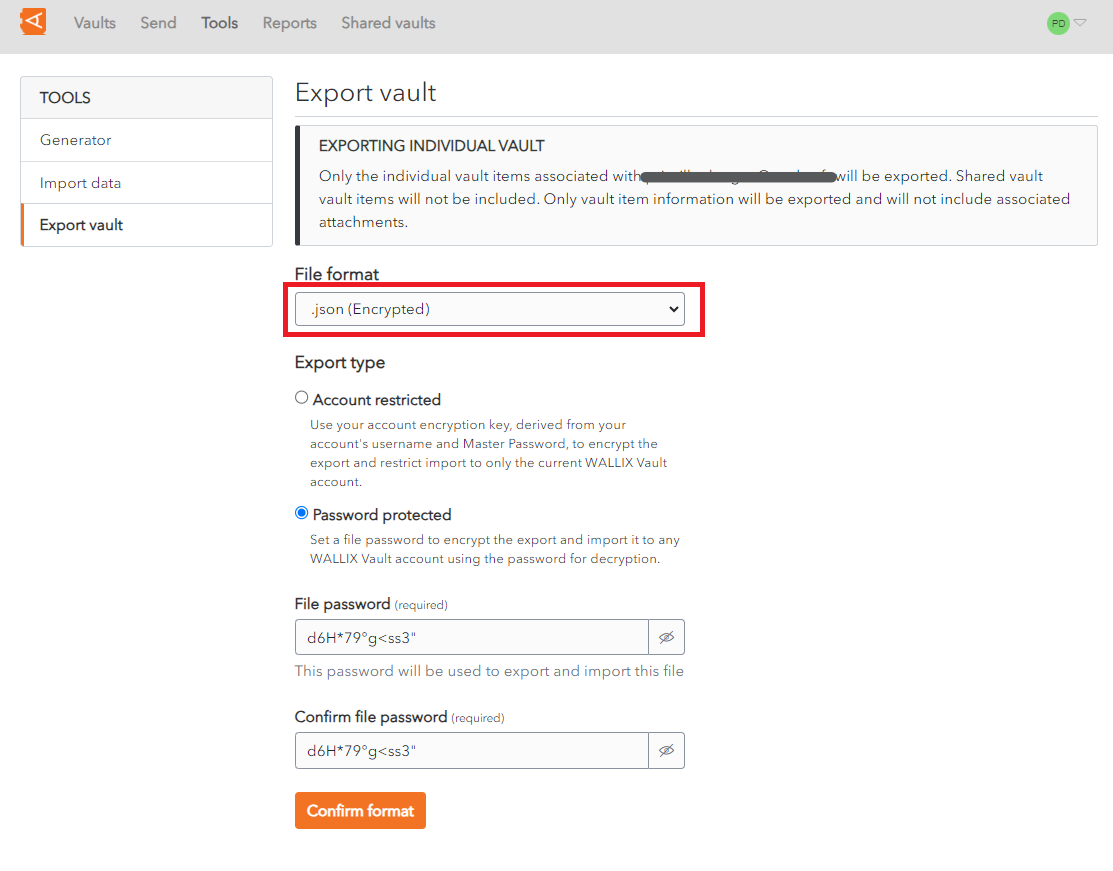
Click Confirm format.
A Confirm vault export screen is displayed.
Enter your Master Password in the Master Password field.
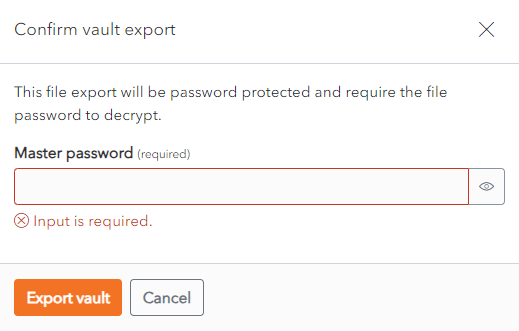
Click Export Vault to export the encrypted vault.The data is exported to the Downloads Folder on your computer.
Alternatively, click Cancel to cancel the operation.
Note on data included in export:
Only the individual vault items associated with your account are exported.
Only vault item information will be exported and will not include associated attachments.
Export from Shared Vault
From the Settings Screen of the Shared Vault chosen, click on the Export vault link. The Export Vault Screen is displayed.
The rest of the procedure is the same as for exporting encrypted individual vault data.
Note on data included in export:
Only the items associated with the Shared Vault selected are exported.
Items in individual vaults or other shared vaults will not be included.
Reimport Encrypted Export
It is possible to reimport an Exported Encrypted Vault.
From Tools > Import Data, the Import Data screen appears.
From the Import destination dropdown, choose the Vault to import the data to. This is a required field.
Encrypted vaults can only be reimported into the Vault they were exported from.
From the Folder dropdown, choose the Folder to save the Vault data to.
From the File Format dropdown, choose Wallix Vault (json) format. This is the file format that the Encrypted Exported Vault.
From Select the import file, choose the encrypted vault to reimport.
Click the Import Data button to reimport the Encypted Exported Vault. The Vault data is reimported to the specified vault and folder.
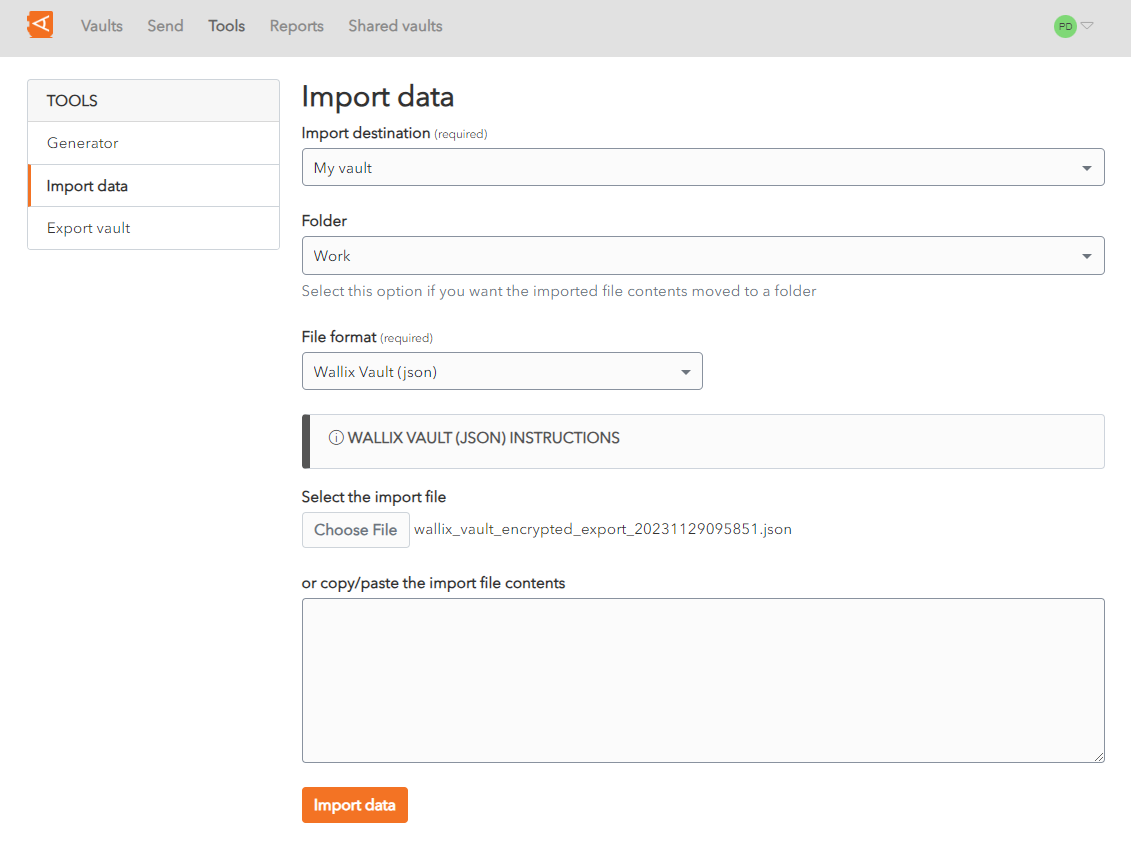
Alternatively, click Cancel to cancel the operation.
Avanced options
Learn how to go further with Entreprise Vault.
Options Overview
When you login to WALLIX Vault, the Vault Home Screen is displayed.
A number of options are possible within your Vault:
- You can Search and Filter to find Items in the Vault.
- In the Preferences Screen, you can set your Timeout Preferences, Change Language, Change Theme, etc.
- You can set Domain Equivalencies for Domains that use the same Login.
- Sync Vault to synchronise the Vault Items in the Web Browser Extension.
- User and Configure Shortcuts.
- Make the most of Custom Fields to add additional fields to Items and to enable Auto-filling on some fields.
- TOTP Authentication is available in the Web Vault, the Browser Extension and the WALLIX Authenticator App, to generate a TOTP code based on an Account Authentication Key.
- The Username and Password Generator can generate usernames, passwords or passphrases for Login Items.
- WALLIX Vault provides a number of Reports to ensure the security of passwords, logins and websites that are stored in the Vault.
- It is possible to Deauthorize Sessions on all logged-in devices. This is especially useful if you accessed WALLIX Vault from a public computer.
- The Vault can be purged of its data or deleted entirely.
Preferences
Click on the User Icon, on the top right-hand side of the screen, to display the User Menu.
Click on Account Settings and then Preferences. The Preferences Screen is displayed.
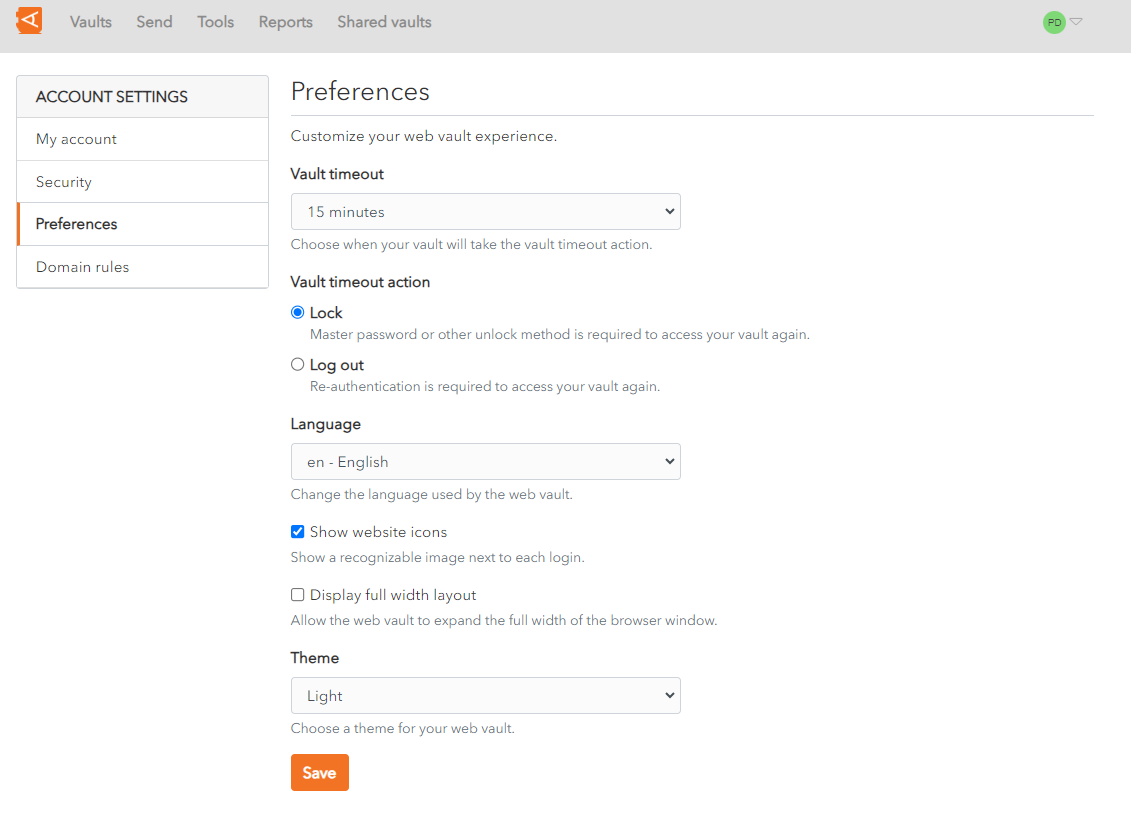
The following options are possible:
- Vault timeout: Set the Vault timeout from the dropdown. The default is 15 minutes.
- Vault Timeout action: Choose Lock or Log-out as the action to take on timeout. The default is Lock.
- Language: Choose the language of the user interface.
- Show website icons: Check to show a recognizable image beside each Login. This is checked by default.
- Display full width layout: Check to allow the Web Vault to take up the full width of the browser window. This is unchecked by default.
- Theme: Choose from the dropdown. Options include Light, Dark and System Theme.
Click Save to save changes.
Change Language
By default, WALLIX Enterprise Vault uses the language of the Web Browser.
To change the language of the screens in WALLIX Enterprise Vault, click on the Account Settings button in the User Menu.

This opens the Preferences Screen.
Choose the language from the Language dropdown menu.
Click the Save button to save the user interface language.
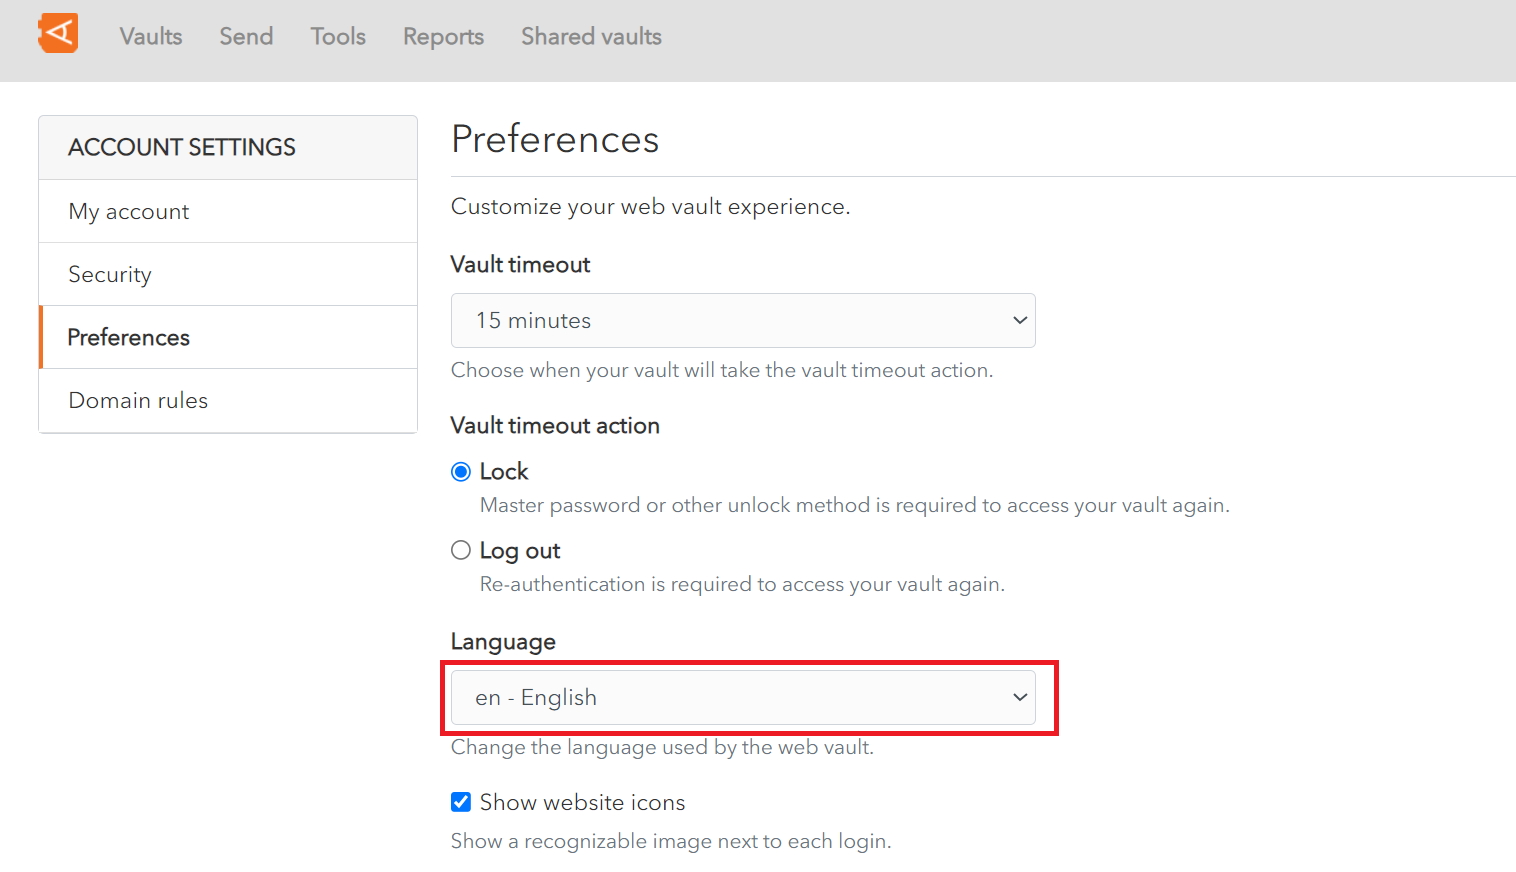

Supported Languages
The following list of languages are currently supported.
Note: Not all languages are supported on all client applications.
|
Symbol |
Language |
|---|---|
|
af |
Afrikaans |
|
az |
Azərbaycanca |
|
be |
Беларуская |
|
bg |
български |
|
ca |
català |
|
cs |
čeština |
|
da |
dansk |
|
de |
Deutsch |
|
el |
Ελληνικά |
|
en |
English |
|
en-GB |
English (British) |
|
eo |
Esperanto |
|
es |
español |
|
et |
eesti |
|
fa |
فارسی |
|
fi |
suomi |
|
fr |
français |
|
he |
עברית |
|
hi |
हिन्दी |
|
hr |
hrvatski |
|
hu |
magyar |
|
id |
Bahasa Indonesia |
|
it |
italiano |
|
ja |
日本語 |
|
ko |
한국어 |
|
lv |
Latvietis |
|
ml |
മലയാളം |
|
nb |
norsk (bokmål) |
|
nl |
Nederlands |
|
pl |
polski |
|
pt-BR |
português do Brasil |
|
pt-PT |
português |
|
ro |
română |
|
ru |
русский |
|
sk |
slovenčina |
|
sr |
Српски |
|
sv |
svenska |
|
th |
ไทย |
|
tr |
Türkçe |
|
uk |
українська |
|
vi |
Tiếng Việt |
|
zh-CN |
中文(中国大陆) |
|
zh-TW |
中文(台灣) |
Domain Equivalencies
It is possible to link equivalent domains, for example, google.com, youtube.com and gmail.com.
This is useful where mulitple domains use the same login credentials.
Click on the User Icon, on the top right-hand side of the screen, to display the User Menu.
Click on Account Settings and then Domain Rules. The Domain Rules Screen is displayed.
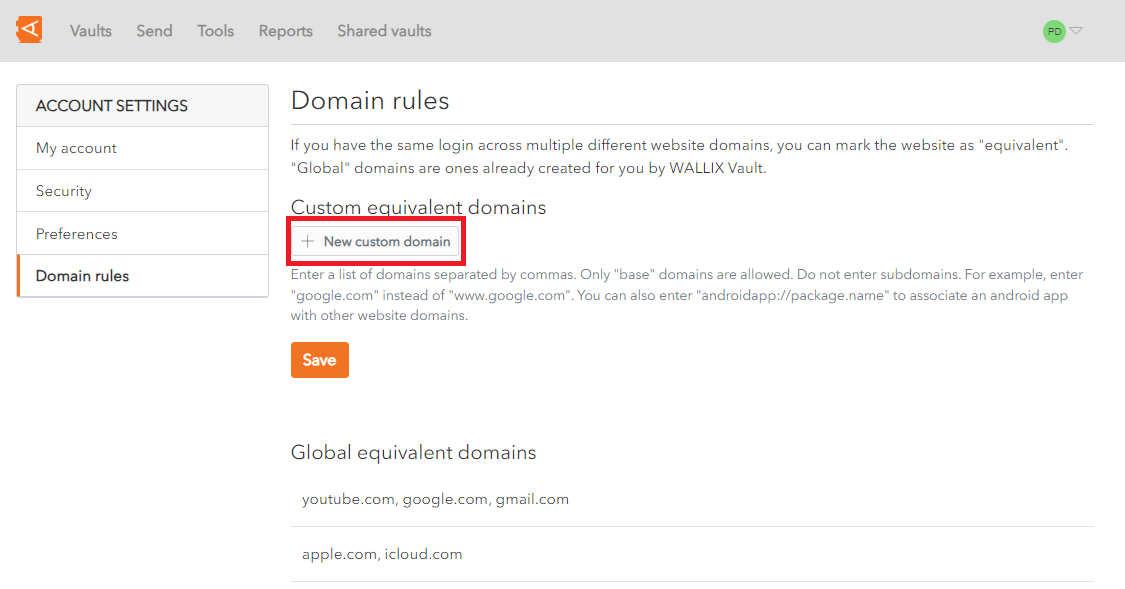
Click the new custom domain button.
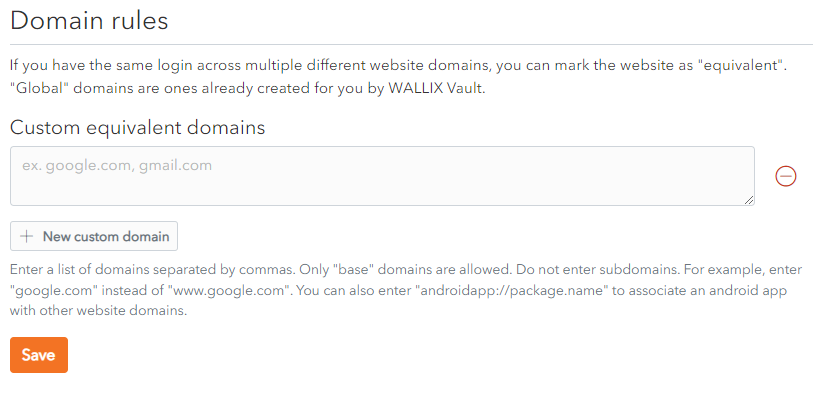
Enter the equivalent domains, delimited by a , comma.
Click Save to save changes.
Sync Vault
This is available the for WALLIX Web Extension.
From Settings > Sync, the Sync Screen is displayed.
Tap the Sync vault now button to Sync the Vault Data in the Web Extension.
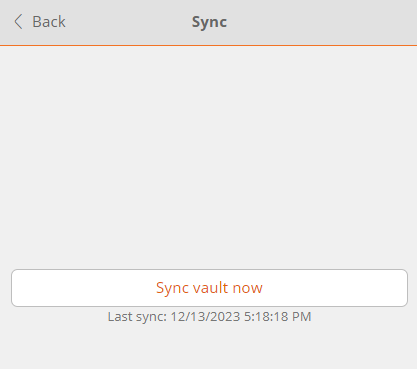
Shortcuts
WALLIX can use shortcuts for certain functions:
- Activate the extension
- Auto-fill the last used login for the current website
- Generate and copy a new random password to the clipboard
- Lock the vault
Shortcuts can be configured in the web browser.
Chrome
The shortcuts are displayed and can be modified.
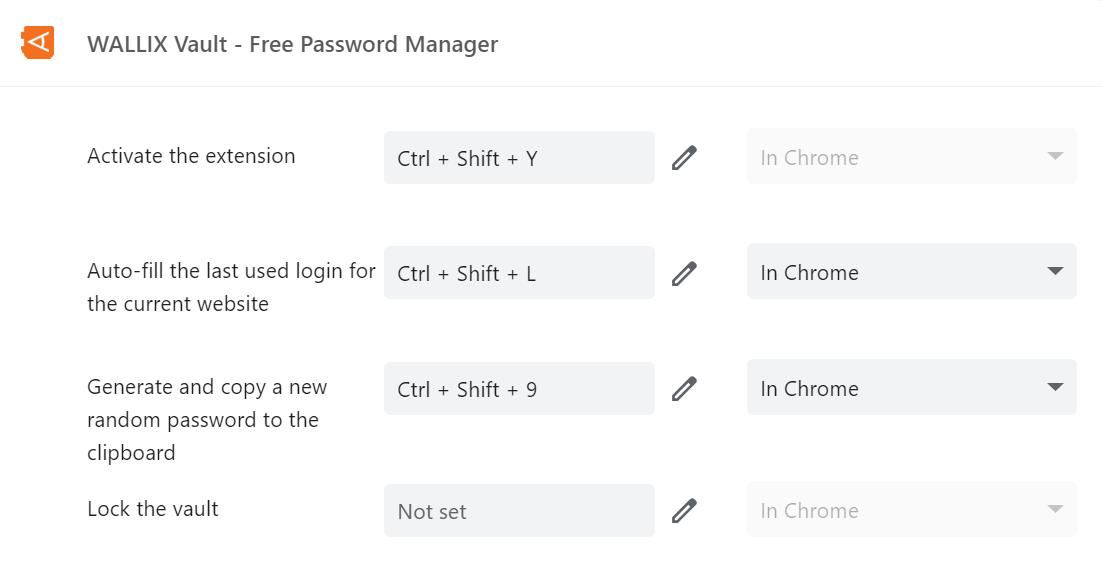
Firefox
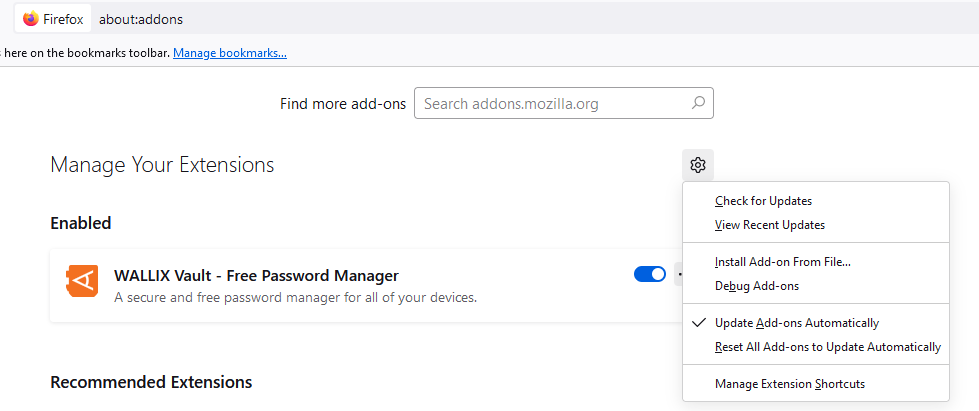
The shortcuts are displayed and can be modified.
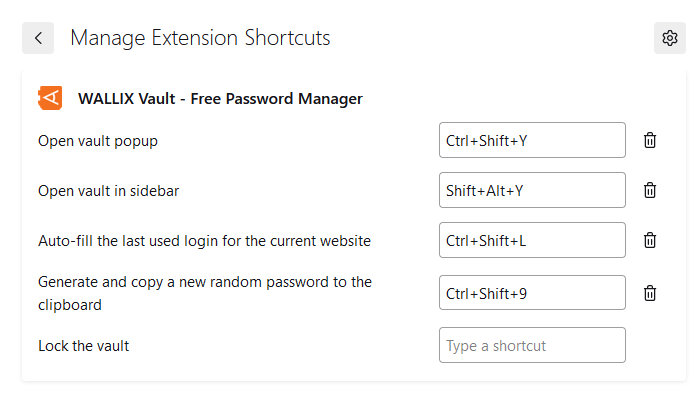
Custom Fields
Create Custom Fields
From the Item Screen, you can also add one or more Custom fields by choosing the field type from the dropdown menu and clicking on the New Custom Field button.
A Custom field has Name and Value properties. The Value field can be of type Text, Boolean, Hidden or Linked.
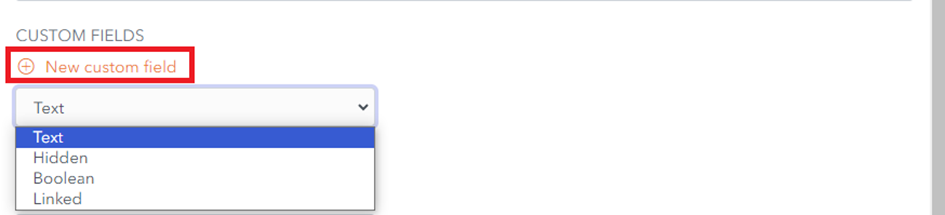
- A Text custom field can hold a text value.
- A Hidden custom field can hold a hidden value and is typically used for passwords. This field can be displayed or hidden using the Display/Hide toggle button.
- A Boolean custom field can hold a true/false value and is typically used for yes/no choices.
- A Linked custom field can link to a Username or Password. Linked Fields are used for certain auto-fill options.
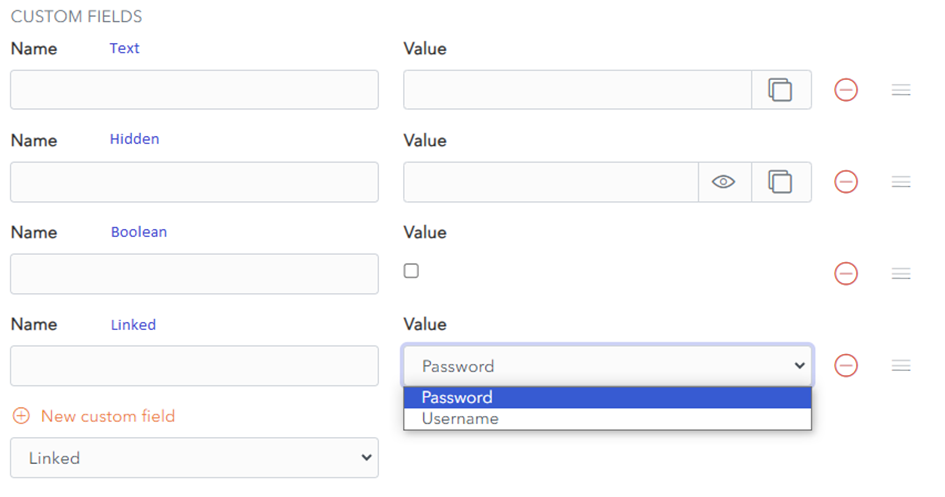
Custom Field Names
The Naming of Custom Fields, that are linked to Login Fields for auto-fill purposes, should take into account the following rules.
Order of Preference
The 4 attributes of the HTML Form Element of the Linked Field take the following order of preference:
- id
- name
- aria-label
- placeholder
Matching
Custom Fields are matched based on exact and case-insensitive comparison, e.g. for the field mylogin
- Matched Names: MyLogin, myLogin
- Unmatched Names: mylogin2, login
Prefixing
Prefixes can be used to influence matching.
csv Prefix
To add multiple possible logins, use the prefix csv=.
For example, if a custom field is named csv=mylogin,MyLogin, myLogin, field name matching will work on mylogin or MyLogin or myLogin.
regex Prefix
To allow matching based on regular expressions, use the prefix regex=.
For example, regex=^myLogin will match on myLogin, or MyLogin.
Username or Password Generator
WALLIX Vault provides a Generator Feature to automatically generate a Username or Password based on certain criteria.
Username Generator
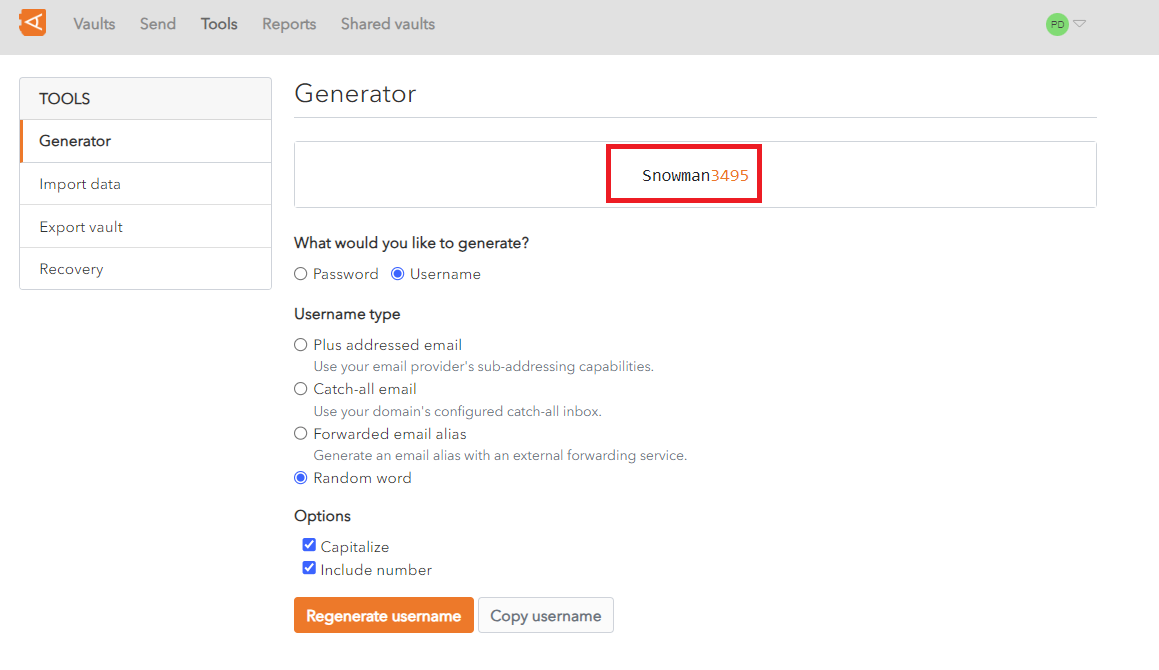
In the What could you like to generate? Field, click Username.
In the Username type field, choose from the following options:
- Plus addressed email: uses your email provider's sub-addressing capabilities for the generated username
- Catch-all email: uses your domain's configured catch-all inbox for the generated username
- Forwarded email alias: generates an email alias with an external forwarding service for the generated username
- Random word: choose a random word for the generated username
In the Options section:
- Check Capitalize to capitalize the letters in the generated username
- Check Include number to include a number in the generated username
Click Regenerate username button to regenerate a username. The generated username displays at the top of the screen. In this example it is Snowman3495.
Click Copy Username to copy the generated username to the clipboard.
Password Generator
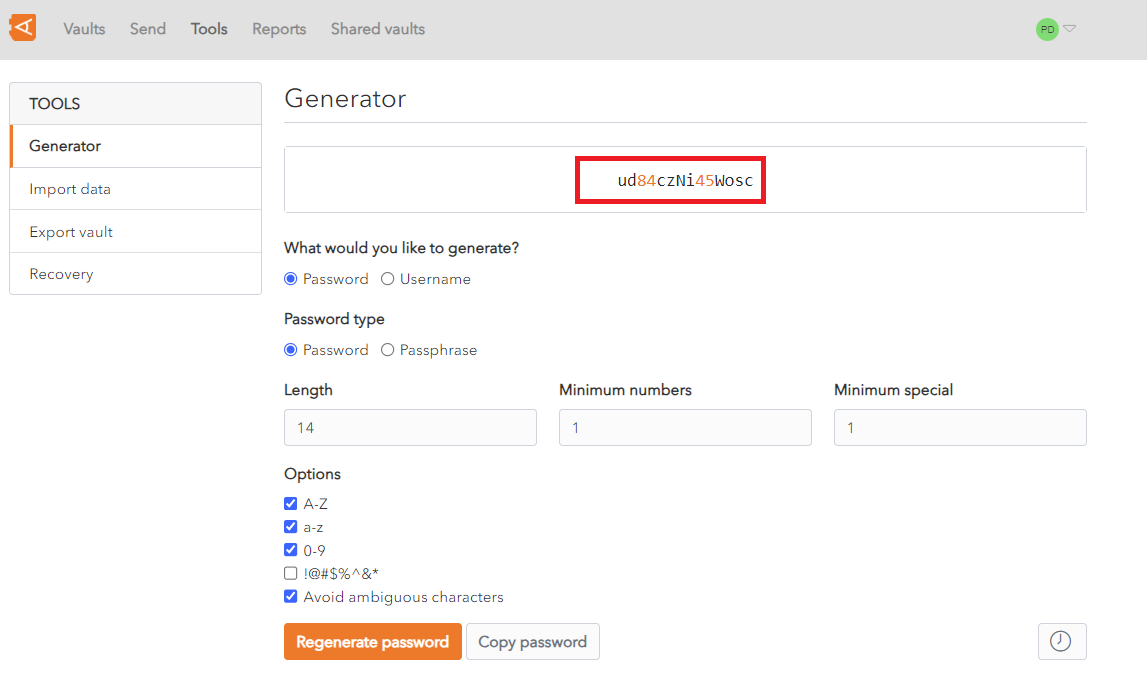
In the What could you like to generate? Field, click Password
In the Password type field, choose either a Password or a Passphrase. A passphrase is a group of randomly generated concatenated words, e.g. hopeful-best-crazy-uses-glasses
If Password is chosen as the Password Type, the following options are available:
- In the Length field enter the required password length
- In the Minimum numbers field enter the minimim number of numbers required in the password
- In the Minimum special field enter the minimim number of special characters required in the password
- In the Options section:
- Check A-Z if the generated password should contain upper case letters. This is checked by default
- Check a-z if the generated password should contain lower case letters. This is checked by default
- Check 0-9 if the generated password should contain numbers. This is checked by default
- Check !@#$%^&* if the generated password should contain special characters. This is unchecked by default
- Check Avoid ambiguous characters to exclude ambiguous characters from the generated username, i.e. 1 and I or 0 and o. This is checked by default
If Passphrase is chosen as the Password Type, the following options are available:
- In the Number of words field enter the number of words required in the passphrase. The Default is 3 words
- In the Word separator field enter the separator to use to concatenate the words in the passphrase. The Default is -
- In the Options section:
- Check Capitalize to capitalize the letters in the generated passphrase
- Check Include number to include a number in the generated passphrase
Click Regenerate username button to regenerate a username. The generated username displays at the top of the screen. In this example it is Snowman3495
Click Copy Username to copy the generated username to the clipboard
Mobile App
This feature is also available on the WALLIX Mobile App, either from the Generator option or the Add/Edit Screen. The exact location depends on the Mobile Device used.
Reports
A number of reports are available in WALLIX Vault.
Click Reports from the Top Menu to access the Reports Screen.
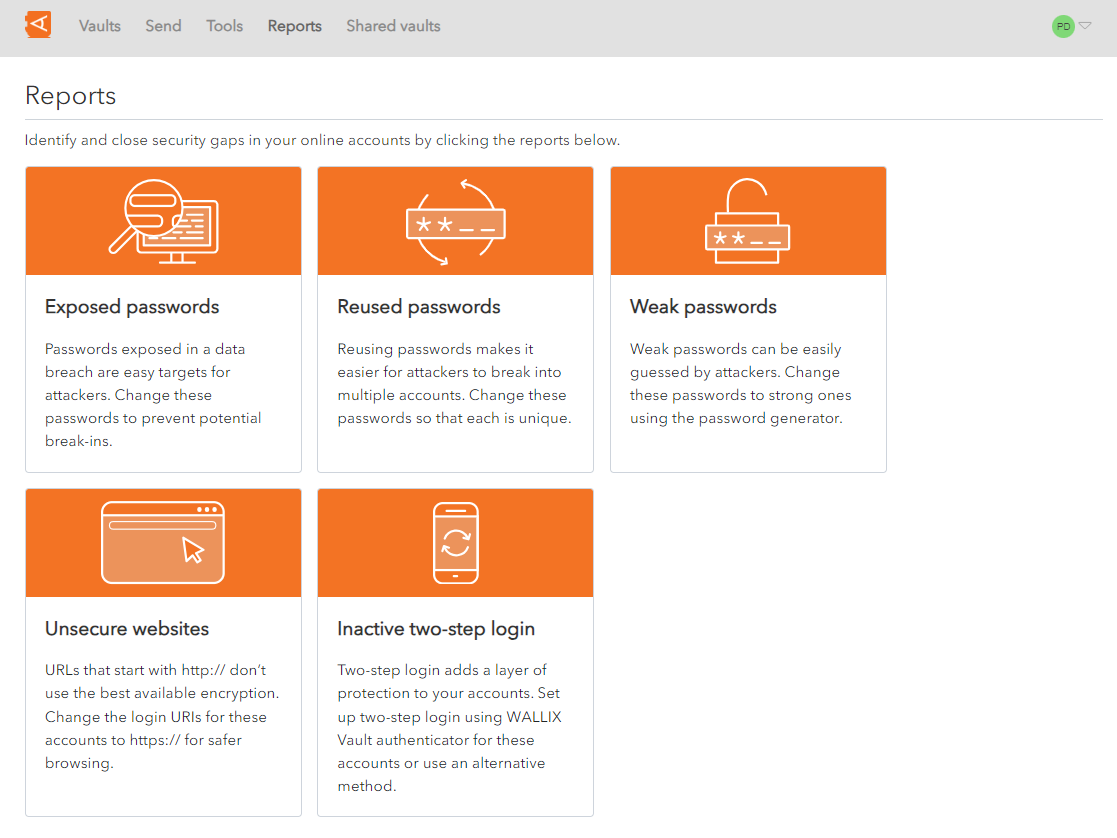
Exposed passwords
Click on the Exposed Passwords Icon to view this report.
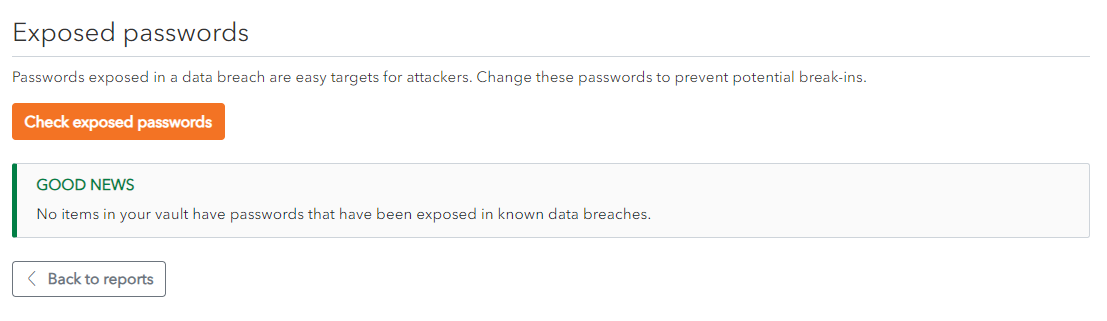
Reused passwords
Click on the Reused Passwords Icon to view this report.
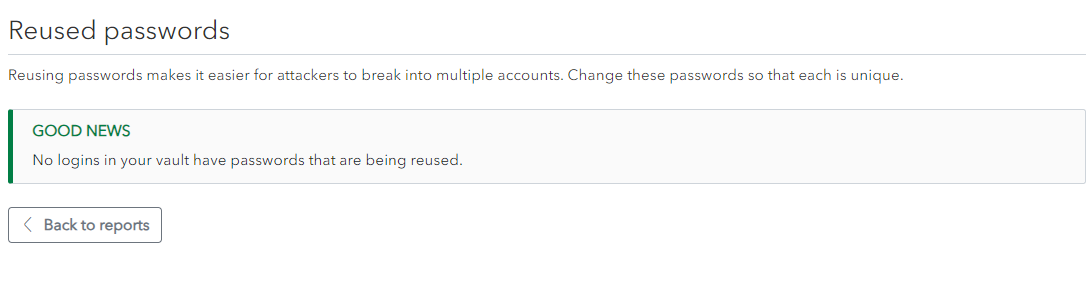
Weak passwords
Click on the Weak Passwords Icon to view this report.
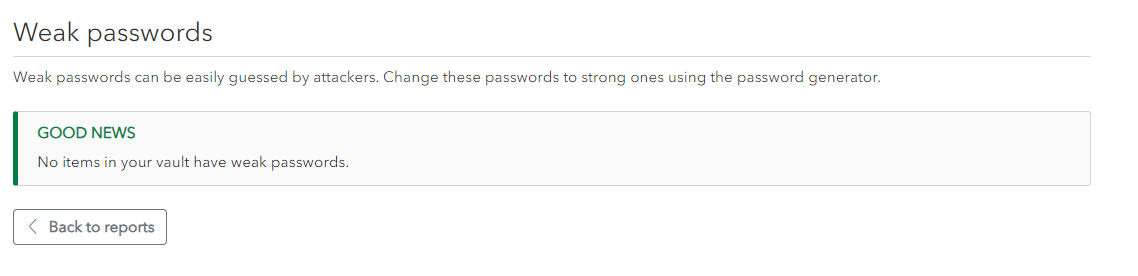
Unsecure websites
Click on the Unsecure websites Icon to view this report.
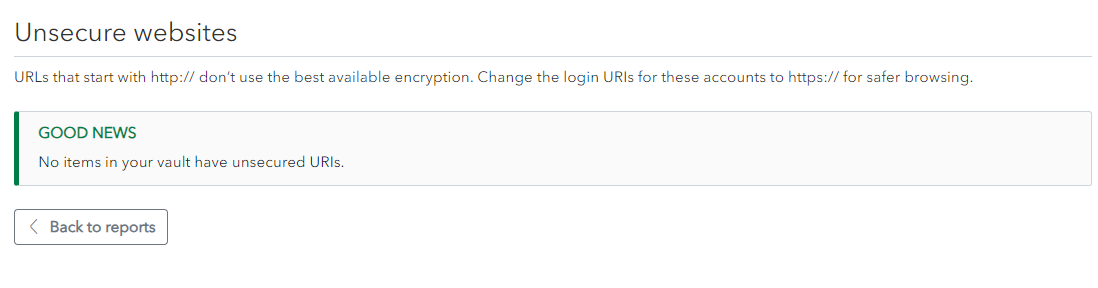
Inactive two-step login
Click on the Inactive 2 two-step login Icon to view this report.
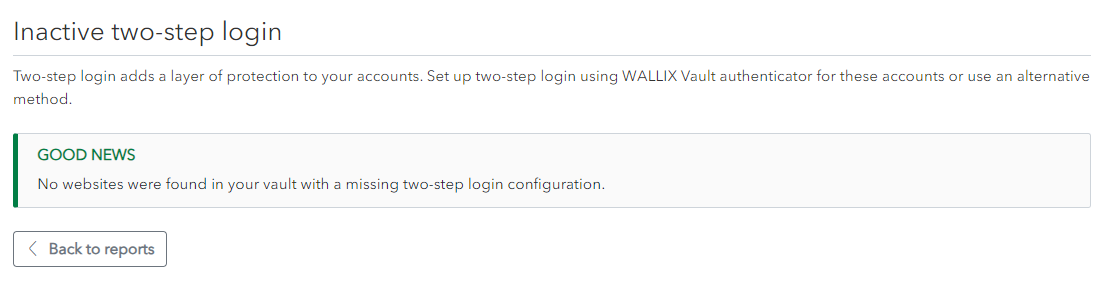
Purge Vault
Click on the User Icon, on the top right-hand side of the screen, to display the User Menu.
Click on Account Settings and then My Account. The My Account Screen is displayed.
Click Purge Vault.
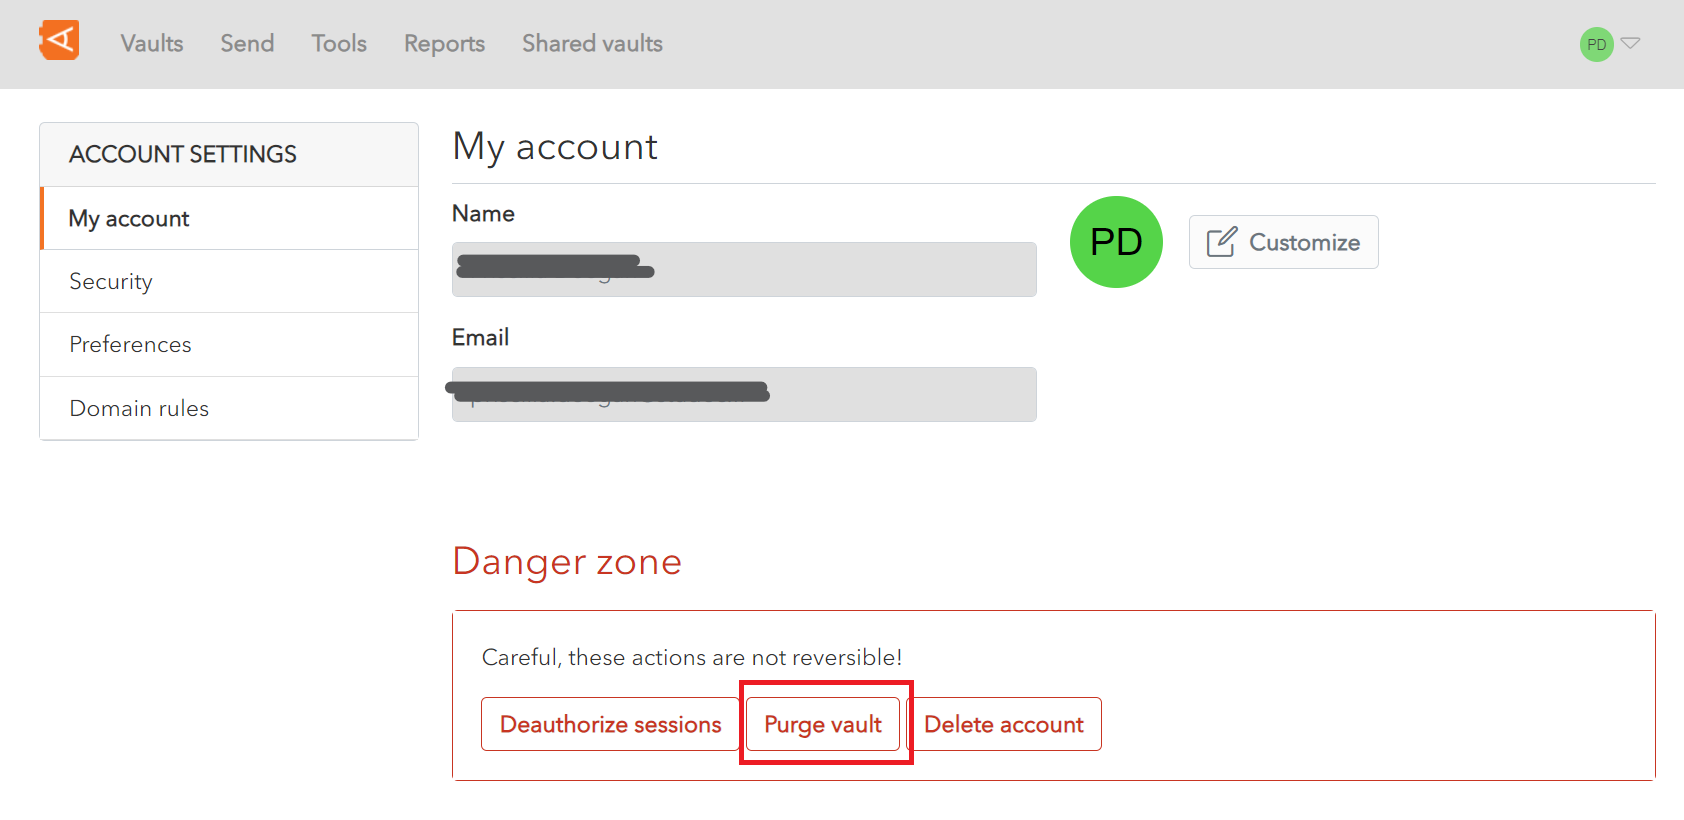
A Confirmation Screen is displayed.
Enter your Master Password and click Purge vault to purge the vault. All data (items and folders) are deleted.
Alternatively, click Close to cancel the operation.
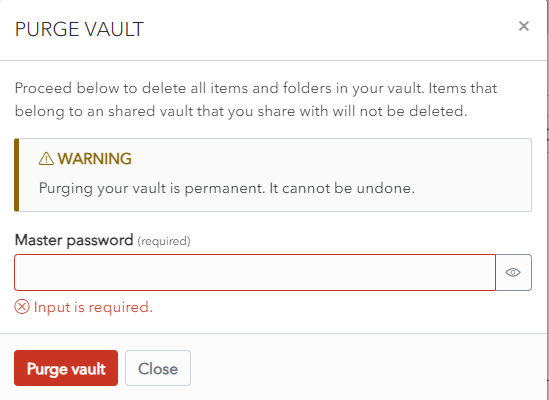
Change Avatar
Click on the User Icon, on the top right-hand side of the screen, to display the User Menu.
Click on Account Settings and then My Account. The My Account Screen is displayed.
Click Customize.
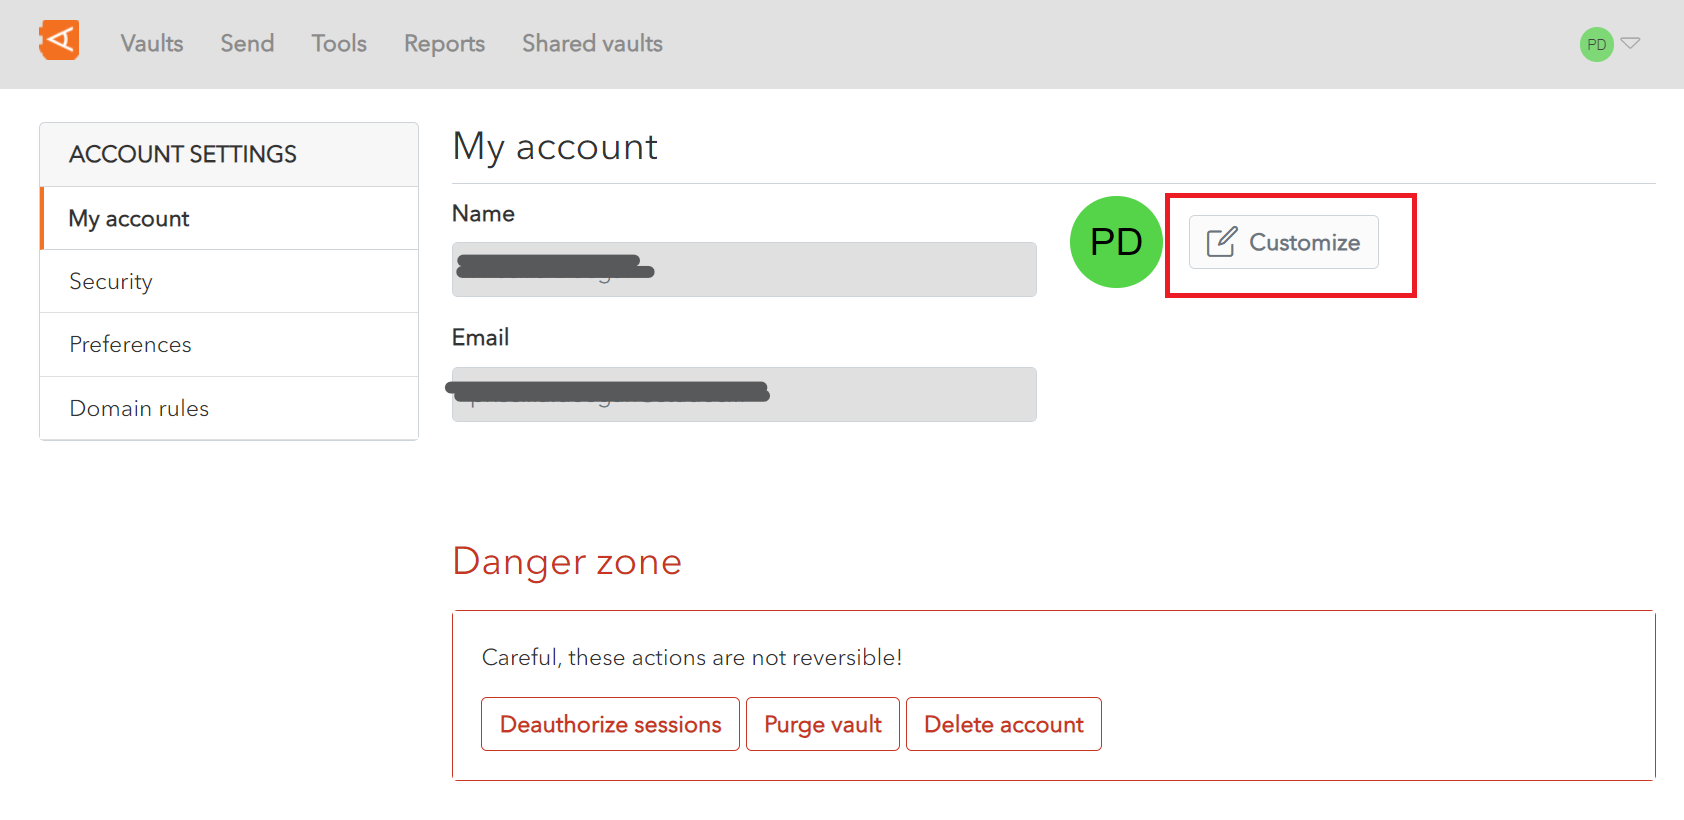
A Customize Avatar Screen is displayed.
Change the color of your avatar and click Save.
Alternatively, click Close to cancel the operation.
![]()