Personal vault
As a reminder, you have access to two types of vault:
- Your personal vault, to which only you have access.
- Shared vaults, enabling secrets to be shared between different people and teams.
On this page, we'll deal with generic information about using Enterprise Vault, like the authentication, then focus on your personal vault.
For simplicity's sake, the screenshots are taken from the web client, but most of the actions described can be performed on mobile or plugin clients.
For more information on shared vaults and plug-ins, please consult the following documentations:
Account management
Authentication, lock & log out
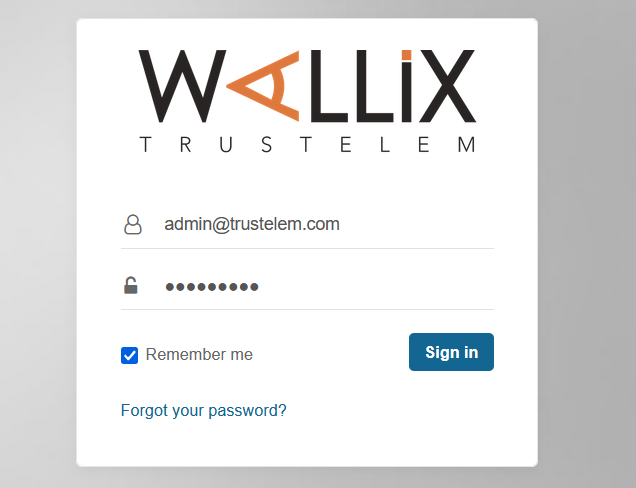
To access to your vault, you must perform 2 actions:
- Authenticate with WALLIX ONE IDaaS using your login, password and optionally 2nd factor.

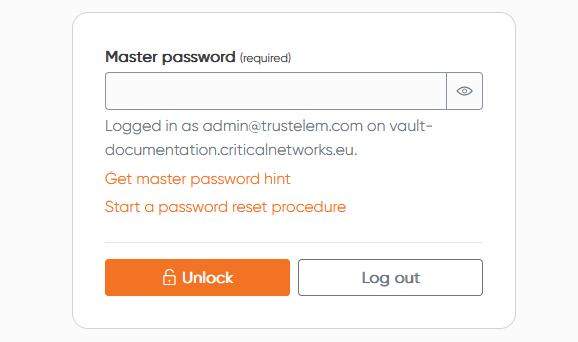
- Provide your master password needed to decrypt your data.

When accessing the service for the first time, or during a reset procedure, you must first define a master password.
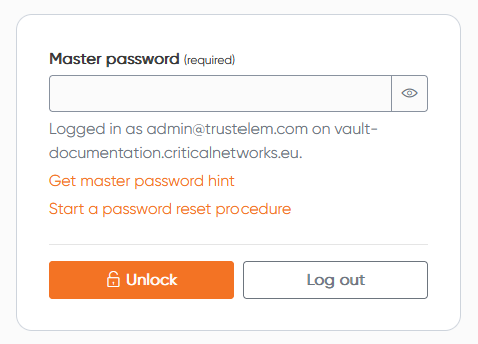
If a you have forgotten your master password, you can click "Get master password hint" to obtain the hint defined at the same time as your master password.
The reset case will be dealt with later.
Lock => provide the master password
If once authenticated you refresh the page or clicks "Lock now", you will have to provide your master password again.
Log out => perform a complete authentication (login, password and master password)
If you click "Log out", you will have to perform a full authentication: login, password and master password.
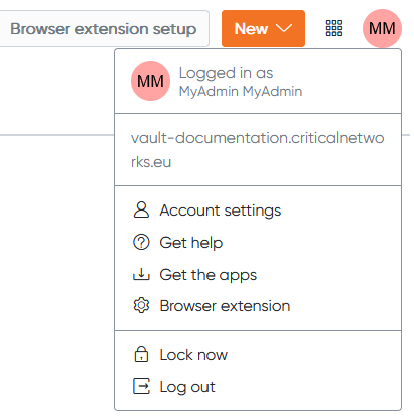
Locking or logging out can also occur after a period of inactivity.
Manage your authentication secrets
There are 3 secrets linked to the authentication which can be managed: the password and 2nd factor for WALLIX ONE IDaaS, and the master password for Enterprise Vault.
Each one can be changed if you know the current secret, or reset if you don't.
Reset WALLIX ONE IDaaS password
If you don't have access to your previous password:
- Access your WALLIX ONE IDaaS dashboard (like your_company@trustelem.com)
- Click Forgot your password?
- Enter the captcha then click Ask your administrator for a reset code
- Your admin will provide a code or a link to reset your password, or a temporary password
Change WALLIX ONE IDaaS password
If you still have access to your previous password:
- Access your WALLIX ONE IDaaS dashboard (like your_company@trustelem.com) and log in
- Click your profile then Security parameters
- Click the icon at the end of the line Password
- Change your password
If you authenticate through your company Identity Provider (Microsoft, Okta...) then you can't change your password with WALLIX ONE IDaaS.
Reset WALLIX ONE IDaaS 2nd factor
If you don't have access and will not recover your previous 2nd factor (for example, if your phone is broken), contact directly your admins: they will generate a new enrollment link, for a new 2nd factor.
Ask for a temporary WALLIX ONE IDaaS 2nd factor
If you're temporarily unable to access your 2nd factor (for example, if you've forgotten your phone), you can request an rescue code.
- Access your WALLIX ONE IDaaS dashboard (like your_company@trustelem.com) and provide your login and password.
- On the 2nd factor page, click Use an alternative method then Ask for a rescue code
- Your admin will provide a code to perform the authentication
Change WALLIX ONE IDaaS 2nd factor
If you still have access to your previous 2nd factor:
- Access your WALLIX ONE IDaaS dashboard (like your_company@trustelem.com) and log in
- Click your profile then Security parameters
- If you didn't use multi-factor authentication to get here, you'll need to click the green button to verify your 2nd factor
- Click the + button for a 2nd factor, then perform the enrollment
- Optionally, you can delete the previous 2nd factor

This feature can be disabled by your company.
If you don't have a + button, then you have to contact your administrators and they will generate a new enrollment link.
Reset Enterprise Vault master password
If you don't have access to your previous master password:
- Go to your Enterprise Vault login page and click Start a password reset procedure
- Define a 6 digits code, and don't loose it!
- Wait for the admins to validate your request: after that you will be notified by email
- Click the link on the email, then provide your code and define your new master password


This feature can be disabled by your company.
If you don't have the button Start a password reset procedure then there is no way to recover your account.
You must contact your administrators, who will create a new account, but all your personal secrets will be lost.
Before doing so, check if you can't find your master password, especially with the hint you can get by using Get master password hint on the login page.
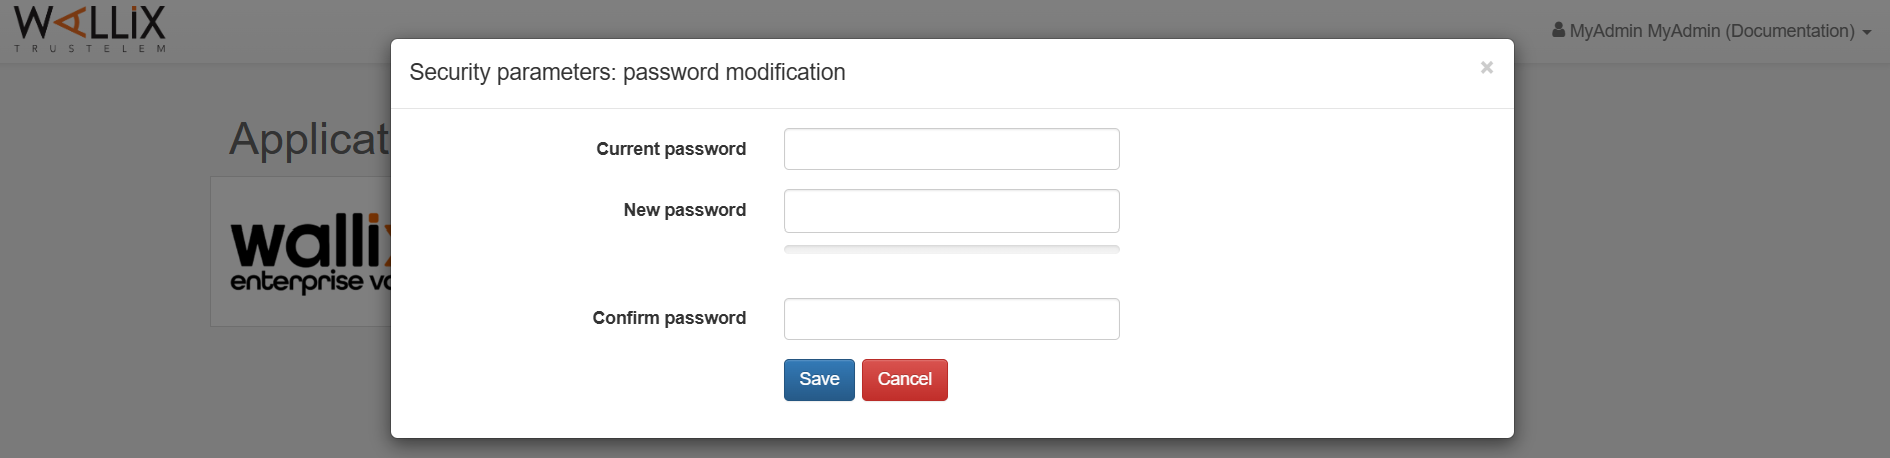
Change Enterprise Vault master password
If you still have access to your previous master password:
- Go to your Enterprise Vault app then Settings and Security
- Provide your current master password, then the new master password
You should check Also rotate my account's encryption key, doing that the keys used to crypt your items will be changed too during the process.
Preferences
Go to your Enterprise Vault app then Settings and Preferences
- Timeout: set the length of time you can remain inactive before locking or logging out
- Vault timeout action: choose whether you want to be locked out (provide only the master password for next access) or logged out (performe full authentication for next access) when your session timeouts.
- Language: change the language used by Enterprise Vault (English or French)
- Show website icons: associate a recognizable image next to each login, if Enterprise Vault recognize the website.
- Theme: choose a light or dark theme, or leave the choice to your system's theme
Purge the account
Go to your Enterprise Vault app then Settings and My account
From here you can:
- Purge vault: delete all items and folders in your personal vault, it doesn't affect shared vaults items or rights
- Delete account: delete all items and folders in your personal vault, remove any rights you may have to shared vaults and erases all your settings
These actions are definitive; no restoration is possible.
Items management
Create items
On your personal vault, you can create New Items.
An Item is a secret, you want to protect and keep for yourself in your vault.
Create login items
Login items are identifier to authenticate on websites or other services
- Name: used to remember what is the item, and to find it easily
- Folder: used to sort items
- Username: identifier used on websites or other services
- Password: password used on websites or other services
From this field, you can also generate a password, verify if the password has been exposed, or toggle character count
- Authenticator key (TOTP): second factor used for multi-factor authentication on websites or other services
- URL & Match detection: used for auto-fill with the browser plugins
- Note: used to add custom content associated to the item
- CUSTOM FIELDS: used for specific use cases with auto-fill
- Who owns this item: used to create the item in a shared vault
- OPTIONS
- Master password re-prompt: used to secure the item, by requesting the master password before use
- Access logging: if not defined by your administrator, let you decide if you want to generate logs when you access the item
Create card items
Card items are credit card you want to store on your vault
- Name: used to remember what is the item, and to find it easily
- Folder: used to sort items
- Credit card information: cardholder name, brand, number, expiration date, security code
- Note: used to add custom content associated to the item
- CUSTOM FIELDS: used for specific use cases with auto-fill
- Who owns this item: used to create the item in a shared vault
- Master password re-prompt: used to secure the item, by requesting the master password before use
Create identity items
Identity items are all the useful information about the people you want to keep. The identity may be for yourself or someone else.
- Name: used to remember what is the item, and to find it easily
- Folder: used to sort items
- Contact information: Title, Name, Company, Passport/License number, Email, Phone, Address
- Note: used to add custom content associated to the item
- CUSTOM FIELDS: used for specific use cases with auto-fill
- Who owns this item: used to create the item in a shared vault
- Master password re-prompt: used to secure the item, by requesting the master password before use
Create secure note items
Secure note items are simple notes that you want to store in your vault.
They can be useful if you wish to store an item whose type is not the default one, for example for an attachment such as a certificate.
- Name: used to remember what is the item, and to find it easily
- Folder: used to sort items
- Note: used to add custom content associated to the item
- CUSTOM FIELDS: used for specific use cases with auto-fill
- Who owns this item: used to create the item in a shared vault
- Master password re-prompt: used to secure the item, by requesting the master password before use
Manage existing items
After the creation, you can edit the item, but also perform new actions clicking the 3 dots at the end of each lines.
- Add / Download / Delete an attachement to the item
- Clone the item
- Assign to collections = move the item to a shared vault
- Delete the item
For login items, you can also copy the username, password and verification code (TOTP) using the 3 dots.
Also for login items, if you change the password, you can open the item and you'll find the previous password under the CUSTOM FIELDS, clicking Password history.
When an item is deleted, it is transferred to the trash. From here, the item can be restored or deleted permanently.
Folders
Folders are used to organize and easily retrieve items that belong together.
This means that these items will continue to appear in the list of all your personal items, but can be found by clicking on the folder name.
To add a folder, you just have to provide its name.
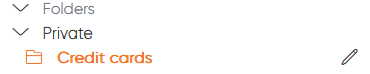
You can create a folder in another folder by specifying the name of the parent folder then /, in the name of the new folder.
For instance I can create the folder "Credit cards" under the folder "Private" using the name: "Private/Credit cards"
After the folder creation, you can:
- Create new item in the folder
- Edit an item, then move it to the folder
- Edit its name or delete the folder, using the pen button after the folder selection (cf the previous screenshot)
Favorites
Favorite items are as useful as folders: they make it easier to find certain frequently-used secrets.
To add an item to favorites, edit it then click on the star at bottom right of the window.
To find favorites items, click on Favorites on the FILTERS menu.
Search items
To search an item, you must use the FILTERS menu.
Basics research:
- Click the input Search my vault to search for specific words displayed in the list of items.
- Click Favorites to display your favorites items
- Click Login, Card, Identity or Secure note to display the corresponding items
- Click a folder name to display the items it contains
- Click the trash button to display deleted items
Don't forget to click All items if you wish to return to the complete list of your items.
Advanced research
Using the input Search my vault you can carry out more complex searches.
Here are some example:
- >name:my_name
returns items whose name is my_name - >login.username:my_username
- returns elements whose login is my_username
- >login.uris:my_uri
returns elements whose associated URL is my_uri - >attachments:my_file
returns elements whose attachment is my_file - >notes:my_note
returns items whose note contains my_note
Filters can also be concatenated:
- >login.username:my_username +name:my_name
returns items whose name is my_name and whose login is my_username - >login.username:my_username-name:my_namer
returns elements whose login is my_username but whose name is not my_name
You can use the ~ character to indicate the number of characters that can be different from the filter:
- >login.username:userX~1
returns elements whose login is user1, user2, user3 but not user10
The * character can be used to replace variable character strings:
- >name:*admin*
returns the element named “my special admin login”.
Send management
The Send feature is able to generate secure links to allow you to share text or files with people who are not Enterprise Vault members.
Create a Send
Go on your Enterprise Vault app, then click Send then New Send.
From here you have to define:
- Name: the name of your Send, used to find it in the list of existing Sends
- Content: text or file
- Text: the text you want to share with your Send. You have the possibility to hide it by default when the Send is opened
- File: the file you want to share with your Send. It can have a size superior to 100Mb
- Share: by ticking the checkbox, the link to your Send will be added to your clipboard after creation
- OPTION
- Deletion date